Leaderboard

.thumb.jpg.53aabc63a639af8d375b2c92cf2e13f8.jpg)

Popular Content
Showing content with the highest reputation on 03/20/2018 in all areas
-
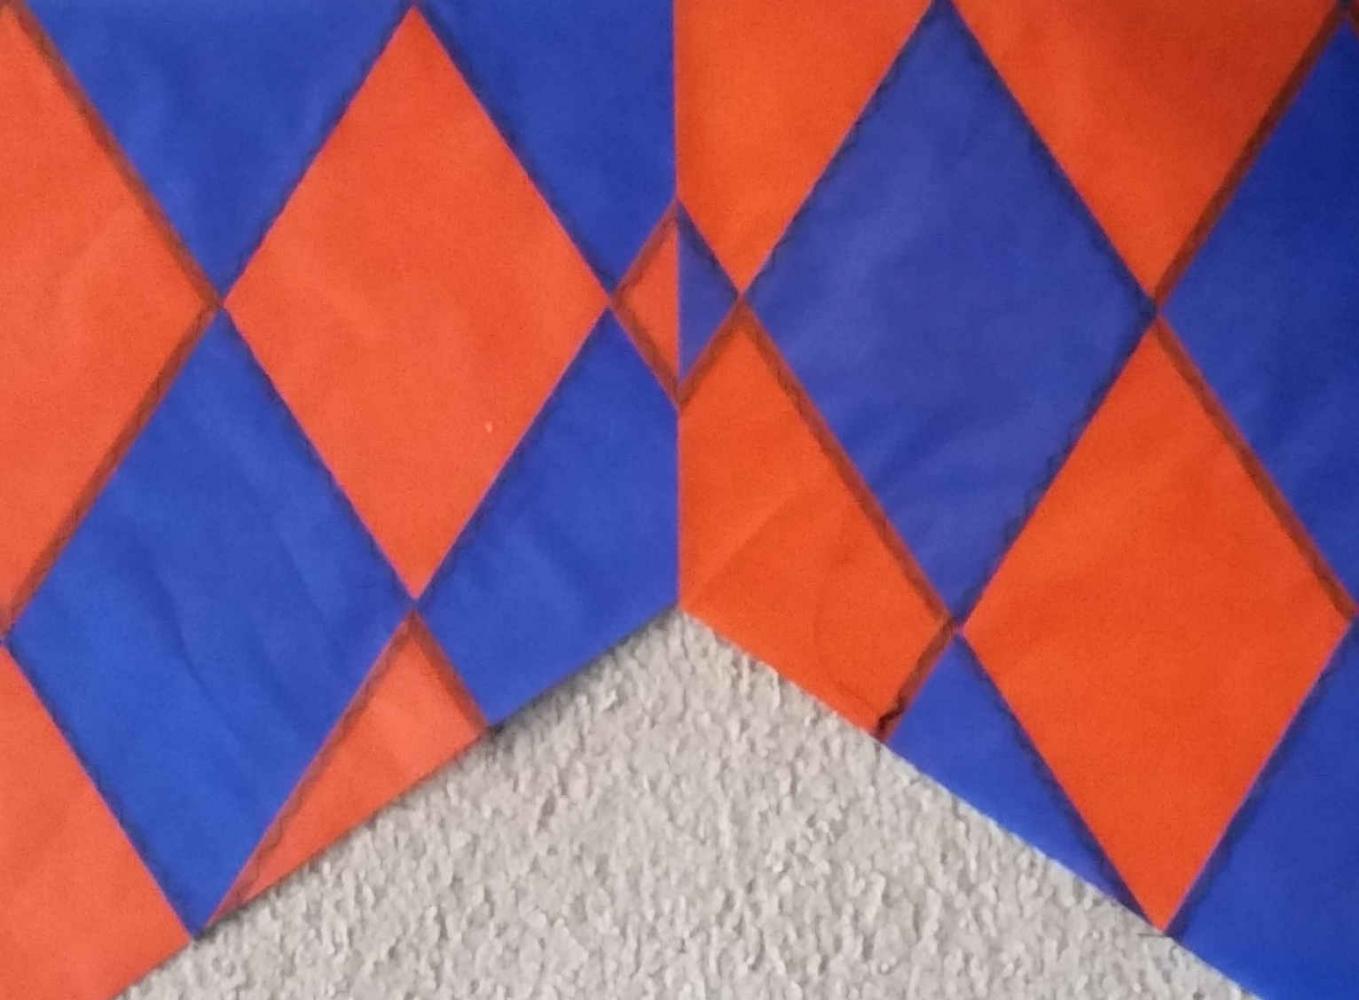
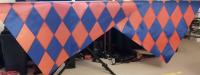
"Jester II" hit the starting blocks today. Decided to make the pattern vertical this time.. LE will be White Edge Binding will be Orange. Panels are basted and ready for sewing..
 3 points
 -
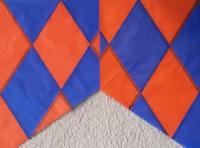
And the center detail..
 3 points
 -
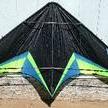
Ok so finally flew the 2.2.4, and absolutely love it! I had riffclown mod one for me. The symphony 2.2.4 is exactly what I was looking for. The symphony is very fast, snappy, and has good pull but not too much, making if more fun but maneageable in higher winds. I love the fact you can fly it backwards, propeller spin it and zip around like a mad man. It also relaunches far better than any kite I’ve ever flown. riffclown did an amazing job and modified my symphony pro 2.2 very quickly. I highly recommend this mod to anyone looking for an exceptional 4 line kite. Abt $100.0 plus the mods and you have one of the best performing smaller 4 liner foils out there. It is highly addictive to fly, and riffclown will even mod one for you!3 points
-
In a wardrobe moving box marked "Wedding Dresses". You'll need a box big enough to hold your Mother's, Aunt's, Sister's, Cousin's, and any other relative or friend's dresses, if ya know what I mean. Cut a hole in the back for access. As a guy, I ain't touching that box with a ten foot pole, mess up "Mom's" wedding dress and I would never hear the end of it. If you need to expand, there is always Prom and Homecoming dress boxes.3 points
-
I love that centre detail. Very nice. Sent from a Galaxy 8 Far Far Down Under.2 points
-
Many folks around the world sit there praying for a breeze of any kind. I guess bad or badass wind is better than none at all? Unless you fly indoor a lot and take it outside.2 points
-
From the picture, I would say to put the fitting on the leading edge rod. Feed the line through the loop on the end of the fitting, pull tension on the line until the fabric is tight along the leading edge with no ripples or puckers (?!?) and then tie it off with a series of half-hitches. That will get you flying. Once I find my 4D ( couldn't find it last night, wasn't upstairs, will have to take some time to goto the basement...) I will get you a picture of the way it looks from the factory.2 points
-
You will know it is right if it won't move without you undoing it. Did tree work once upon a time, and used that knot extensively, even trusting my life to it while tree climbing. If you get the starting loop correct, there's an old saying that helps you remember - with the free end in hand - "the rabbit goes out the hole, around the tree, and back into the hole." Pull tight from both ends. This should form a loop that will not come loose til you undo it.2 points
-
There are endless ways to tie the tip knots while tensioning the sail. You can do a fairly simple knot & cover it with a vinyl end cap. The knot will likely be held securely by the cap. The main thing IMHO is to make the tip snagless by tucking the remaining cord back into the tip of the sail. My objection to most wing tip cords by Prism is that they are too short to get very elaborate with your knot tying. Many people give up on vinyl end caps as they continually knock them off & lose them. Try different things until something pleases you & the kite. Seems like I would have some kind of standard after many years of tying them but I don't. But I also rarely undo the tips once I have assembled the leading edges. When you have a kite with a leech line tied at the tip it gets even more complex. Just try things & keep on flyin'. When you figure out the best way let us know..... SHBKF P.S. I tried the old trick of trying to buy a set of kites that all looked alike but were different weights, like SUL, UL, standard & vented. Did not work. One day I am flying a mid vent Rev for the first time & my genius wife immediately notices. She proceeded to comment on how the screen vents should help with the wind gusts. I barely knew that myself at that time. She just knew it somehow. Sometimes I think she reads the forums. my favorite 1.5 Rev, the mid vent2 points
-
Build a shed with a nice fence around it. Then find a reputable dog academy and buy a highly trained guard dog loyal only to you. If the dogs big enough you can make a pack so it can carry your kites and guard the ones your not flying. My Great Danes are big babies so it doesn't work with them. My Akbash Shepherds get offended when I put anything on their backs. I harness up my Chihuahuas but they can only tote 1 at a time. My Toy Fox Terrier just lays down and goes to sleep. The Pekingese gets very violent. The cats you might ask. Well that becomes a little life threatening. Hmm maybe I need a mini Burro. Lots of folks here have 4Ds . Won't be long before you get help.2 points
-
Easy, peasy to do. Does grow the length overall by about a 1/2" or so. I modded mine before I got too used to a certain length. But the amount really isn't that much to throw off mere mortals!! But BEWARE : there is a nasty burr of metal under those seemingly harmless vinyl caps. It will lay you open if not careful with it!!!! Deburr before reassembly!!!2 points
-
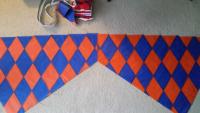
Panel sewing is done.. LE and Edge Binding remain.. Framing and Bridling to follow soon after..
 1 point
 -
I’ve been enjoying the steady wind on the Oregon Coast the last couple evenings after adulting. Got hired at a trucking company today. [emoji847] my wife is at an interview now and has another one in an hour and in two hours have an appointment to look at a house on 3 acres that’s mainly cleared and grass. Boy it would be something to have multiple flyers on 120’s in my back yard. Sent from my IPhone1 point
-
Fantastic morning mild temps with winds around 5 to 6. Last 3 days winds have gusted 25 to plus 30 mph. Had chores and errands to do. Got done grabbed the Hydra went to set up and winds started gusting + 20. Sigh I do love Spring but dang it man. Sent my info to that fella up north yesterday. I'll let him guide me to the kite. Really thought long and hard about the Silver Fox vented and the Challenger Max. Going to bite the money bullet. With good flying and good fortune should last the rest of my life. Got a never flown Widow Maker Pro sewn by Steve Tapp that should be here by Thursday. Practicing some more sewing thinking about the new Widow and dreaming of the next kite ought to keep me from being to much of a . Probably not. Man I want to fly.1 point
-
Step 2 - the fitting knot. You could start with using a "clove hitch" around the bulge in the fitting. you will know that it is right when you get the lines going out in opposite directions. Think - loop with the free end under, then another loop with the free end under. If right, the ends should go in opposite directions. you can use this on the fitting end and by trial and error, find the length that lets you get the fitting on, but with proper tension to the sail. Then you just have to throw another hitch or two on, and dress up the end to your satisfaction!1 point
-
Best way is to call Prism and ask for "tech support" to walk you through it, or you can just hang loose until someone who flies a 4D chimes in here. The folks at Prism are usually friendly and helpful. I tried Googling the info, but only found the same manual you did.1 point
-
Mines 1200 miles east of me or I’d take it apart and get pics of it. I’ll be home next week to do so if you still need help figuring out the way it came from prism. Lots of great ideas here too. Good luck Sent from my IPhone1 point
-
i can make a suggestion ? you may use bungee on both side like you have on any other kites but be careful,whatever you chose make the knots with the kite fully assembled to have control of tension1 point
-
SHBKF is right. there are " professional" ways and personal ways. pick your method, how long is please you and is do the job you will be fine. There are some great flyers on the New York area, try to meet them for a fly session and for sure they will show you how to do "things". how to find them? is a general topic LOCAL CONNECTIONS, post there where and when you will fly and for sure somebody will join or suggest a different spot1 point
-
Twin Roses where are you located ?1 point
-
best will be to made a double 8 knot. is not slip and is easy to undo. actually this topic was on this site in 2009. you need just the last steps1 point
-
The Nexus stack is sold and my dad decided to keep the other one for now. The 3 "no-name" kites are also sold.1 point
-
I will have to look at my 4D and see what it looks like. pictures of yours would help. It's been awhile since I've had the 4D out since my son has graduated two full-size kites. Sent from my [device_name] using http://KiteLife mobile app1 point
-
Any knot that isn't a slip type knot should work to form the loop. Know a bowline knot? Forms a loop that holds til the cord breaks!! Hard to explain, actually easy to do. Holds like forever or until you release it. How it is attached to the fitting is a little unclear even with the pic.1 point
-
Two large duffle bags full of sleds and laundry ... a garage corner of deltas and box kites... yeah I have that problem also... maybe another duffle? Or storage unit? [emoji23] Island Life | UFUV | Kite Life Subscriber 14821 point
-
to hide the kite do this: fly the kite without him at least one time and when will be ask about just say " this old one? i had it and just find it couple days ago" easy right ? will be half true1 point
-
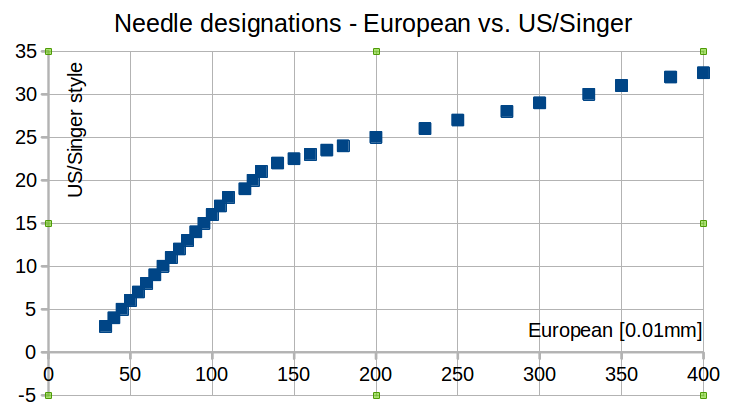
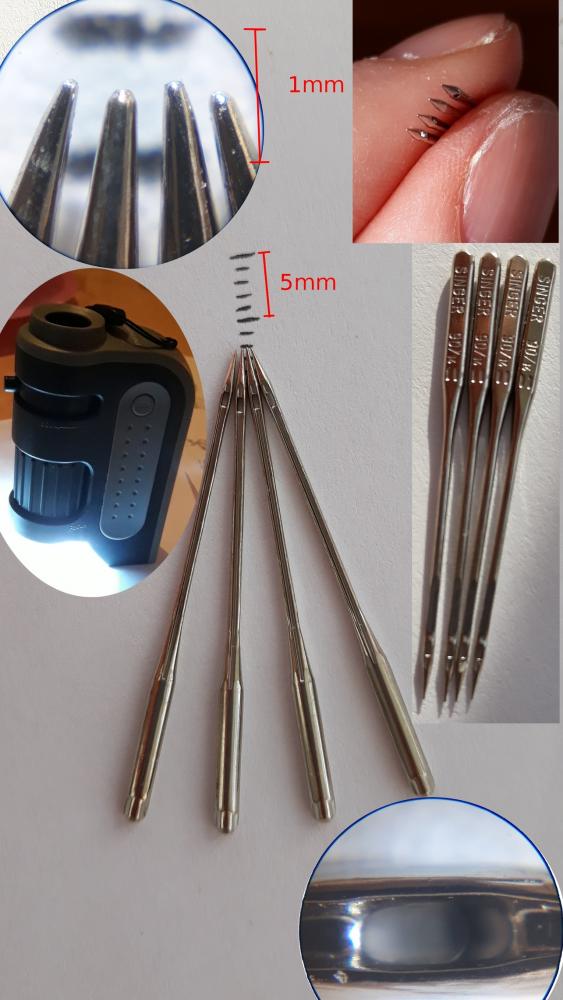
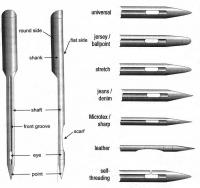
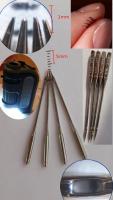
Needle dimensions My plan was to write about the material used rather soon after the equipment, but then I realized that I hadn't understood the needle dimensions yet. So I started to find out about it and I found things not so straight forward. First problem I see with saying that a needle size is "90/14" is that there are no units. 90 pieces of what or 14 pieces of what - the text "90/14" just doesn't say anything in itself. If, but only if, you know the conventions you have a chance. First with knowledge about the convention the numbers are given a meaning. The second thing is that there are two numbers for the to express the one and same diameter. If the relation between these two numbers was simple, it shouldn't be required to provide both of them. How the size codes (Y-axis) depends on the needle diameters (X-axis). The needle diameter is here expressed as in the NM system where the unit is 0.01mm or equivalently 10µm. The European number metric (NM) system The European/number metric/NM system is almost sane, it is just the needle dimension expressed in units of 1/100 of a mm (or in units of 0.01mm or 10µm). As long as you know this it is nice and linear scale. E.g. NM 90 corresponds to 0.90mm - just as you would expect. If you mean that a needle is 0.9mm it would be better to write it like that directly with the unit included IMO. The Singer/US size code And now over to something completely different - the Singer/US size code. The nicest thing that can be said about it is that it exists (a sub) range(s) of linear needle diameters (part of this range is recognized in the above link http://www.singerco.com/sewing-resources/machine-needles ). There are thicker needles outside this range, but then the size code no longer varies linearily with the needle diameter ( https://en.wikipedia.org/wiki/Sewing_machine_needle , http://www.thethreadexchange.com/miva/merchant.mvc?Screen=CTGY&Category_Code=needle_size_conversion_chart , http://apparelscience.com/index.php/apparel-science/technical/85-apparel-science/technical/150-needle-number-system ). This info is plotted in the above diagram. The non linearity starts already at needle dimensions of 1.2mm (120/19). Then, for thicker needles, a small change in the Singer size code starts to correspond to a large change in needle diameter. Another funny thing about these size codes is that to express really small values one would need to use negative values if one would extrapolate the curve for small values with a straight line. Not keeping things clear and simple takes away power from the user/DIYer by obfuscating matters IMO. The needle tips provided with the sewing machine (yes the same image as image as above). Types of sewing machine needles. The image is in the public domain as given in https://en.wikipedia.org/wiki/File:Sewing-machine-needles-types.jpg . Looking at the µscope images in the original post and comparing them to the Wikipedia needle graphics, the needle tips that came with the sewing machine looks like something between an universal needle and a needle for stretch material. Considering the beginner tool the needles came with, a Singer Simple, perhaps the needles provided were chosen towards the more robust side with slightly rounded tips?

 1 point
 -
Just my sense of humour [emoji4] , I’m guessing your living in us now ?? Sent from my iPhone using KiteLife mobile app1 point
-
You'll just have to make do with what is available. Sorry.1 point
-
I make the best handles in the world. They come fully programmed with all the moves and tricks that JB can do, and can be updated online as new moves and tricks become available. The grip diameter is infinitely adjustable to fit any size of hand perfectly, and the color of grips and shafts can be programmed to whatever combination you desire. They can be had in four lengths, each made specifically for the type of kite being flown, to give you a truly zoned-in experience: 1. 17" (indoor) 2. 15" for size 1 3. 13" for 1.5's 4.11" for size II Each comes with a lifetime warranty, and a free jar of fairy dust (for competition use). At only $1495.00 per set, they are certainly a bargain, since they are worth more than twice their weight in gold. Original TK-tied JB leaders included with each set at no additional charge. Order now and get a second set of your choice at 25% off. Will be available for shipment in exactly 13 days, for one day only. Don't miss out on this once-in-a-lifetime offer! Dual-line straps in various configurations will be available next year.1 point