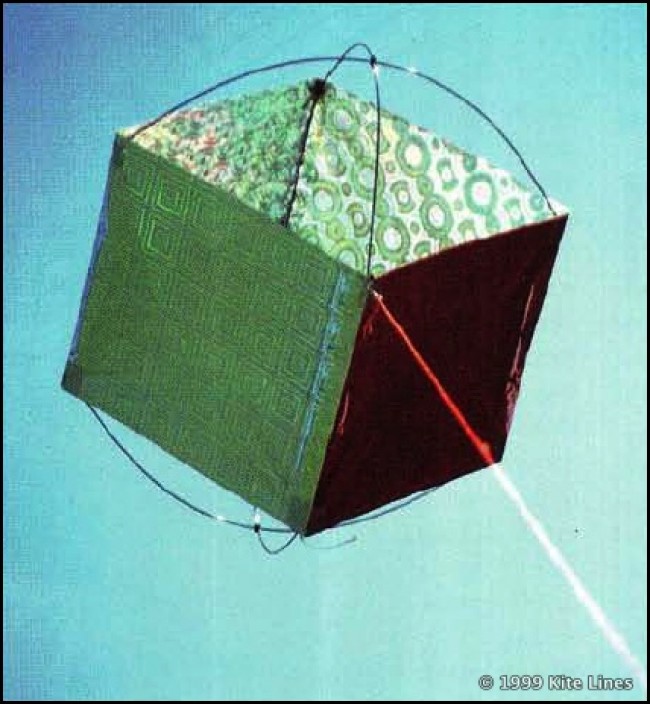
We first saw this kite bobbing over the boardwalk at Ocean City, Maryland during the 1998 Maryland International Kite Expo. Strolling underneath was its genial maker, Lee Sedgwick of Erie, Pennsylvania. The shiny kite had concave spars bowed out of each end and a sliding bridle that enabled him to roll and bounce it over the ground and tumble and flick it around the sky, almost like a fighter kite.
When Sedgwick donated his kite to the auction at the Ocean City event, Mel Govig bought it and was pleased when the maker agreed to permit us to reproduce the plans.
Sedgwick makes no claim to originating the kite. In fact, tracking the trail of the cube kite proves again how good kite ideas bounce around.
Sedgwick traces his knowledge of the cube back to Alix Martin of New York City, who was selling a few similar kites at the 1997 AKA convention in Wildwood, New Jersey. She, however, had scaled up her kites from a two-inch tumbling cube made by Charlie Sotich of Chicago, Illinois. That little kite was auctioned at the 1991 AKA convention in Jacksonville, Florida to David Klein, owner of Big City Kites in New York City, who showed it to Martin.
However, some years ago we published a photo from Gubbio, Italy (Winter, 1991-92) of a much larger cube kite decorated as a gambling die, being shown by Thorsten Schacht of Denmark (who is one-third of the team known as Dr. Hvirvelvind). And plans for a quite similar dice kite, about one meter square, appear in the 1995 book, Box Kites: Making and Flying, by Dr. Bill Cochrane. Finally, at the 1999 AKA Convention in Muncie, Indiana, we discovered our friend Barbara Hall flying two small dice kites branching from one line, which she had made in salute to the gambling mecca of Atlantic City, New Jersey, near her home.
 On left, variations on the one-cell theme: a pair of dice kites made and flown by Barbara Hall at the AKA convention in Muncie, Indiana.
The kite “took off” commercially in 1998, after the Shanti Kite Company negotiated with Martin for rights to make her box. The single-cell market niche now also includes the Triad and the PopKan. (See our reviews of the Cube and Triad in Kite Lines, Spring 1999, and of the PopKan in this issue.)
 Sedgwick was drawn to the design in an ongoing search for a fighter kite that would relaunch from any position on the ground, and guessed that the sliding bridle would be the key. (Kite Lines first documented the use of such a system in the “convertible cubics” of Japan’s Takaji Kuroda, Fall. 1980.) Sedgwick made his kite from four textures of metalized Mylar®, all silver except for one side in red. But he notes the kite could be made from an array of solid hues, or even just a single sheet of material. And while Mylar works well, “almost anything” can be adapted as sail material (ripstop, Ty-vek®, tissue). Further, he has seen other makers use wood dowels and even drinking straws as spar material.
Materials
- One 9” x 42-1/2” strip, or four 9” x 11” pieces of Mylar or other lightweight covering material (our sample was made of Mylar commonly sold as gift wrap.)
. - 0.05”-dia. carbon fiber rod, cut into four 17-1/2” lengths and three 9” lengths (for spars)
. - 0.07”-dia. carbon fiber rod, cut to one 9” length (for leading edge) 10 vinyl end caps, 1/16” dia., for spar connectors (Plastic tubing of similar diameter may also be used, cut to 10 lengths of approximately 3/8”.
. - 13″ of 200-1b-test pre-stretched Spectra® line, for bridle.
. - One fishing snap swivel ½” long.
. - Glue (for Mylar, contact cement works best.)
. - Ripstop nylon patching tape, 1” wide.

Construction
- If using one long piece of material, layout horizontally and mark vertical spar positions (Fig. 1). Measuring from one end, mark top and bottom edges every 10-1/2”: at 10-1/2”, 21″, 31-1/2” and 42″. (The extra ½” at the end becomes a flap to “close the box” later.) If using four pieces of material, tape or glue together by overlapping 11″ edges by ½”. Do not tape or glue the last flap yet, leaving the material lying flat.
. - Cut vertical spars to 9″. Pierce eight vinyl end caps, as near to the closed end as possible, and slide two of these tubing connectors onto each spar. Position )1″ from ends (Fig. 2).
. - Crease the sail material carefully at each marked position. Lay vertical spars on sail material at each fold, with end cap connectors pointing out. Glue the spars in place at top and bottom, using enough cement to completely surround the spar and base of connectors (Fig. 3).
. - Connect spreaders for top and bottom using two vinyl end caps. Using a needle, pierce two holes in each cap, perpendicular to each other and separated by approximately 0.07″. Insert two 17-1/2″ rods halfway in each cap to form an X pattern, and set aside. Spars should fit snugly in the tubing (Fig. 4).
. - Close the box by gluing the last ½” flap of the material to the first edge, with the spars on the inside forming each corner of the box.
- Reinforce all eight corners of the box on outside edges with ripstop tape, about 1-1/2″long pieces.
. - When final seam and reinforcements are dry, assemble the completed cell by inserting the X-shaped cross-spreader assemblies into the tubing connectors of vertical spars (Fig. 5), bowing the spars outward. Slide the spreader spars in connectors as necessary to make the cell “square.”
. - To assemble the sliding bridle, carefully punch two holes in sail material at each end of the 0.07″ leading edge vertical spar. Thread and securely tie the heavier-weight Spectra line at one end.
Slide the round or closed end of the fishing snap onto the bridle line. Now tie the bridle line to the other end of the same spar, making line as taut as possible without bend bending spar. Too much slack prevents the fishing snap from sliding properly.
Flying
Attach flying line directly to the fishing snap, or use another snap swivel on the end of the flying line. When the line goes slack or unusual gusts strike the kite, the sliding fishing snap allows the kite to flip over and fly “upside down.”
Sedgwick recommends using 20-lb-test line for the first 10 feet, then 30- to 90- lb-test for the rest of the line. He says the lighter line near the kite makes it float better. He also suggests the kite flies best on only 40 or 50 feet of line, with the line fully extended from the spool. In our experience, gentle pumping of the spool is enough to make the kite do its thing.
The maker also has experimented with tying a line through the center of the box between the junctions of the cross-spars, to increase tension for sharper movement. Sedgwick says this kite keeps offering him new games to play.
“The kite is awesome,” he says. “You can fly it at night, indoors or out, in low wind or high.”
(Republished with permission from Kite Lines, Winter 1999-00, Vol. 13 No. 2)