
When I was a junior in high school I became obsessed with the geometry of the fourth dimension. I later turned that obsession into an award-winning science/math fair project, but at 16 it was just a weird fun thing to be enthusiastic about. In the process of reading books like The Fourth Dimension Simply Explained, I learned about three-dimensional projections of four-dimensional solids, and (without taking a lot of time to tell you precisely what that means here in an article about kites) went from there to building geometrical models out of straws and balloon sticks. I made models of the more interesting regular solids, including the tetrahedron, octahedron, and dodecahedron.
 Using sticks or straws, this was a lot of work. However, I soon discovered that over at the American Science Center store at Nagle and Northwest Highway in Chicago, they sold a very neat geometry-oriented construction set called D-Stix. The set consisted of a large number of 1/8” thick wooden sticks dyed various colors, and a collection of soft plastic connectors into which you could insert the sticks. (Left.) There were connectors with five, six, and eight sockets. (The connector shown above with three sockets was originally a six-socket item, with three sockets snipped off.) It worked beautifully, and I could construct the regular solids in a matter of minutes. However, something intriguing was also included with the kit: Instructions for building an unusual sort of kite using D-Stix as a frame and tissue paper for the sails. On a folded piece of paper in the kit was a template for cutting out the sails. All you needed to do was cut sails from sheets of paper using the template, and then glue or tape the sails to the D-Stix frame.
 The summer I turned 17 I built the D-Stix tetrahedral kite, and in August I asked my new girlfriend Carol to go out and fly it with me. (I had met her only two weeks before.) The kite flew reasonably well, if a little wildly. In looking back from 40 years of further experience, I’d say that the wind was a little strong that day for this kind of kite, and caused it to crash. Some of the sticks broke and others popped out of their connectors, which is why the kite in the old photo looks wrong. (Carol took the photo when we were about to throw everything in the car and head home.)
That was the summer of 1969. Almost forty years later, Carol is still with me (we have been married now for 32 years) and when my little margarine dish full of D-Stix connectors turned up recently in a box of packed oddments, it occurred to me that I could re-create the kite we had flown together during the Summer of Love. Here’s what I did and how I did it.
The Overall Design
A four-cell tetrahedral kite consists of four tetrahedrons stacked in a three-sided pyramid, which is in turn a tetrahedron. The four cells have tissue paper glued to two of their surfaces. Each cell is thus something like a bow kite with a sharp bend down the front edge rather than a gentle bow. When gluing the sails to the skeleton, make sure that the leading edges of the covered cells all face the same way. (See the photo of the kite at the top of this article, showing the finished kite in flight.)
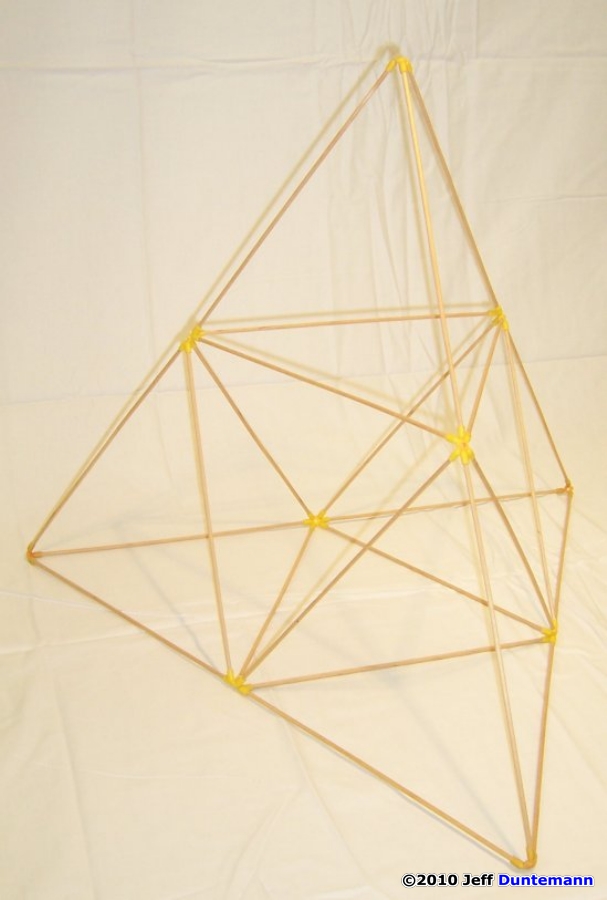
 You can make tetrahedral kites with more than 4 cells, and I have made the next “bigger” size, which is ten cells. It seems to me that the more cells the kite has, the better it will fly, assuming it isn’t too heavy. D-Stix are not suitable for making larger kites than the one I’m presenting here. The connectors are too heavy, and the 1/8″ dowels are not stiff enough. The kite shown above was made with 36″ hardwood dowels. The dowels forming the 4 outer edges were 1/4″ in diameter. The other dowels were 1/8″. The kite was a little heavy, but it flew well with a tail. (The photo shows it lying on the grass upside-down.) Without the convenience of D-Stix connectors, tying and gluing all the sticks together was a huge amount of work!
It’s important to note here that there have been two general “eras” of D-Stix kits. The ones dating from the 1960s used dyed wooden sticks and yellow plastic connectors. These are the sets that I had in high school. Later kits (dating to the mid-1970s) used colored plastic sticks and black rubber connectors. I bought a set of the plastic/rubber D-Stix on eBay in 2007 and found them, well, awful. The plastic sticks are quite smooth and do not grip the connector sockets like wooden sticks do. Worse, the black rubber connectors are fragile and tear easily, and do not grip even wooden sticks as well as the older yellow plastic connectors do. If all you have is one of the newer plastic/rubber D-Stix kits, I’d recommend cutting your own wooden sticks from 1/8” dowel stock, and putting a drop of plastic cement in each socket before inserting the sticks. This requires, obviously, that you know which sockets get which sticks—so assemble the skeleton without glue first to make sure you have it right!
After years of looking, I’ve begun to see new-build D-Stix sets available online, mostly from teacher supply stores. Google around for “D-Stix set”; many places sell them. I have not bought one of these and I’m not sure how good the connectors are. They aren’t the awful black rubber that was being sold in the 1970s. The sticks look like plastic, and I still recommend that you use unfinished wooden dowels.
One thing you won’t get with the new D-Stix sets is the paper template for the cells’ sails. I had it easy: All I had to do was trace the outline onto sheets of colored tissue paper and cut them out. You’re going to have to do a little drafting, as I’ll explain shortly.
Getting Ready to Build
 Take a look at the model shown above. This is a small version of the kite skeleton, using 4″ sticks. It’s far too small to be a kite, obviously, but it will show you the general way that the D-Stix connectors and sticks go together. For the real skeleton you will need 24 identical 10″ sticks. The sticks should ideally be unpainted wooden dowels 1/8” in diameter. I no longer have the sticks from my original D-Stix kit, but found unpainted 1/8” dowels in 36” lengths at Home Depot. I have also seen them at craft stores like Hobby Lobby and Michael’s.
In my kite I made the sticks 10” long. Why 10”? From the few fuzzy photos I have of my original 1969 kite, that seems to be the length I used. A 1970s vintage D-Stix kit I bought also has 12” sticks, but after some experiments I found that at 12”, the kite is a little too flexible. Smaller than 10” makes the kite too heavy for the sail area it would have. 10″ is about right.
Cutting the dowels can be done with a fine-toothed coping saw, but I had good results simply snipping them to length using a pair of diagonal pliers. Be reasonably careful to make the length the same for all sticks, but one-sixteenth inch variations or less won’t hurt.
 You will need ten D-Stix connectors for the kite: four connectors with three sockets, and six connectors with six sockets. The D-Stix kit does not include a three-socket connector, but you can easy snip three ears from a six-socket connector using diagonal pliers. You can use the 6-socket D-Stix connectors for the six-stick joints, but I found that modifying an 8-socket connector by snipping off two sockets with a wire cutter works better. (Below.) The angles are a little more natural for the connector, and there’s less stress tending to pull the sticks out of their sockets.
The way the skeleton goes together is much easier to show you in photos than to explain here in the text. I’ll be using the yellow model rather than the actual skeleton, but the arrangement of the sticks and the connectors is precisely the same.
Assembling the Skeleton
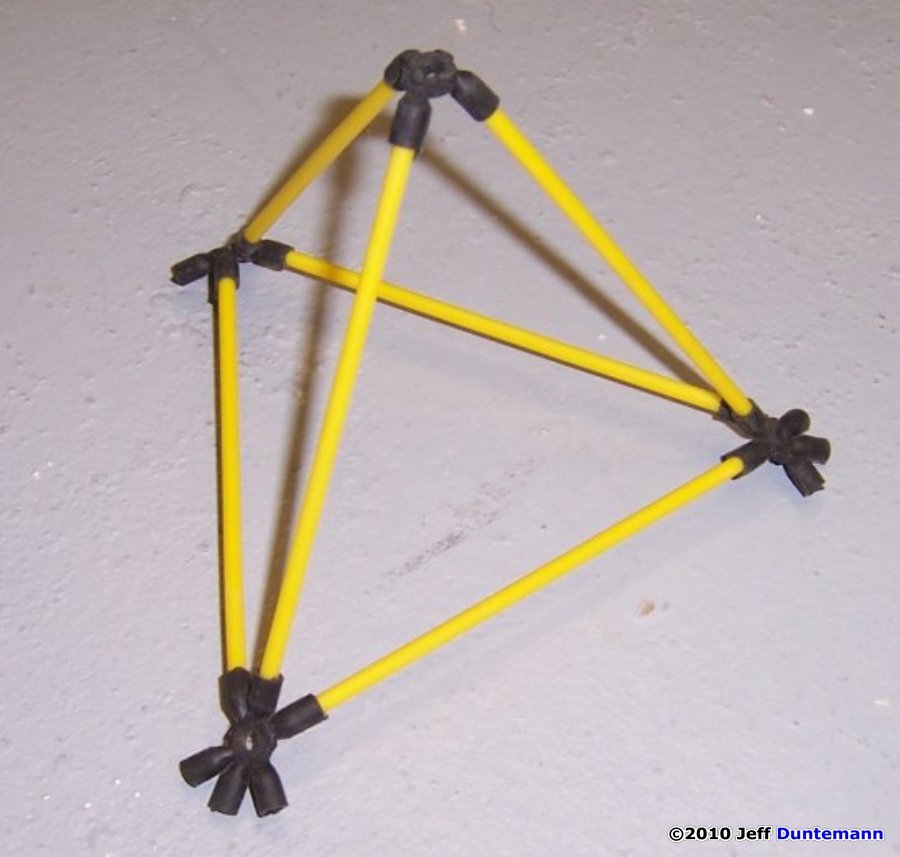
Begin by building the top tetrahedron. Use a 3-socket connector for the top vertex, and 6-socket connectors for the other three vertices:
Add six more sticks to the lower three vertices of the top tetrahedron, as shown below:
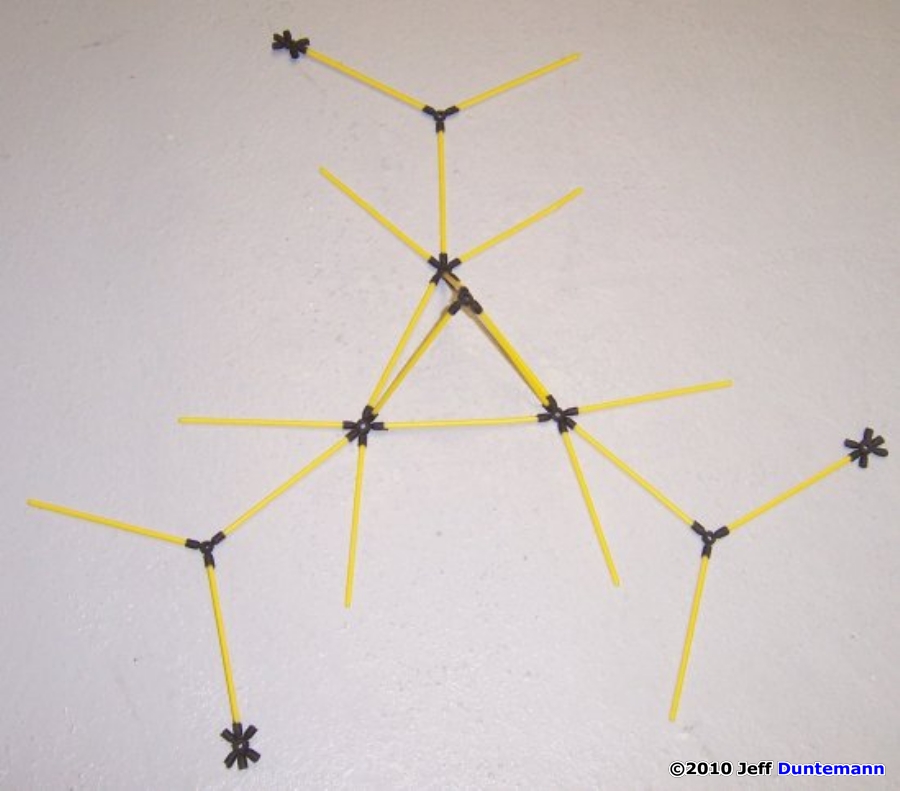
The next step is a little more complicated. Look carefully at the photo. We’re adding the rest of the connectors to the lower vertices, plus all but three of the remaining sticks. Build this step flat on the table or floor, as shown here.

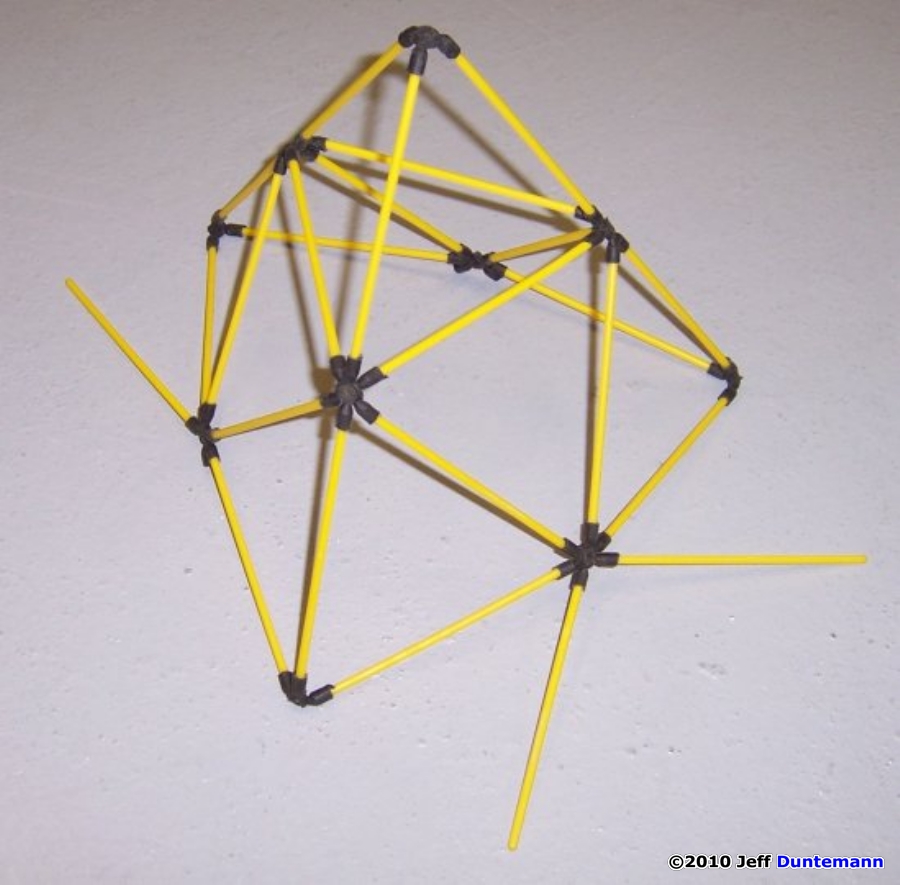
The next step is to “fold up” the sticks and connectors now lying flat on the table to form the lower three tetrahedrons. Three sticks will still be missing; these are the sticks that lie on the bottom of the kite. Short of taking a movie, there’s no easy way to explain this. I suggest taking one of the three “dangling” 6-socket connectors and working counterclockwise, plugging in the loose ends of the sticks to form the lower tier of three tetrahedrons. (Look ahead to the next photo.) You may make a couple of mistakes, but they will very quickly be seen as mistakes, and the nice part about D-Stix is that you can yank them out again without damage to the parts.
The final step is to add the three last sticks and connect them across the bottom face of the overall tetrahedron. Look closely at the photo below and it should begin to make sense.
The photo below shows the finished skeleton of the full-sized kite:
Drawing the Sail Template
 Each of the four cells has an identical sail. The sail consists of two 10″ equilateral triangles joined at one edge, with 1″ glue flaps extending beyond the unjoined edges. The best way to explain this (as with a lot in geometry) is simply to show you:
I drew the template on a sheet of thin Hobby Lobby posterboard with a felt marker, a steel rule, and a quaint piece of ancient technology known as a “drafting triangle.” Although I’m an old guy and that’s how I learned to draw in the 1960s, I would have drawn the template in a drawing program like Visio if I had a printer that would print something that large. I don’t, and you probably don’t either. If you do, it might save you some time.
Art stores and craft stores (like Hobby Lobby) still carry drafting triangles, and you want one with a 60° angle. (The other common type has two 45° angles and a 90° angle, and that will not help you here, though it’s a good thing to have in your kitemaking kit.) The two faces of each cell in the kite are equilateral triangles, and all the angles in an equilateral triangle are 60°.
Draw the joined equilateral triangles first. Then extend the edges as shown to form the flaps. The flaps are 1″ wide, and are cut such that when you fold them over for gluing, they will not overlap.
After you’ve drawn all the lines, cut the template out of the posterboard so that it looks like the one in the photo. Use a paper cutter to cut the long edges if you can. You want the edges to be straight and smooth so you can trace the sail shapes onto the paper you use to build your kite. The notches you can cut with a craft knife.
Cutting Out the Cell Sails
Choosing a paper for any kite is tricky. Tissue wrapping paper usually comes in some very nice colors and patterns, but it’s a little thin to use single-ply. Christmas wrap is often very fragile (it’s for ripping, after all!) and kraft paper is a little too heavy for a kite that has a lot of sticks, as all tetras do. What I did now (and did in 1969 as well) is to use a double thickness of tissue wrapping paper that I bought in a package of several colors at Hobby Lobby.
The best way to cut the sails from a double thickness of tissue paper is with a sharp craft or mat knife. (I use an Exacto knife.) Unfold the doubled-up tissue onto a craft cutting board or a piece of scrap plywood and smooth it out flat. Tack the corners down with thumb tacks, doing your best to flatten out all creases. Lay the cardboard template over the tissue paper and carefully cut out the cell sail with a craft knife. Keep one hand on the template so that the tissue remains flat while you’re cutting. Creased tissue has a tendency to remain creased, and it’s important to keep the creases “spread out” and the tissue as a whole flat on the board.
It’s possible to trace the template with a pencil or marker and then cut out the cell sail with a scissors, but remember that you’re working with two layers of tissue paper, and they must remain aligned while you cut! This is much trickier using a scissors with the paper in your hands than with the paper flat on a board, cutting with a craft knife.
Although I’ve never tried it (I like paper for kites!) it’s certainly possible to use the template to cut out sails from plastic trash bags or Hobby Lobby mylar wrapping sheets. Mylar is a good kite material and I’ve used it in other designs, but it doesn’t glue easily, and when using Mylar you should use plastic tape to fasten the flaps.
Remember that metallized Mylar is a no-no for kites, as it conducts electricity.
Gluing the Sails to the Kite Skeleton
Remember that you’re gluing two separate sheets of tissue paper that must remain completely aligned with one another. You need a liquid glue that will permeate the top sheet and bond it to the bottom sheet. Glue sticks will not do this! The two sorts of glue I have used successfully in tissue paper kite work are Elmer’s Glue (or any similar liquid casein glue) and mucilage.
 Mucilage was once available in any dime store but is now very uncommon. You can find it in some larger art stores or online. (Ross still makes it; google on “Ross mucilage” to find dealers.) I like mucilage less because of the glue than because the bottles it comes in have a soft rubber “nose” with a flat face that makes it easy to spread a film of glue onto paper. It’s nontoxic, has no odor, and the applicator makes it a lot less messy than spreading Elmer’s Glue around with your fingers!
 It’s easiest to glue the flaps when the cell face you’re working on is lying flat. Place the kite on a table or on the floor with the working face down, spread glue on each flap in turn, and fold it over, smoothing with your fingers. Remember that you’re dealing with two layers of tissue, and make sure there’s enough Elmer’s glue or mucilage to soak through the tissue.
 Gluing the flaps on the “interior” faces is a little trickier, because there’s no way to make the interior sail faces lie flat against the table. I put a piece of scrap plywood on the table so that one corner stuck out a few inches, and then laid the interior face partly on the protruding corner of plywood, as shown above. Be careful handling the kite during the gluing operation, as very little of it is supported by the plywood. Build a D-STIX
When all the flaps are glued, the kite proper is finished.
Attaching the Bridle
The bridle points are the two ends of the lead edge of the kite. I tied the string through the center holes of the connectors at those two ends. As with most kites, finding just the right point to attach the flying string to the bridle takes some cut-n-try. Start by attaching the string about one-third of the way down the top of the bridle. Ideally, use a knot that will allow the flying string to be pulled up or down the bridle for adjustment. There’s some finesse here: You have to tie the knot tight enough so that the pull of the kite will not change the attachment point, but not so tight that you break the bridle string while pulling the flying string up or down the bridle!
To Tail or Not to Tail
The original D-Stix instructions, and most of the kite literature I have read, insist that tetrahedral kites fly well without tails. Well, that certainly hasn’t been my experience. The original 1969 kite required a tail, and when I launched my new D-Stix tetra earlier this year I remembered why: It has a tendency to “lean” in one direction or another, and will eventually dive or loop if the wind gusts a little. I’ve had this same problem with other tetrahedral kites I’ve made over the years, and I can’t quite explain it, but I think that the kite’s weight has something to do with the problem. Tetras have a lot of stick in them and are quite heavy for their surface area, compared to simple bow kites. I think that this makes them more sensitive to small violations of balance. Or something.
Nonetheless, you should be ready with a good length of tail when you first take your kite out into the field. If you make good light “bow-tie” tail, even 8′ of tail will not bog the kite down too much, and it will make for much less, er, lively flying. See my separate article on making kite tail for details and suggestions.
Flying the Kite
It’s good to remember that tetras have more in common with box kites than with bow kites, and I’ve found that they fly more like box kites too. They pull hard, they lean, and they respond aggressively to gusts. They have a tendency to dive, and that was the end of my original 1969 D-Stix tetra. At some point it turned over and headed for the ground at speed, and when it hit, it hit hard. One of the sticks broke, and there was much ripping of tissue. I intended to fix it, but, well, I had a new girlfriend, and suddenly kites were much less an obsession with me than they had been for the previous six or seven years.
It’s important to get the kite above erratic ground winds as quickly as possible. This is not the sort of kite you can launch alone by simply throwing it into the air. Have an assistant, if possible. Send the kite back with your assistant at least fifty feet. Have him/her hold the kite up high, lead edge forward. Wait for a steady breeze and turn the kite loose. Walk back sharply to make it rise quickly. Once it gets above the shattered drafts near the surface it should settle down.
If it leans and looks like it may turn over, walk toward the kite until it rights itself. If it does too much of that, you may need to (carefully!) bring it down and add a little more tail, or wait for a day with a slightly lighter breeze.
 So here it is, on its first flight in Colorado Springs, on a gorgeous fall day against a brilliant blue sky. It’s a good kite that takes some skill to fly, and may well provide some adrenaline rush on a blustery day. It crashed on me later that day, but repairing it was no more difficult than plugging in two sticks that had popped out of their sockets and taping a small tear in one cell. That’s the magic of D-Stix: The joints flex a little, and the kite can bounce pretty hard without breaking any sticks. Tissue is cheap (I cut out two spare cells from tissue when I made the kite, which is a good idea) and I will replace the torn cell before next summer.
Next summer is significant, because in August 2009 it will have been forty years since I asked a beautiful 16-year-old girl to come fly a kite with me. We have a new kite, and some of the parts were in that original tetra from 1969. Carol and I will take it out to the field and be kids again, for at least a little while. Kites are good that way.