
In the January issue, we debuted KiteCraft, a how-to series of articles on building a high-end sportkite, the Pizazz by Dick Barnes.
The introduction and first five lessons are available HERE.
The following sections will be in this issue, a new one wil be added weekly. Check back often.
EDITOR’S NOTE: We’re sorry to report that the full size images for this article were hosted on the author’s website at the time of publishing (1999) and are no longer available, we must apologize for only having thumbnails available.
Part 6 – Attaching the Leading Edge

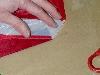

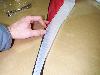
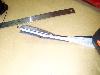
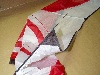
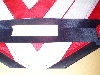
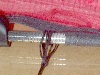
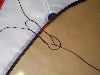
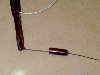
Tape the leading edge to the work surface with seam stick. Put the seam stick along the “open” edge of the leading edge tube. Remove the backing from the tape at this time. With the sail face up, closely align the nose of the kite with the nose end of the leading edge as shown in the picture above. The nose of the leading edge is the end without the seam. Press the sail onto the tape at this point. Now work your way down the leading edge applying slight tension to the sail and pulling the leading edge tube out to conform to the contour of the sail. When you reach the wing tip of the sail/leading edge you should have approximately 1/4″ inch of sail extending beyond the leading edge tube. (I shortened the kite 1/4″ and never shortened the templates). You can trim that off.


Sew the seam just as the others being careful around the bulk of the leading edge cutouts. Now tape the other leading edge on and sew it also. Again, trim away the sail and remove the seam stick.
Before going any farther fold the leading edge tube and crease it to make it easier to tuck under when we sew the seam shut.

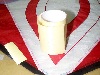
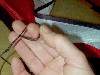
Measure up 5″ from the wing tip on the inside of the leading edge and make a mark for reference. Apply seam stick along the leading edge from the wing tip up approximately 6″. Measure off 11″ of black dacron bridle line (I use 80lb). Fold the dacron line in the middle and press the two ends into the seam stick 5″ from the wing tip and centered between your seam and the fold. Press the rest of the line into the seam stick drawing it to the wing tip. You should have a 1/2 inch loop sticking out the end of the wing tip.


Place a second layer of seam stick over the dacron line and extending beyond your seam. Remove the paper backing and fold the leading edge over and into the tape. The edge of the leading edge should line up with the seam. Then fold the wing tip of the sail over top of the leading edge and press it into the leading edge making sure the tape sticks. My sewing machine will not feed the lump we are about to make so I put a length of line through the dacron loop to assist moving the sail under the foot of the sewing machine. Starting with the wing tip sew the dacron loop into the leading edge. A walking zigzag works good for this. I set the stitch length to zero and walk the needle across the end of the leading edge twice to lock the stitch. Then set the stitch length to .8 mm and sew down the leading edge seam using the walking zigzag. Use the walking zigzag until you get to the end of the dacron line (5″). As your needle gets to the outside of the fold (where you would normally close the seam with a straight stitch) switch to a straight stitch and adjust the stitch length. Just a note in passing, I stop sewing and tie off at this point on the right wing then sew from the nose. I prefer that to stuffing the entire kite through the sewing machine.
Next we will put the nose on. I promise I won’t be so long between parts!
Part 7 – Attaching the Trailing Edge
The trailing edge is made of 9/16″ wide 1.5 ounce r/s nylon approximately 62″ long. Two pieces are required.
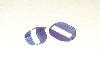

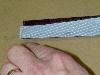
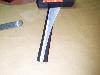
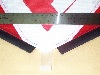
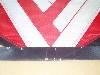
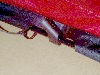
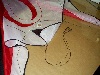
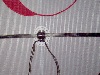
Cut two small ovals from 3.9 ounce dacron for standoff reinforcements. I use the handle from the cold water shut off under the bathroom sink as a template for this but anything approximately 1 1/4″ x 2″ will do. Put seam stick on one side of the dacron and crease it in the middle. Put the dacron reinforcements on the trailing edge of the sail as shown in the picture above. Note that the seam in the sail should be centered on the dacron reinforcement approximately 3/8″ up from the fold in the dacron. Sew these reinforcements in place. I use a small zig zag for this. Eventually we will punch a hole through this.


Fold the 1.5 ounce r/s nylon in half the entire length of the cloth. Crease it well as you go. I find it easiest to start sewing from the spine tip and sew to the wing tips. I put the leach line in the trailing edge after I have it sewn on using a small diameter of micro fiberglass rod.
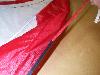
Sew the trailing edge to the sail by pulling the sail and trailing edges straight in a series of short short intervals with the sail pushed completely into the pocket of the trailing edge. Sew close to the open side of the r/s nylon, approximately 1 mm (1/16″). Continue sewing until you reach the end of the wing tip and cut off the excess. Then sew the opposite trailing edge on in the same fashion.


Glue the end of a piece of spectra line to the end of a length of thin (I use .046″) micro fiberglass rod. Feed the mfr into the trailing edge pocket from the wing tip and slide it through. There maybe some difficulty getting the rod past the dacron standoff reinforcement but it always goes eventually. Continue feeding the rod through the trailing edge and out the tip of the spine reinforcement. Then back into the other wing and out the opposite wing tip. When you get the line all the way through the sail tie a loop approximately 1/2″ long at the end and cut the beginning end off generously so we can finish the leach line later.


Punch .200″ holes in the dacron reinforcements just above the trailing edge and centered on the seam joining the wing to the center sail. This is for the standoffs. Remember way back when.. I said it would make a little difference in the way your kite flew if you rolled that seam in or out? This is why. If you rolled the seam in the kite will fly just a touch more precisely, if out it will fly a teensy bit more radical.
This completes the sail. Now the framing.
Part 8 – Attaching the Nose
The nose on the Pizazz is made of 3″ wide 3.9 ounce black dacron. It is reinforced inside with a 1 1/4″ x 4″ piece of self adhesive kevlar stuck to the black dacron. The self adhesive kevlar is available from Tom Marvin at Hang-em High Fabrics or you could probably email me and talk me out of a teensy piece.

Tape the sail face down on your cutting surface with the nose toward you. Measure along the outside edge of the leading edge from the nose down 1 1/8″ and make a mark. Do the same to the other side. Cut the nose off along a line between these two points. This should leave you approximately a 4″ wide nose and cut off just the tips of each leading edge and the sail center.


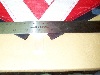
Cut a 1 1/4″ wide piece of self adhesive kevlar from a 4″ wide roll. Cut a strip of 3″ wide 3.9 ounce dacron 11″ long and fold it down the center. Stick the kevlar to the inside of the fold on the black dacron, centered from side to side and end to end. Run seam stick tape along one edge of the dacron. I generally re-crease the dacron at this point to make sure I have a nice crisp 90 degree bend. Remove the paper backing rom the seam stick and slide the nose piece under the sail with the taped edge of the dacron going under the nose. We have the sail face down so we do not tape the pocket for the spine shut. When you have the nose aligned on the kite with the kevlar reinforcement centered and up against the kite press the kite into the seam stick and smooth it down. Once you are satisfied that the nose is in the correct location add seam stick to the top of the kite and fold the nose over flat. Do not put seam stick over the area where the spine pocket will be.


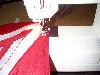
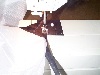
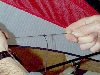
Draw the sewing lines on the nose. The outside stitching line is drawn just far enough from the edge to be comfortable to sew. The lines on the inside of the leading edge pockets are extensions of the seams sewing the pocket to the kite. The seams for the spine pocket are 3/4″ apart and are centered on the center line of the kite. The nose can be sewn in one continuous seam as shown above. Starting at the outside edge (1) of the leading edge tube (upper right hand corner of the nose as you see it pictured above). Sew along the edge to the tip of the nose (2), across the nose to the edge of the spine pocket (3) and down the spine pocket (4). Sew across the bottom of the of the nose to the inside of the leading edge pocket (5). Then sew along the inside of the leading edge pocket back to the top of the nose (6). Sew across the top to the other side of the kite (7) and down the inside of the second leading edge pocket (8). Sew back toward the center of the kite to the edge of the spine pocket (9) then up to the tip of the nose (10). Sew along the tip of the nose to the outside edge of the second leading edge tube (11) then down to the bottom of the nose along the outside of the leading edge (12). With a straight edge mark a line parallel to your leading edge for cutting. You just need to leave enough room so you don’t cut your stitching. Trim the excess away from the kite with a hot knife.
This completes the nose.
Part 9 – Cutting the Frame
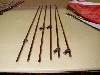
 For the frame you will need the following pieces.
4 spars cut 31.75″ (leading edges)
2 spars cut 31.75″ (lower spreaders)
1 spine 42″ (I use a two piece spine)
1 upper spreader 22″
2 9″ micro carbon rods for standoffs
2 ferrules cut 3″ long for the leading edges
1 ferrule cut 3 5/8″ long for the center T/lower spreaders
1 ferrule cut 3″ long for the spine if you use a 2 piece spine
1 ferrule cut 1 1/2″ to attach the arrow nock to the spine
4 leading edge connectors
1 center T
3 arrow nocks
2 spreader end stand off connectors
2 sail end stand off connectors
2 vec’s for the ends of the stand offs
3 vec’s for the ends of the leading edges and spine
4 stoppers (I use small o’rings) for the leading edge connectors
For this discussion I will talk about GForce UL for a frame. The assembly sequence is critical on tapered spars due to the taper. I will discuss assembling the pultrude spars afterwards.


Mark the 3″ and 3 5/8″ ferrules 1 1/2″ from the end. Glue these into one end of 3 of the 31.75″ spars sliding them into the spars 1 1/2″. The 2 spars with the 3 inch ferrules will be our upper leading edges. The spar with the 3 5/8″ ferrule will be one lower spreader. If you are using a 2 piece spine that I supplied mark and glue a 3″ ferrule into the shorter section of the spine at this time. Press the 1 1/2″ ferrule into one of the nocks and glue the nock/ferrule into the other end of the shorter spine piece seating the nock fully against the spine section.
Heat the leading edge connectors and center T before putting them on the spars. Water in a cup near boiling is a good choice for heating. The leading edge connectors on the lower leading edge spars need to go onto the spars before the stoppers and the stoppers need to go onto the upper leading edge spars before the leading edge connectors.
1. Heat the lower leading edge connectors and slide them up the lower leading edge spars until they are within 2 1/2″ of the ferruled end of the spar.
2. Put the o’ring (or equivalent) stoppers on the spars. Glue them in place. The upper leading edge stoppers are glued so that there is 12 3/4″ of spar extending beyond the stopper toward the narrow end of the spar. The lower leading edge stoppers are glued so that there is 10″ of spar extending beyond the stopper toward the ferruled (large) end of the spar.
3. Heat the upper spreader connectors and slide them down the spar close to the stopper.
4. Put the vec’s over the end of the upper spreaders.
5. Press the arrow nocks onto the ends of the lower leading edges. You may need to heat these also. I hammer them on with a wooden mallet.
6. Heat the center T and slide the small opening over the ferrule on the short end of the spine. Press the ferruled end into the longer section of the spine. This will cause the center T to ride up onto the spine. Slide the center T onto the long section of the spine and position it centered 26 1/2″ from one end. Slide the ferruled end of the lower spreader into the spreader portion of the center T and set it aside to cool. This will prevent the center T from distorting as it cools.
7. Slide the spreader end stand off connectors onto the lower spreaders and position them approximately 17″ from the ferruled end.
8. Push the 9″ micro carbon rods into the sail end spreader connectors. Make sure they seat evenly into the connectors. Glue them there. Put the small vec’s over the exposed end of the mcr.
If you are using pultrude spars heat the center T and press one of the ferrules into the larger opening in the center T. Center this ferrule and glue it in place. Put the center T through the cut out in the sail and put the spine through the smaller hole. Put a stopper (rubber o’ring) on the spine above the center T. Position the center T properly on the spine and slide the stopper down to the top of the center T. Glue the stopper in place. Put a stopper approximately 1 1/2″ from the center T end of each spreader. Make sure the spreaders meet in the middle of the ferrule that is in the center T. Glue the stoppers in place.
Set the frame aside to dry and we’ll make up the bridle.
Part 10 – Tying the Bridle
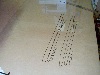 For the bridle you will need 2 lengths of 80# black braided dacron cut 60-1/4″, 2 cut 51-3/4″, and 2 cut 11″. Cut these and put a mark on each end of the lines 5-1/2″ from the ends. Fold the lines at the mark and tie an overhand knot leaving a large loop. The two longest lines go from the upper leading edge spreader to the lower leading edge spreader, the shorter line goes between the longer line and the spine, and the shortest line (11″) is used as the tow point.
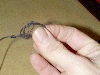

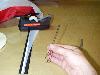
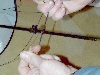
Tie a loop in the loop of both ends of the longest bridle line and in one end of the shorter bridle line as pictured above. First put your thumb and index finger through the large loop, wrap your thumb and index finger around the line and pull it through the loop as in the figure on the left. Next put your thumb and index finger through the new loop and pull the line through again. It should look like the center picture above. Do not pull the knot through the loop. Cinch the loop down on the line.

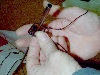
Now install the upper leading edge spar. Slide the upper leading edge fitting to the top of the spar and put the ferruled end of the spar in the leading edge tube through the upper leading edge cut out. Slide the spar all the way down the leading edge until you can get the tip of the spar into the cut out. Slide the loop on one end of the bridle over the tip of the spar and slide the spar up into the leading edge while sliding the leading edge connector and bridle line down. The tip of the spar should fit snuggle in the nose of the kite and the leading edge connector should be seated against the stopper as shown in the picture on the left. Slide the lower leading edge spar into the lower leading edge cut out and down until the end of the spar is at the cut out. Put the loop in the second end of the bridle line over the spar and the fitting so the bridle is below the leading edge connector as shown in the center picture. Slide the spar into the pocket and up the leading edge while pulling the bridle and fitting down the spar. When the stopper on the lower leading edge spar comes into view loop the bridle line over the stopper as shown in the picture on the right. Pull the loop tight and pull the leading edge fitting down so it seats against the bridle and stopper. Make sure the ferrule on the upper spar in inside the end of the lower spar. Do the same to the other side of the kite.
Tie the large loop on the shorter of the bridle lines to the bridle line attached to the leading edge with a double larks head as shown in the picture on the left. It is not important at this time where along the line you tie it. Push the other end through the center T cut out so it comes out the back of the kite.

With the two bridle loops out the back of the kite interlock them as shown in the picture on the left (one loop of one bridle, a loop of the second, the second loop of the first bridle, then the second loop of the second bridle). Push the spine through these loops and pull the loops tight around the spine with the bridle below the center T.


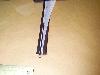
Now to attach the spine to the sail. The pictures here are of the wing tip, but they are typical of the spine also with the exception the loop is not attached to the trick line. Start with one of your tow points to gauge the length of loop you will need. slide one end of the loop through the small loop sewn into the sail at the tip of the spine reinforcement. Run the loop onto the nock and pull the other end of the loop up over the nock also. The spine should be tight, but not so tight as to put a bow in it. Once you get the length figured out make a loop for the spine and attach the spine. The cheater line has loops in the ends that tension the sail to the leading edges.
*I* use a piece of 80# dacron cut 116″ long for this. If you made your kite exactly as I make mine you can also. But I would suggest you start with a line somewhat longer just in case. First determine how long the loop needs to be that tensions your leading edges. I use an 11″ loop here also so you may want to start with that. Again, you can check this with one of your tow points. The leading edge tension should bow the leading edge spars just slightly. Determine your individual loop size. For the cheater/trick line you need 94 inches of line between the knots that form the loops on the ends of the line. As example, I have 11″ for the loop on one end, 94″ for the cheater line, and 11″ for the loop on the other end, or 116″ total. Once you get this length figured out, put the three vec’s (with holes cut in them for the line) over the line and tension the sail. I cut a single hole in the end of the vec for the wing tip and two holes in the vec for the spine for the line to pass through.


Once the tension lines are in place add the standoffs and the spreaders so the kite is framed for flying. Now tie the tow points on the shorter bridle lines.
Adjusting the bridle.
With the kite fully framed lay the bridle down against the kite and pull it snugly toward the center T. The junction between the longer bridle line and the shorter bridle line should be just above the lower spreader. Adjust this point as necessary and tighten the knot. The tow point should be approximately 1/2″ beyond the knot in the loop on the opposite bridle. See the picture above right.
Put the end of the leach line with the loop in it over the arrow nock. Loop the leach line over the spine arrow nock. Pull the excess leach line out the opposite wing tip taking up all the slack. Pull it tight, it will draw back into position. Once all the slack is out of the leach line hold the loose end up to the arrow nock and place a mark on the leach line right at the bottom of the valley in the nock. Fold the leach line at that mark and tie a loop there using an over hand knot. Put that loop over the arrow nock and the bridling is complete. If the kite is noisy when you fly it you can take up slack in the leach line by putting an overhand knot in the line just below the knot forming the loop.
I really feel like I’m babbling.. It’s been a long day. Let me know how your kite flys and thanks for the interest in the kite.
dickb
Check next issue of KiteLife for plans to make a vented Pizazz.