
Specifications
[fourcol_one]SailBow
Spine
Battens[/fourcol_one] [twocol_one]Ultra-light Orcon, Icarex or polyfilm
.06″ carbon rods, 24 9/16″ or 624mm long
Bamboo at 18 1/4″ or 464mm long
.03″ carbon rod 5″ or 127mm long[/twocol_one] [fourcol_one_last].
.
.
.[/fourcol_one_last]
The following method of building a fighter kite works really well for me; it doesn’t require special skills and is reasonably quick, about 2 hours to make a kite. Obviously there are many building methods that result in successful fighter kites, this particular method has worked very well for me for several years and I thought other fighter kite fans may enjoy trying it if they don’t already have a favorite building method.
NOTE: The photos in this step by step building guide are of more than one kite…so if you notice some inconsistencies in the kite photos, you are correct; this is because I used photos from more than one kite to assemble this step by step ‘ TANGLER’ building guide. The process or technique shown in a photo is the important aspect to pay attention to.
You can adopt the following construction techniques to any fighter kite plan. For the kite skin material in this discussion, I am using black Orcon because it shows best in photos, plus, I like working with it and I really like its characteristics in the air. Your kite skin can be made of Tyvek, Icarex, Orcon, ripstop nylon, paper, Mylar or gift wrap poly films and the information and techniques described here apply exactly the same; except for one possible difference; that difference is the tape and glue may be different from the tape and glue used in this discussion. The important issue is that the tape and glue you choose bonds well to the skin material you are using.
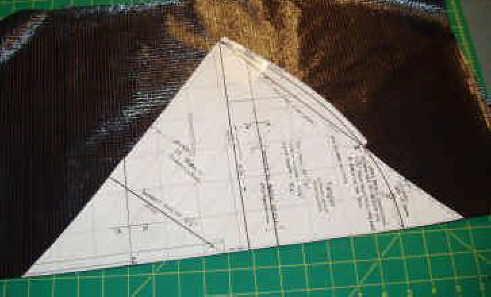
I suggest you read through the entire construction guide and study the photos and the full sized template before you begin. This will make your building faster and you’re less likely to encounter surprises.
The parts you need to make TANGLER: A cut out fighter kite skin, 1- bamboo spine 18-1/4″ long, 1 – 0.060″ diameter carbon fiber rod 24-9/16″ long for the bow if you want TANGLER to fly in 5-12 mph winds OR a 24-9/16″ long 0.050″ diameter carbon fiber bow if you want TANGLER to fly in 0-5 mph winds, 2- bridle stops (optional), 2- battens of 0.040″ or 0.030″ diameter carbon fiber, each 5″ to 5-1/4″ long ( the exact length is not critical as long as both battens are the same length), tape that bonds well to your skin material for reinforcing the leading edges, a few other small pieces of tape for reinforcements, cornstarch, about 60” of bridle line and the kite parts will be bonded together using Weldwood original contact cement, or glue that bonds well to your skin material plus a couple drops of CA (superglue) glue.
The Full Size TANGLER Template was created from my original plan and provided by the creative genius of Merwin Updyke, http://mukites.com. Many thanks Merwin!
The full sized template is a separate Adobe PDF file.
When you open Adobe Acrobat Reader to view the template, it will have 4 separate pages that you print. You tape the printed pieces together to make the actual full sized ½ kite template.
NOTE: If you don’t have Acrobat Reader 6, I recommend downloading it before you begin. Go to www.adobe.com to download it.
Before you print the pages, be certain your Acrobat Reader shows 100% as the scale in the zoom window in the tool bar above the image, and, in the print window it should show ‘none’ in the drop down window and not ‘shrink to page’; otherwise the size of the printed image will be slightly different from the original. If this happens the bow and spine lengths described in this discussion will not be the correct dimensions. The way to be certain your template is the correct size is to make two measurements after you have taped the pieces of the template together; the wingtip to spine dimension should be 10-1/16″ and the spine length should be 18-1/4″. If these two dimensions are correct, your kite template is the correct size.
Once you’ve taped the paper template pieces together, tape or glue them to a mat board, poster board or other stiff material. Or…..rather than that, if your printer will handle thicker paper than standard copy paper, such as 110 lb index stock, print the templates on 110 lb index stock and when you tape the pieces together you will have a ready to use template. 110 lb index stock can be purchased by the sheet at most office supply stores such as Office Depot for a few cents a sheet.
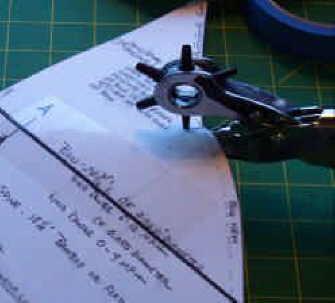
Holes in the template are a shortcut.
I find it useful to place holes in the template at important points on the plan. This eliminates the need to measure those points for each kite I make. You can use any sharp item you have to make the holes. The holes only need to be large enough to allow the tip of your pen to go through. I place holes at two points along the batten line, one hole at the lower bridle point, one hole at the preferred balance point and two along the nose reinforcement tape location line. I also cut a small notch at the trailing edge of the wingtip where the bow intersects with the trailing edge. I use the notch to place the tip of a pen to make a large dot identifying the location of the bow tip.
Cutting out the kite’s skin.
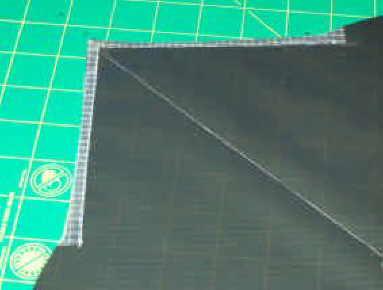
Fold your skin material in half. There are 2 things to watch for when doing this; be certain the fold is longer than the spine line length of the template, and, the side of the material you want for the backside of the kite is on the inside of the folded material.

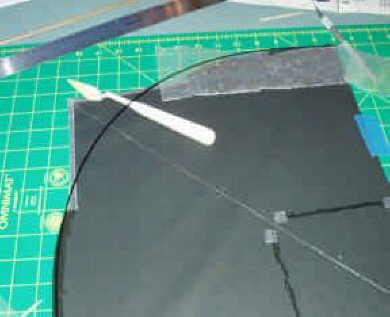
Smooth the folded skin material onto your work surface and carefully align the template so the spine line is on the fold of the skin material. Press down on the template to hold the 2 layers of material from moving and cut around the template with a hobby knife or single edged razor blade……it works best if the blade is new!
After the kite skin is cut out; open the folded kite skin, so the fold is a valley……the backside of the kite is facing up. Place the template on one half of the skin so the spine line is aligned along the fold and put the tip of your pen through each of the holes you made in your template and place a dot on the kite skin at each hole and also make a large dot at the notch at the wingtip……repeat on the other side of the kite skin……then connect the appropriate dots for identifying the batten locations, nose tape reinforcement, etc.
What is a Bow Setter?
When I build a kite, I use a device I call a ‘bow setter’ to aid in positioning and securing the bow tips to the kite skin. I can make several kites of the same plan and use the same bow setter. It really saves time and provides repeatable results; your kites are very similar in performance one to the other.
A bow setter is a device that holds the bow under tension (bent) with the tips of the bow at the correct position at the wingtips; right where they need to be. And the best part is it allows both your hands free to bond the kite skin hem to the bow. It’s a pretty neat device and fortunately very simple to make and use.
Making the Bow Setter
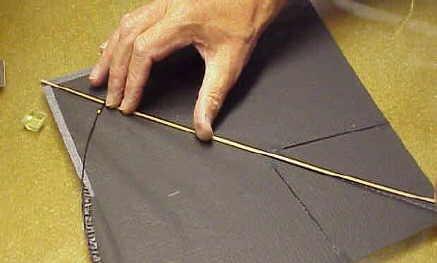
There are many different styles of bow setting techniques and all work well. The style of bow setter I prefer is made from a flat piece of mat board, metal or wood about 1″ wide about 1/8″ thick and about 24″ long. It’s very simple.
Cut two notches on one edge of the bow setter. The notches are separated by the exact distance between the locations of the wingtips of your kite plan. The bow setter lays across the kite skin while you install the bow. The bow tips are placed in notches in the bow setter that correspond with the kite plan wingtip to wingtip dimension and hold the bow at the correct curve and under tension with the bow tips exactly at the point you want them while you bond the hem around the tips of the bow. After the tips of the bow are bonded and secured by the hem tab, the bow setter is removed and is not needed for that kite any longer.


For example, for the TANGLER, the distance from wingtip to wingtip is 20-1/8″. Cut two notches in the bow setter so the distance between the extremes of the notches is 20-1/8″. The result is the bow tips when placed in the notches will be 20-1/8″ apart; and because the bow is longer than 20-1/8″ long, the bow will be bent to the correct curve needed. I make the shape of the notches as shown in the photos, with the vertical part of the notches exactly 20-1/8″ apart. These 2 notches will hold the bow at the correct curve under tension and in the correct position on the kite skin so you can use two hands to glue or tape the bow tips securely to the kite’s skin.
This style of bow setter requires the bow length be cut in advance to the precise length needed for the kite and the bow needs to be installed before the spine. The bow length for TANGLER is 24-9/16″.
TANGLER Construction Steps:
Smooth out the kite skin and secure it to your work surface, I like to work on a glass surface, but any smooth surface is good. A good way to secure the kite skin to your work surface is to spray a light mist of water on the work surface, lay the kite skin onto the water so the back side of the kite skin is facing up and gently smooth the kite skin with your hands and a piece of paper towel to remove wrinkles and/or trapped air bubbles. When smoothing the skin, don’t stretch or distort the material.
Another method is to tape the skin to the work surface with low tack masking tape; I like to use the blue colored masking tape. Sometimes, like in some of the photos, it is not possible to get the kite skin absolutely smooth. It is best if you can, but the kite will fly well even if the skin is not perfectly smooth.


 1. Using a pen that easily writes on your skin material draw the lines of the spine, battens and a line parallel to the nose area of the leading edge. This parallel nose leading edge line will be the guide for placement of the reinforcement tape. I usually draw these parallel lines about 3/8″ from the leading edge. Also enlarge the dot at the wingtips. I also draw a line parallel to the spine about ¼” away from the spine on either side of the spine line. This line helps me to precisely align of the spine when time comes to glue it to the kite skin.
 2. Prepare the spine. This may require bamboo splitting, some shaping of the bamboo using a utility knife and/or hand plane, or may only require cutting to length and straightening, or only cutting to length. This depends on the piece of bamboo you are using.
3. Many fighter kite makers don’t feel there is any benefit to reinforcing the leading edge of the kite near the nose, but I always do it. I find it adds durability to the kite if not also improving its performance. If you are going to reinforce the leading edge near the nose, now is the time. Use a piece of tape about 3/4”-1” wide and the length of the nose portion of the leading edge. Align one long edge of the tape to the line drawn on the kite, and allow the balance of the tape to extend onto your work surface.

Smooth out the tape and burnish. Cut away the excess tape using a straight edge and razor blade if your nose leading edge is a straight line, use the template as a cutting guide if the nose area leading edge is curved. Remove the excess tape from your work surface.
4. To prepare the battens cut to length and smooth the ends of each batten with sandpaper.
NOTE: When gluing, here’s a method that works pretty well and is easy. Pour a small amount of contact cement into a lid of a small bottle, mini cupcake paper, or anything that is disposable. Then dip a small disposable artist’s paint brush or foam glue spreader into the glue container and spread the glue where you need it.

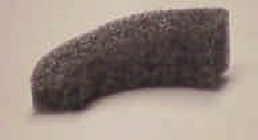
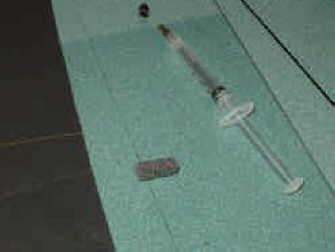
The glue spreader I use I make from closed cell foam pipe insulation that I buy at the hardware store. I cut a slice about ¼” – 3/8” wide from the foam pipe insulation and cut that slice into 3 pieces. Each piece I use as a glue spreader. These are easily shaped with scissors to any width or shape and are disposable. Make one end about the width of a small artist’s brush. Most of the time I use a syringe minus the needle to apply a small bead of glue and then I spread the glue using the foam pieces.
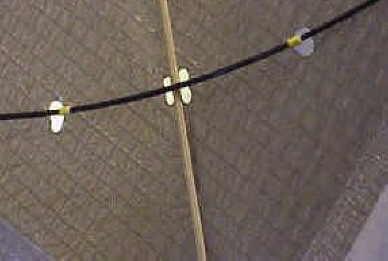
 5. To install the battens, apply glue along the drawn lines of the batten locations and place battens on the glue line and press them firmly into the glue while the glue is still wet. I also secure the ends of the battens with small pieces of tape. The 4 small pieces of tape are shown. I usually apply the tape after the glue is dry. The best time during the construction process to install the battens is anytime after the bow has been installed.
 6. Apply glue to the wing tip areas; about a 1″ long x ¾” area, begin at the wingtip. This is the hem area that will become the bow tip tab. You will create the bow tip tab a little later. Allow the glue to dry for a few minutes.
7. Apply glue along the spine line.
8. Apply glue to the entire length of the spine on the “skin” side of the bamboo. Set the spine aside to dry.
NOTE: An alternative method of attaching the spine to the skin is to apply double sided tape to the ‘skin’ side of the bamboo spine. Using double sided tape eliminates using glue on both the kite skin and on the spine itself.
9. Prepare the bow. This requires cutting it to the proper length, 24-9/16″, and smooth off the ends with sandpaper and if you are using bridle stops, slide on 2 heat shrink pieces (each about 1/8” long) and slide to the center of the bow.
NOTE: Bridle stops are not necessary, CA glue can secure the bridle line to the bow instead of using bridle stops if you prefer.
Measure from each bow tip 10-3/4″ and make a mark on the bow with silver or other color pen that is easily visible. These marks indicate the location of the upper bridle line connection points on the bow.
 If you are using bridle stops, slide the stops near the center of the bow, place a drop of CA glue on one of the marks you made on the bow and slide one of the stops through the glue and align the edge of the stop closest to the bow tip with the mark. Do the same for the other stop.
Apply contact cement to each bow tip. The glue should be applied to about the last 1″ of each end of the bow and around its circumference; set the bow aside for the glue to dry.
10. After the spine line glue is dry, lay the bow setter across the kite skin, carefully align the bow setter notches so the bow tips will be located at the precise wingtip dots then secure the bow setter to your work surface using masking tape.
Installing the Bow
 11. Place the tips of the bow in the notches of the bow setter. Position of the bow so its bent shape is vertical to your work surface so only the bow tips are in contact with the kite skin in the bow setter notches.
Lower the bow so it comes in complete contact with the kite skin.
 12. Press down on the tips to secure them to the glued area of the kite skin.
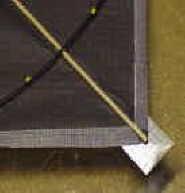
13. While pressing on the bow about 2″ from toward the nose from a bow tip, make a cut in the kite skin hem at a point about 1/2″ toward the nose from the bow tip. Start the cut at the outside edge of the bow and continue the cut to the outer edge of the hem. Then make a second cut about 1/2″ closer to the nose of the kite. You are creating two tabs; one about ½” wide that is located at the wingtip or bow tip and another, next to it, nearer the nose.

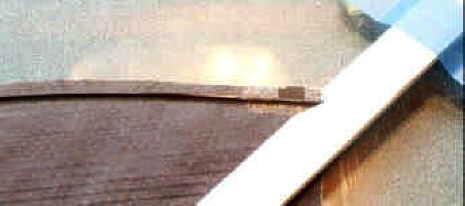
14. Lift up the tab closest to the nose of the kite and wrap it around the bow. Do the same for the other side. Now remove the bow setter and fold over the remaining tab at the very tip of the bow. The following photos show a close up of the two tabs as they are wrapped around the bow.

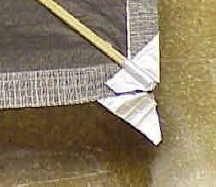
Below is a photo of the kite with the bow setter removed and the bow ready for the balance of the hem to be glued to it. The bow is secured to the kite skin only by the tabs.

15. Raise the bow off the kite skin by placing a pen or other object under the bow near the bow/spine cross point. Apply glue to the bow and the bow hem area on both sides of the kite. Let it dry for a few minutes. If you’re concerned about the exposed glued surfaces of the bow and skin touching each other before you are ready for them to, place a piece of waxed paper between the skin and bow. The waxed paper will be placed on wet glue, but will easily release when the glue is dry.

16. After the glue has dried for a few minutes, make certain the skin is smooth, then remove the item holding the bow off the kite skin and press the bow onto the glued area on the skin.
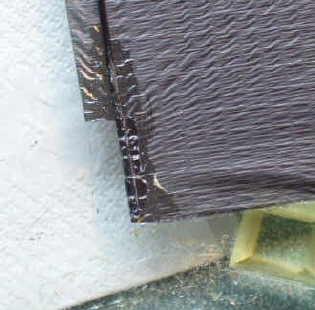
17. Next, fold over the hem to enclose the bow on both sides of the kite. During this process, be careful not to distort the shape of the bow while you are folding over the hem. To minimize distorting the bow shape during this stage, I use a small piece of waxed paper laid on top of the bow, then with one hand pressing down on the waxed paper to secure the bow to my work surface, I wrap the hem around the bow.

18. Although I don’t show the waxed paper in the following photos, using it while installing the spine makes the job easier. Lay a small piece of waxed paper on the exposed spine glue line beginning at the nose and extending under the bow.
Installing the Spine
19. Lift the bow near the bow/spine cross point enough to allow the spine to fit underneath it. Slide the spine under the bow keeping the tail end of the spine above the kite skin. Once the nose of the spine is aligned with the nose of the skin, remove the waxed paper and touch only the nose end of the spine onto the very tip of the nose of the kite skin. Then slowly lay the spine along the glued spine line on the kite skin.
Be very careful not to allow the glued side of the spine to touch the exposed glue on the spine line of the kite skin until you have the spine properly positioned above the line. One way to help avoid a “mistake” is to put a strip of waxed paper on the glued spine line, lay the spine on the wax paper, position it, and pull out the waxed paper while holding the spine in place.

20. Cut 2 pieces of tape about ¼” wide x about ¾”-1” long. Apply one piece to each of the wing tips at the point where the bow hem was cut to make the bow tip tabs and extend the tape all the way to the wingtip. This will stop the possibility of the cuts creating tears into the skin of the kite during flight. It also protects the skin at the wingtip from getting torn from your kite line getting snagged around the wingtip.

 21. Another point that should be reinforced is the point where the leading edge changes shape; this is where the nose portion of the leading edge meets thecurved shape of the bow. I usually have about ½ of the tape on the front of the kite and ½ on the back, other kite makers put the tape only on the back. I use a piece of tape about 3/4″ wide x 1″ long. You can see in this photo that I forgot to put on the reinforcing tape until after I dusted the kite with cornstarch…..not a
22. This step is optional. It adds extra strength to the nose of the kite. Cut a piece of tape about 1” square and apply to the nose of the kite, this secures the nose of the spine to the kite skin. Or

you can use the method shown in step 23 to add additional strength to the nose. Both methods work fine…..or you can
use both. I typically use the method in step 23.good idea. It is best to put on all reinforcing tape before dusting the kite.
The cornstarch prevents the tape from forming a secure bond.
23. The following photos show a way to cut and wrap the nose of the kite with a piece of tape for added ‘crash’ protection. The tape is about 1″ x 1-1/2″.


24. This step isn’t shown in a photo….Cut a piece of tape about ¼” wide and about 1” long and wrap it around the end of the spine so part of the tape is on the front side of the skin and the rest is on the back of the spine. This helps secure the tail of the kite skin to the tail of the spine. Or you can cut a 1″ square of tape and apply it on the spine in a similar fashion as described above for securing the nose of the skin and spine.
 25. Place the kite face down on your work surface with the nose pointed toward you. Use the marks indicating the upper bridle connection points that you marked on the bow to mark kite skin. If you use bridle stops, like in the photo, use the edge of the stop closest to the wingtip as a guide for marking the skin.
26. The marks you make on your kite skin indicate where to place small pieces of tape for reinforcing the bridle holes you’ll melt in the kite skin with a soldering iron. It’s best if you use reinforcing tape at the bridle holes, but as you can see in the photo, I did not use reinforcing tape on the kite shown. The need for reinforcing depends on the kite skin material and how durable it is. Plus if you plan to tie the bow and spine together you will need holes in the skin at that location also.

An alternate method to actually melting small holes in the kite skin to allow the bridle to enter and exit the kite skin is to use a large eyed needle; thread it with the bridle line and use the needle to puncture the kite skin. This eliminates a larger hole in the skin of the kite. Either method works fine.
Making the Bridle
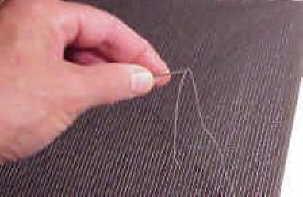
 27. Wax the entire length of bridle line you will be using; I use beeswax because it is stickier than paraffin. Waxing helps the knots hold more securely. Cut a piece of bridle line about 12” long, this will be used to tie the bow and spine together. Using a large eyed needle or the holes you melted in the skin, poke the line from the front of the kite to the back and tie the bow and spine securely. The knot should be on the back of the kite. If you aren’t going to tie the spine to the bow, skip over this step. Some fighter kite makers do not tie the bow to the spine; it’s your option, the kite flies great either way. I tie them together.
 28. Cut a second piece of bridle line about 12” long, this will become the upper bridle line or upper yoke. At the outside edge of the bridle stop, the edge closest to the wingtip, tie one end to the bow. (If you’re not using bridle stops, tie the bridle to the bow at the location of the bridle marks you put on the bow, you will CA glue the bridle line to the bow later).
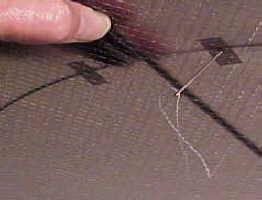
The bridle line must enter and exit on the front face of the kite through the hole in the kite skin. See photos for details.
Next, tie the other end of the upper bridle line to the other side of the bow through the hole in the skin. BUT BEFORE you secure that end to the bow, make sure the loop of line you about to create is too short to reach the nose of the kite. When pulled toward the nose, the upper bridle loop should NOT extend beyond the nose of the kite. When the correct upper bridle line length is determined, then tie the second end of the upper bridle yoke to the bow. If you aren’t using bridle stops on the bow, now is a good time to CA glue the bridle line to the bow. Glue the bridle onto the marks you made on the bow.
 29. Cut a 3rd piece of bridle line about 24”; this is the lower bridle line. Fold over about 3”-4” of line at one end and tie an overhand or figure eight knot, making about a 2”-21/2” long loop on that end of the line. Using a larkshead knot, or a prussik knot, attach this loop to the upper bridle yoke.
 30. Tie the remaining end of this lower bridle line to the lower bridle connection point on the spine as indicated on the kite plan. If the lower bridle point is not identified on your kite plan, tie it at 1/3 of the length of the spine, measured from the tail of the spine.
HOWEVER, be sure the bridle line length, when pulled toward a wingtip, does not extend beyond the wingtip; then secure the knot to the spine. (kite shown is not TANGLER)
31. Cut a piece of bridle line about 6” long; this will become the tow connection loop. Fold it in half and tie an overhand or figure eight knot tying the loose ends together. You will have a loop about 2-1/2″ long. Using a larkshead or prussik knot, attach this 2”-3” long loop to the lower bridle line. This loop is the point where you will attach your flying line to the kite; it’s the tow connection loop.
 32. Slide the tow connection loop to the point on the lower bridle line that, when the kite is suspended by the tow connection loop, the tail of the kite is touching the top of a table and nose of the kite is raised about 1-1/2″ above the table top. This will position the tow connection loop to allow the kite to fly pretty well. ( the photo is not of TANGLER)
However, you will want to adjust the tow connection loop’s position, either closer to the tail or closer to the nose, as part of normal tuning of TANGLER or any other kite you make. The goal in tuning a kite is to optimize the kite’s performance. Adjusting the tow connection loop and then testing how the kite flies with the tow connection loop at various positions is an important part of the tuning process. Pick the position that provides the flight performance you like best.
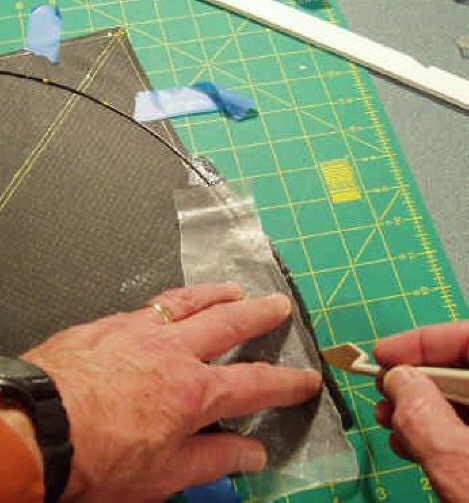
 Using a small brush, dust with cornstarch all the areas of the back of the kite skin that have exposed glue and/or tape. This removes the stickiness of the glue and/or tape, so grass and sand won’t cling to the kite when flying and so the kite won’t stick to other kites in your kite box. Tap on the kite to remove the excess cornstarch or brush it off.
Now it’s time to fly this baby!!
Please enjoy building and flying the Tangler. Use it as part of a jumping off point to do your own experimentation with fighter design.
If you have questions about building, tuning or flying fighters and/or about purchasing specific fighter kite materials, please don’t hesitate to email me by clicking my name below!
BigFighterKiteGrins,
Rev September 2004 Bruce Lambert