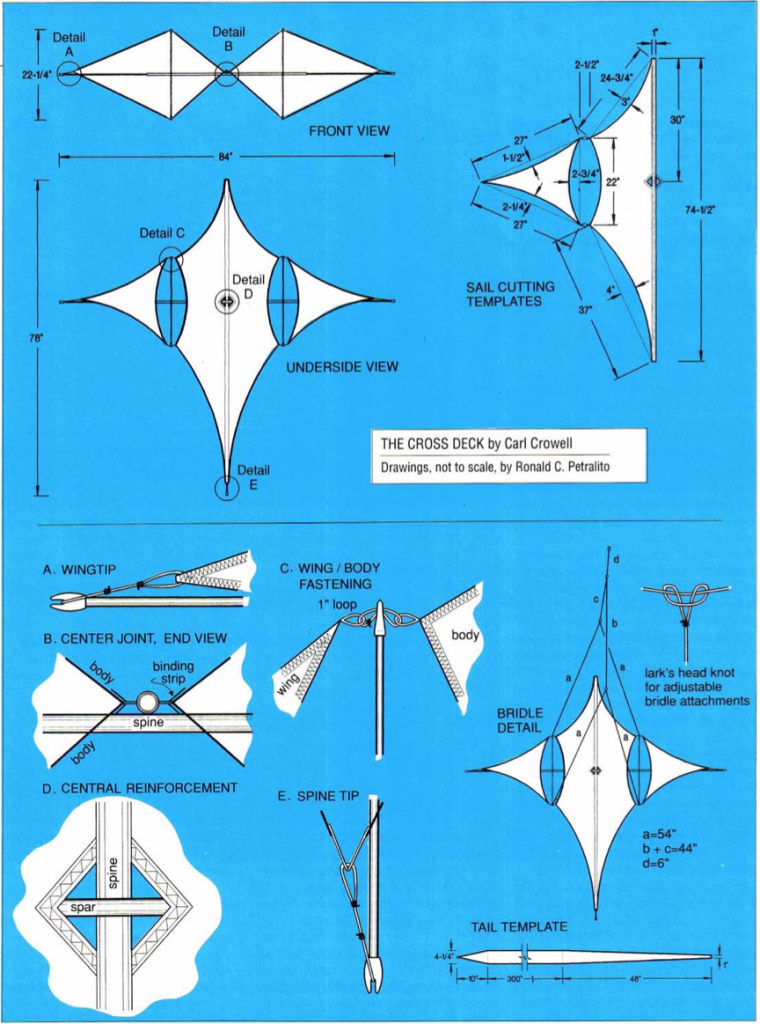
I am not sure how everyone else builds kites, but I will assume that anyone wanting to build this kite will know how to sew and will have some familiarity with the materials used.
TOOLS
- Hot knife
- Sewing machine
- Poster board
- 1/8”-diameter fiberglass rod, about 4’ long ( for pattern making)
- Cyanoacrylate (“super”) glue
- Stick glue
MATERIALS
- 5 yards 3/4-oz. ripstop nylon
- 1/2 yard x 41” 1-1/2-oz. ripstop nylon (for binding)
- 4-oz. Dacron polyester for reinforcements (two 4” x 4”)
- Two 1/4”-diameter dowels, one 36” long, one 48” long
- 4 pieces of .180” O.D. linear graphite tubing, 30-1/2” long
- 3 pieces of .254” O.D. linear graphite tubing, 33” long
- 11 arrow nocks
- 1/16” black Dacron cord, 12” (120-lb line)
- 1/4” I.D. brass tubing for ferrules
CONSTRUCTION
Body Template
Piece together some poster board to create a single piece that is at least 74-1/2” x 16-1/2” for your body template. Clearly mark out 0”, 19”, 41” and 74-1/2” along one side.
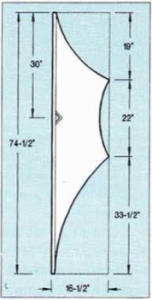 Mark 1/2” inside the long edge for a hem allowance. At the 19- and 41-inch points, mark out to 16-1/2” at 90 degrees. You will connect your marked points to get the kite’s outline, but you want curved (cambered) edges.
As a guide for the curves, I bend a piece of fiberglass rod between each point, deflecting inward, and then draw a line along its edge. You may free- hand the lines. I just use the fiberglass so that if I accelerate a curve I don’t have to do any math to make sure that it is a uniform curve. An accelerated curve is achieved by bending one side of the fiberglass with more force than the other.
The maximum deflections are given. Do not use greater deflections than these until you are familiar with the technique. I recommend less deflection for an easier build. All curves must be concave along their entire length. Cut out your finished template and set aside.
Wing Template
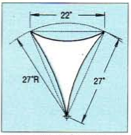 Mark out a triangle that is 27” x 27” x 22”. One way to do this is by marking an arc at intersection points. (Remember your basic geometry class?) Attach a pencil at each end of a string that measures 27” between the pencils. This is your radius length. One pencil marks the center point, the other draws an arc tracing a path a little longer than 22”. Take a ruler and measure a straight line distance (chord) of 22” across the arc. From each of your two intersection points on the arc, draw a straight 27” line to the center point. This is your triangular wing. Again now, make curves foe the edges as you see fit. My deflection figures are given and I would not exceed them on the first time around.
Cutting & Sewing
Cut four body sections and four wing sections from 3/4-oz. cloth. For sail edge binding, cut at least 16 pieces of 1/2” x 41” and four pieces of 2” x 41” from 1-1/2-oz. cloth. For reinforcements, cut two 4” x 4” pieces of 4-oz. Dacron.
Fold and crease the 1/2”-wide strips to make 1/4”-wide edge binding. I use zig-zag stitch, 5mm wide, 2.5mm long, to sew this binding on, and “ psh to fit” around curves. Practice on extra fabric, go slowly if you have to and don’t worry if it doesn’t come out perfect the first time. When you are comfortable with the process, bind all three edges of each wing panel and all body panels except the inside straight portions. Do not sew the binding strips end to end because it will create a weak point in the sail; binding ends should overlap about 1/2”.
In the center of two of the body panels, sew on the Dacron reinforcement patches, folding them over the edges so that both sides of the sail are covered by a triangle of Dacron (Detail D). The patches should be securely stitched down around their perimeters and then the centers cut out, leaving a 1/2” border. These two body panels will go on the back of the kite to allow the cross-spar to pass through the body.
Next, sew the four pieces of 2” x 41” 1-1/2 oz. cloth together end to end so that you end up with two pieces that are 2” x 81” or longer. This makes two binding strips.
Joining the Body Panels (Tricky Part)
Leaving four inches loose and extra at the nose, line up one 1-1/2 oz. binding strip along one side of a body panel. Sew these two pieces together 1/2” in from the edge of the body panel. You should have plenty of extra at the tail. Fold over and sew a flat fell seam to complete the stitching. Line up a second body panel on the other side and repeat.
Now make a second one. You will be joining the two back pieces (with the Dacron patch) and then joining the two pieces of the face. The resulting pair of body panels should each have a 1”-wide piece of 1-1/2 oz. ripstop between them. They should from a two-dimensional outline of the when you are sewing one panel to another you line them up carefully so that the two sides are not staggered.
Now you have two pieces, a back and a face. The nose and tail need to be finished before they are joined. For this finishing, I fold the binding fabric to follow the curving lines of the body panels. At the nose, I fold the tip back to a 1/2” square. I cut off the excess and hem the ends.
Casing the Spine (Even Trickier Part)
The body will have a 1/2”-wide casing down its center length to hold the spine when you are finished. To join the two halves together, I start with (can you believe this?) glue. I use a water-soluble glue stick, smear some along one side and smack the two pieces together. These must be aligned carefully. The glue will not dry anytime soon, so you can spend 15 minutes lining up the two pieces and letting them set just enough to hold.
Now I stitch a seam %” in from the edge of the binding, down each side (Detail B); the body is securely joined. I sew the nose shut but leave the tail open.
Extract excess glue left in the spine casing by inserting a piece of dowel, pulling it out and wiping the glue off with a damp towel. Once is usually enough, but two or three times is recommended to to be safe.
Finishing
At this point the kite is nearly done. I use a number of favorite finishing techniques. One is to sew tabs onto every joint except the nose and then tie the pieces together with loops (Detail C). The tabs I prefer consist of 5″ pieces of 120-lb Dacron line, sewn to leave a 1″ loop extending from each point, and two 1-1/2“lengths sewn in along the the binding tape of the kite.
The loops that hold this kite together should be of uniform size. I use 1″ loops or 3″ of line. Make sure that at the tail of the center spine you sew two strips about 6″ long (Detail E). This will need to be beaded and knotted so that the sail can be pulled taut along the spine. I also tie the wingtips together with 6″ tabs (Detail A) so that the wings can be pulled taut and adjusted.
Sparring
Drill out arrow nocks to fit your spars. Drill 1/4” deep so that they fit snugly. I have found that the drill bit I use makes a fit so tight I do not need to use glue. If your nocks fit too loosely, glue them on with a little cyanoacrylate.
For the spine, use two dowels, joined together with ferrules. I taper one end of each dowel to fit my ferrule, then glue the ferrule on.
For the cross-spar, use three pieces of 1/4” O.D. graphite tubing. Join the three pieces with ferrules to make a cross-spar 83″ long. The two outside pieces are slightly tapered at one end to fit the arrow nocks. (I use my pencil sharpener, but a file or sandpaper would do.) Then the nocks are glued on.
For the wing tensioning spars, with arrow nocks at each end, use two .180 O.D. tubes 30-1/2″ long on each side of the kite, forming an X to hold both the body and the wings open.
Tying It All Together
After tying the wings together at the outside tips, tie them to the body with the 1″ loops (Detail C). The cross-spar nocks will slip onto these loops. Adjustments may be made by beads and knots placed on the tail of the body for the spine and on the wingtips for the wing spars. Where the spar crosses the spine and where the wing-tensioning X’s cross the spar, you may fasten them together with 1/2” O rings. These will not provide any structural support, but they will help the kite hold its shape and not knock about as much in the sky.
Note: The cross spar nocks should seat in the connecting loops just beyond the body of the kite. This is necessary to get the sail taut without puckers. The points of tension must be beyond the sail. If you feel that a frame should always be within a sail, then I am sorry. This is a kite in which the sail rides inside the frame.
Bridling
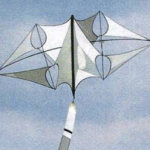
The Cross Deck will fly from a two-point bridle, but I recommend outfitting the kite for both two and four points (see Bridle Detail).
I like to build what I call a two-stage adjustable bridle. I use two-leg bridles (a) from side to side at both the fore and aft bridle points. These are then connected by a larkshead knot to a fore-and-aft line (b-c). A short length of line (d) is then connected to the b-c line by a larkshead which can be positioned up or down for pitch (or attitude) adjustment. Pitch will be sensitive to wind speed.
My bridles have clips, one at each point of attachment to the kite and one at the towing point. I make the bridles separate from the kite so that I can display the kite without them.
FLYING
In steady winds, the Cross Deck will fly fine without a tail and will fly best from a two-point bridle. In rough winds, it will fly best from two points with a tail. In very light winds (my range) it flies better from a four-point bridle.
I do not know the kite’s upper wind limit; I have never wanted to find out. Play around with it and do what you feel is best.
FINAL COMMENTS
I built this kite as a sculpture. I was willing to sacrifice wind range and stability to the aesthetic that I was seeking. I retained enough of the flight elements to allow the kite to fly. My main goal was the appearance of the kite more than the actual flight. It turned out to fly well anyway.
These are the plans for a single cell of this kite. Combining cells of different sizes and shapes is where the real action is.
HISTORY OF THE CROSS DECK
I include this because for many of my kites, how I come about the kite is nearly as important as how I build it.
To start, this kite is a mistake. It is not supposed to exist. It all started when I met Ron Gibian of Visalia, California, who not only knows how to sew, but also makes kites from time to time. Ron had this little green compound Eddy thing he was trying to fly. He convinced me that I should explore some cellular kites. “They are going to be the future, you know,” or so he said.
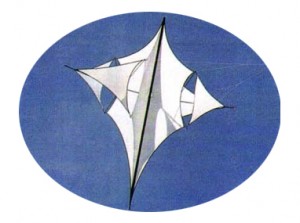
So I went home and built a cellular kite. It was going to be my third cellular kite, after a 3:1 high-aspect-ratio tetrahedral and a 24-cell 16’ x 14’ tetra. The kite that Ron inspired me to build is what I call the Triple Deck, which was the predecessor to the Cross Deck. It is a little too heavy on the Zen side of things to be easily described. I use the term Zen only for the aspects of designing kites that I do not yet fully understand. Suffice it to say that a lot of my designs just “feel right” and I don’t actually know why I build them the way I do. Blah, blah, blah…
Well, after I built the Triple Deck, which I felt to be a most unique design, I was lying in bed unable to sleep when a mutation of the design floated through my mind. It was a simple shift of tension points along the sails of the Triple Deck that not only vastly simplified the architecture of the kite, but would add to the stability of flight and provide much of the same aesthetic appeal. A translation of the sail, retention of the old frame, and Bingo! New Kite, or so I thought.
That was the birth of the Cross Deck.
A couple of months later, at Long Beach, Washington, someone came up and told me that Ron Gibian had built a copy of the Triple Deck. I walked over and there was the green Eddy thing. Fair to Ron, his kite did come first. Fair to me, in my failure to accurately recall Ron’s kite, and in the generation of my own version, I had come up with an excellent example of convergent evolution.
The architecture and sail forms of the two kites are independently derived and distinct. The kites don’t even fly alike, but we are both aiming at the same target and if anyone ever asks, I will say that it was Ron’s idea first, and it was.
Maybe in a year or two we will build the exact same kite.
KITEMAKING WISDOM
When it doesn’t work, try to understand why. You would be surprised at how many people will try to sew something and, at the first snag, give up, thinking it hopeless. Really.
Try adjustments in needle size, thread tension and how you move anything, If you try and don’t succeed, try something else until you find something that works.
Or call someone to ask how it is done. (A Telephone bill can be the most expensive part of building a kite.)
Carl Crowell
This article was reprinted with permission from Volume 10, Issue 2
(Summer-Fall 1993) of Kite Lines magazine, available in our archives.


