Whether the Marconi-rigged kite actually gets added performance from its overlapping jib and Venturi slot is questionable. However, there is no denying that it is a spectacular looking creation. This is especially true of the Four-Masted Schooner by Arthr Kurle*.
 It can also be said that the construction is rather complicated. One might hesitate to risk so much labor, time and material in real gung-ho kite building for fear of loss or damage.
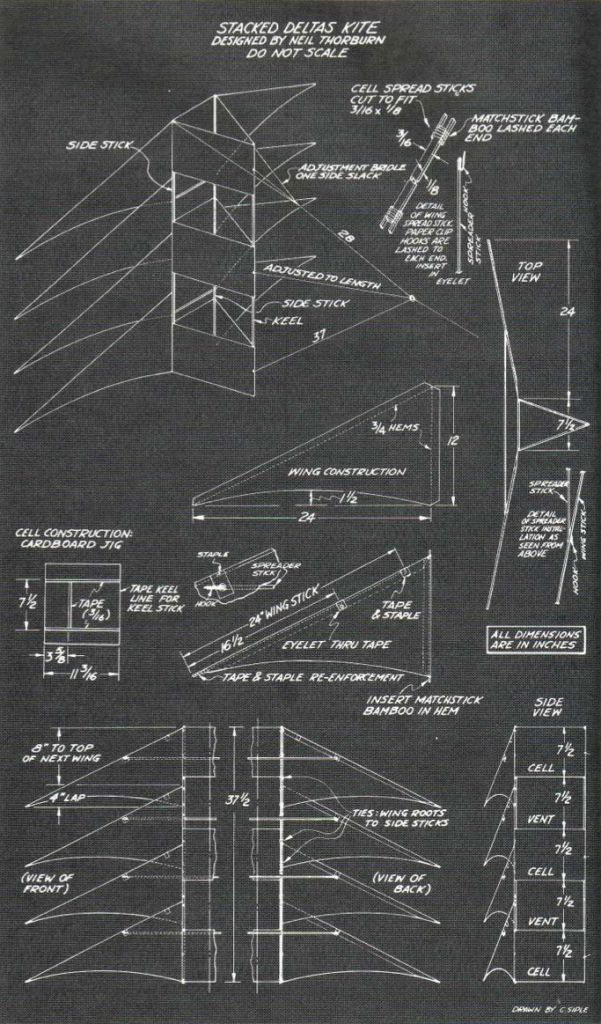
Stacked Deltas is an attempt to create the appearance of the Schooner without the complexities in construction. I decided on a three-cell box of this size to limit the wing spread so the spreaders could remain light. Food storage bags in Mrs. Thorburn’s kitchen seemed a reasonable size for the cells, though the design should lend itself very well to other coverings, such as rip-stop nylon. An aspect ratio of two to one looked pretty rakish in my drawing, and I came up with nice even measurements of 12 and 24 inches.
I think this kite also has its own Venturi effect, though I haven’t been able to test it in a wind tunnel. In ordinary flying, though, it is good in both light and strong winds, flies at a high angle while keeping the string taut, and shows no annoying idiosyncracies in flight.
*Lee Scott Newman and Jay Hartley Newman, Kite Craft (New York : Crown, 1974), pp. 187-188.
MATERIALS
- Wing covering : 24×30” white plastic kitchen trash bags.
. - Cell coverings : 11” plastic food bags, such as Baggies or Glad Bags. (The trash bag plastic could be used but would have to be seamed.)
. - Sticks, 3/16 x 3/16” spruce, pine or other straight grain wood. Cut 8 pieces 24” long for wings; 3 pieces 37-1/2” long for framing of the triangular cells (2 sides and keel); and 2 pieces about 7-1/2” long for cell spreader sticks (cut to fit tightly after kite is built)
. - Wing spreader sticks, slightly heavier, 3/16 x 1/4” wood or garden stake bamboo, each 27” long.
. - Matchstick bamboo: 8 pieces 13″ long for wing hem inserts, and 8 small 1″ pieces to be lashed onto the cell spreader sticks.
. - Miscellaneous : strapping tape, staples, drapery hooks, needle and thread, felt tip markers and tail material .
INSTRUCTIONS
- Cut the wings one set at a time from the folded bags and hem as shown using tape or a heat-sealing method.
. - Staple the wing sticks through the tape patches after they have been inserted in the hems.
. - Slip a piece of matchstick bamboo into each 12” hem and tape the ends to the wing while stretching the plasticslightly.
. - Reinforce the cells as shown with narrow strips of strapping tape at the top and bottom perimeters and also the length of the cells at each frame stick location (in thirds) . This can be facilitated by slipping the bag over a cardboard trimmed to the width of the bag.
. - Staple the cells through the tape strips to the side sticks and keel sticks of the triangular box . (An ordinary office stapler works very well for this task.)
. - Starting at the bottom, tie each set of wings to the side sticks of the box section by sewing around the matchstick bamboo strips and tying securely. Overlap the next set of wings 4″ over the bottom set and tie them to the center section. Continue this process until the wings are in place.
. - Attach wing spreader connections using eyelets and drapery hooks or whatever you prefer to make spreaders. The triangular box may also be braced with four spreaders between the side sticks. Let the keel float free.
. - Tie the bridle as shown. The bridle strings from the side sticks at the top are only necessary if the kite does not fly straight . (This is an old trick on Filipino kites. Tightening the right string will cure a left hand lean and vice versa.)
. - Decorating can be done with permanent ink felt pens for a vivid appearance in flight. Two tips: the big fat markers lately imported from Japan have broad tips and speed up the process. If the colors seem a bit pale, color both sides of the plastic to increase the intensity.
. - Gussy it up with tails if you like. I used 2 pieces of surveyor’s tape about 42″ long at the lower wing tips.
FLYING NOTES
 This kite is a good performer in winds from 3 or 4 miles per hour, and the nice surprise is that it turns out to be an excellent strong wind kite, flyable in velocities as high as 25 miles per hour. It will achieve vertical flight in thermals and hold up a lot of string.
I use about 1000 feet of 15-to 25-lb. test monofilament.
VARIATIONS
Though right now Stacked Deltas seems like an ultimate design, next year I might come up with another design to make me neglect this one.
Of course, variations of this plan can be made with wings of different sizes on the same kite or a different number of wing sets than four, such as…
This article was reprinted with permission from Volume 1, Issue 4
(Winter 1977-78) of Kite Lines magazine, available in our archives.


