Leaderboard


Popular Content
Showing content with the highest reputation on 05/12/2021 in all areas
-
Good coaching, thank you!1 point
-
I'm back from my weekend trip. I used an adidas Unisex Utility Wheeled Bat Bag with my OSKUSA Quad Kite Roll-Up Bag inside. I had to cut out one of the inside pockets of the bat bag in order to be able to fit the quad bag inside, and it just barely fits lengthwise. I packed my other clothes and gear loose around the quad bag. I packed for three days, but I easily could have fit twice the clothes or more. Next time I might try some internal stuff sacks or bags like what JB mentioned in the old post I referenced, because by the time I got to Long Beach, my clothes were sort of jumbled all over the place. Not a big deal, just a little annoyance. When loaded, the bag won't stand up on its own. If I needed to stand it up, I had to turn it around and lean it against something to keep the wheels off the ground. Other than that, I was happy with it. I checked the bag; it wouldn't work as a carry-on.1 point
-
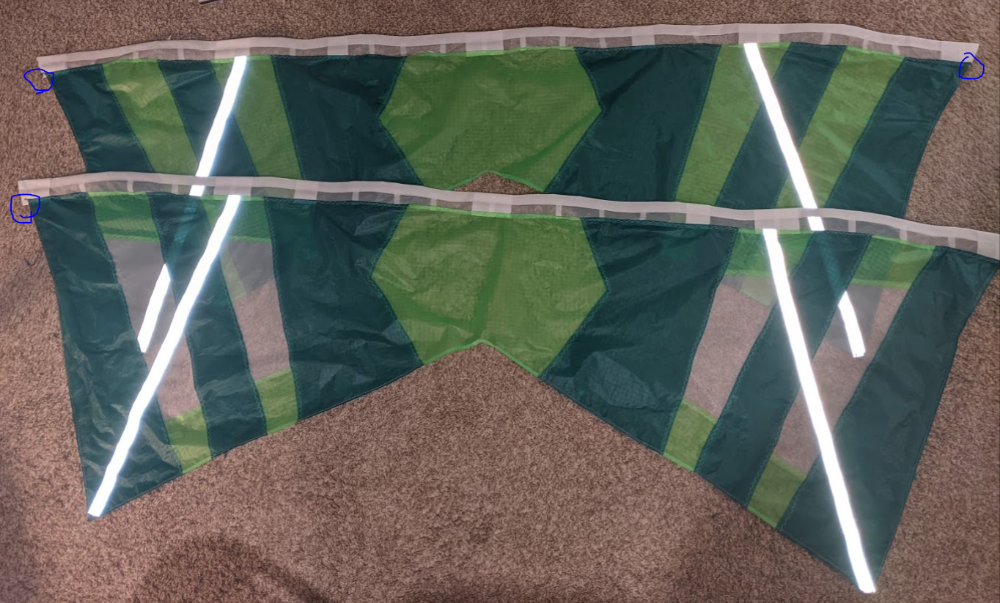
Done with the other leading edge. It only took about 2 hours this time. This bit right here has been the hardest to sew in each one, followed by the end tip: It's the reflective tape on the front, Dacron stretch strip in the back, Icarex from the body, plus 2x Dacron (4x in the overlap) for the leading edge, and the mesh which isn't difficult ... all of that tripled because it is a folded hem. 24 layer thickness. Every step I needed to manually push the needle down while turning the machine's wheel, and manually help pull it back out. Some required driving a hole through it gradually to get through all the layers. Same with the two pieces at the end with all the folded over bits to make a non-fray corner, lots and lots of layers mean I'm basically manually stitching each one of the triple zigzag. So the sails are basically complete. There is certainly room for improvement, those tiny white corners on the leading edge bug me. I think next time I'll need to make the LE about an inch narrower, which should help it on either side. Stitching isn't perfect, but should be adequate. I'm likely going to be the only person most concerned about how some of the zigzag stitches are narrow, some wide, some rather strange looking. But it should hold: Even so, that's some more checkmarks down the long list: ✔ Figure out paper prototype dimensions ✔ Cut and tape paper prototype ✔ Verify paper prototype, refine template ✔ Cut pieces for full sail ✔ Sew full sail body ✔ Cut pieces for vented sail ✔ Sew vented sail body ✔ Prepare reinforcements ✔ Sew reinforcements on both sails ✔ Sew hems on both sails ✔ Apply fray check and check all the details ✔ Cut leading edge pieces ✔ Sew both leading edges ✔ Attach both leading edges ⬜ Sew on LED light strips on both kites ⬜ Final soldering for joints on LED light strips on both kites (48 solder joints. Eeek.) ⬜ Tie bridles ⬜ Attach bridles, elastics, and endcaps ⬜ Create kite bags for both kites

 1 point
 -
None whatsoever, my favorite kites are decade old and still in the van, used weekly any weather1 point
-
I don’t get to the beach very often but when I do i want every hour I can and it always pays off. This time it’s the monkey bars maneuver. After years of wanting to get this move, it finally clicked. Anyways here is the last 10 minutes of me enjoying a heavenly breeze on a beautiful morning. Sent from my iPhone using Tapatalk1 point