
jmaldo100
-
Posts
26 -
Joined
-
Last visited
Content Type
Profiles
Forums
Gallery
Events
Downloads
KL Shop
Blogs
Articles
Classifieds
Community Map
Posts posted by jmaldo100
-
-
Congratulations!
Sent from my iPhone using KiteLife mobile app-
 2
2
-
-
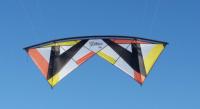
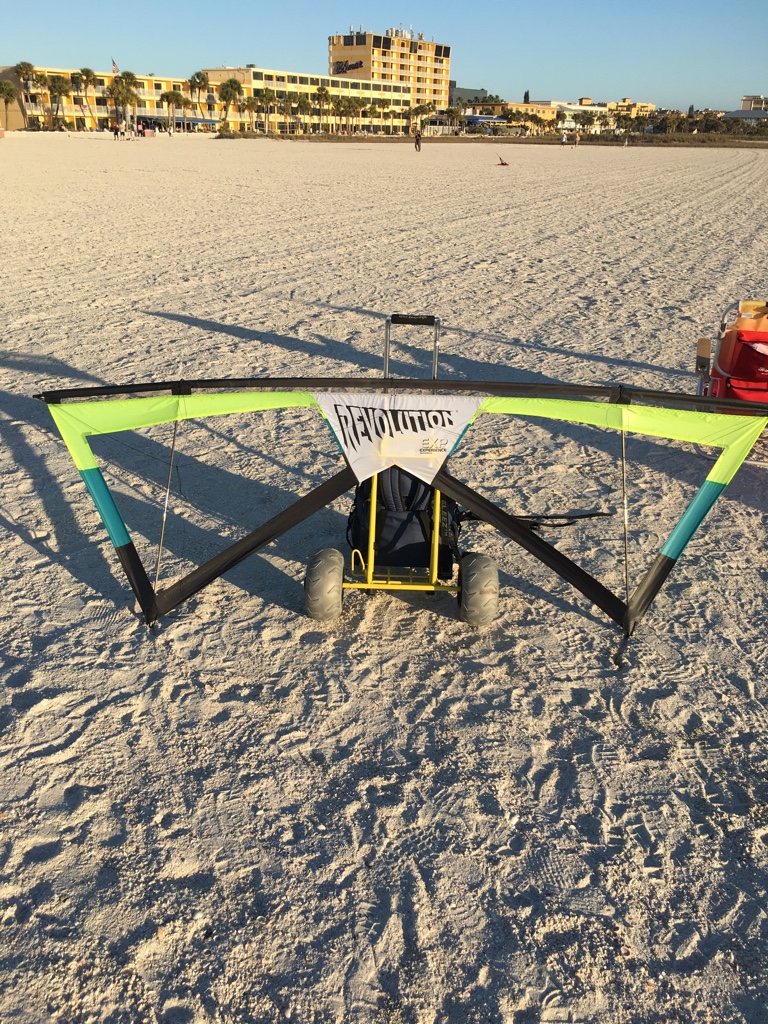
I called the kite Revi because it has the revolution logo on it
Sent from my iPhone using KiteLife mobile app -
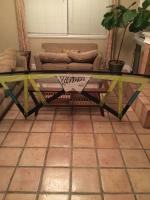
The Vicky at low altitude looses lift if the winds are not strong enough. I added a strip on the down tube but the material was folding over so I added the mesh to maintain its shape and create some lift. It did stop the fluttering and it still has more than a full vented kite. type
Sent from my iPhone using KiteLife mobile app-
1
-
-
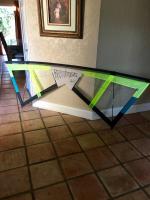
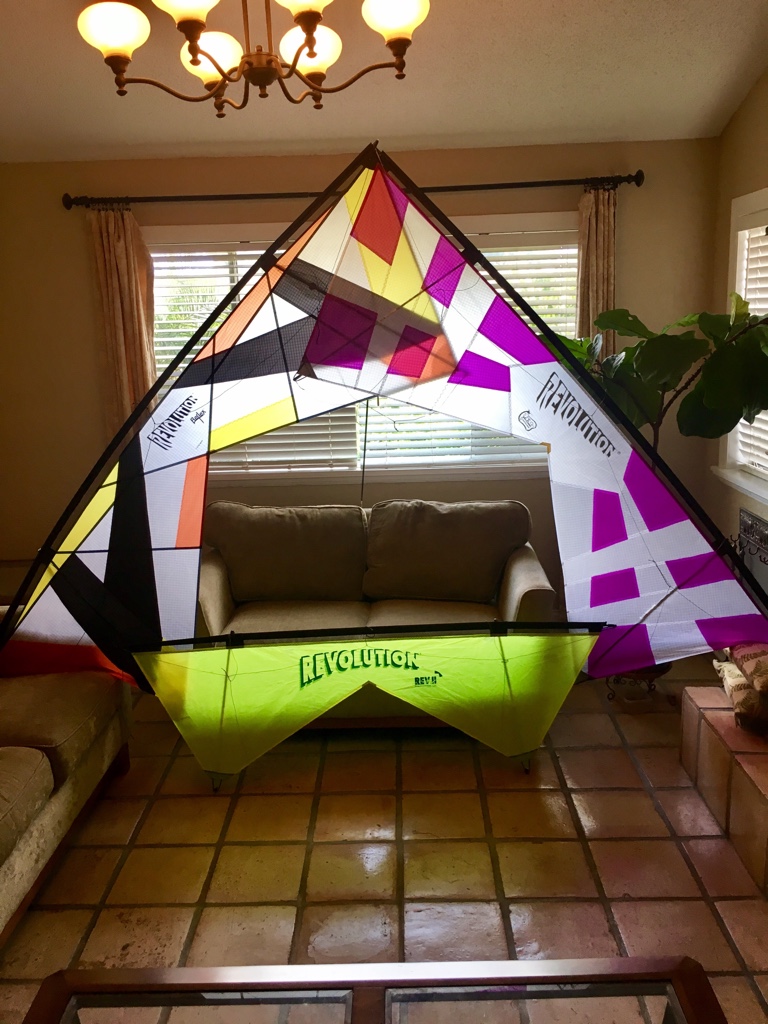
 added more material to gain control and screen at the ends
Sent from my iPhone using KiteLife mobile app -
I need to win! I need to stack up on my collection you guys have a collection. Purple I love purple.
Sent from my iPhone using KiteLife mobile app -
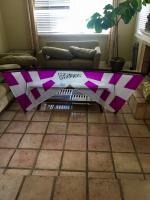
 I added the center strips to stop the fluttering
Sent from my iPhone using KiteLife mobile app-
2
-
-
-
good looking kites!
Sent from my iPhone using KiteLife mobile app -
I got the meaning thanks
Sent from my iPhone using KiteLife mobile app -
Stellar work?
Sent from my iPhone using KiteLife mobile app -
What is the OP next to my name
Sent from my iPhone using KiteLife mobile app -
I am planning to purchase and Elliot Shook 75% kite
Sent from my iPhone using KiteLife mobile app-
1
-
-

Sent from my iPhone using KiteLife mobile app
-
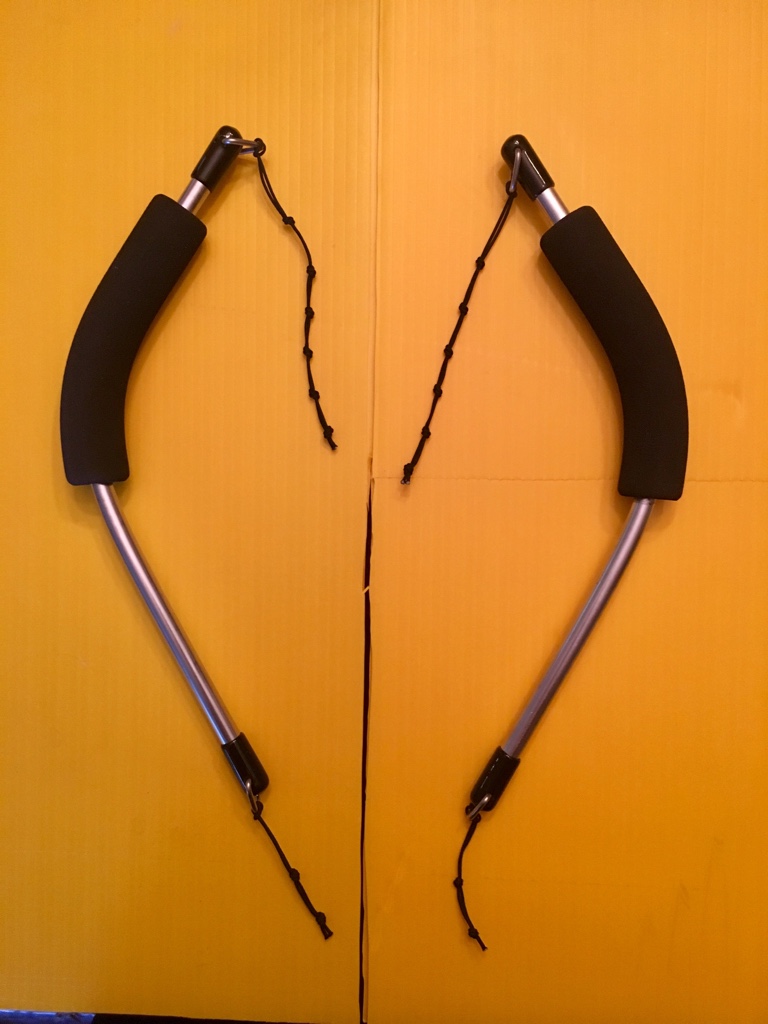
Hello i met jinx today she took a picture of us together. Question when you buy the handle leaders from JB do they come in a pair top and bottom left and right.
Sent from my iPhone using KiteLife mobile app-
1
-
-
I'm going to duplicate the knots on the reflex handles same as the B series. That way I could start modifying to B handles and to make them snagless
Sent from my iPhone using KiteLife mobile app-
1
-
-
On the Reflex handles - try going out as far on top from the handle tip as you can and work back towards it as you find your "sweet spot". Then as you get used to that, try letting them out a knot - unless you start all the way out! - and each time see how it works. You should find yourself pretty much out on them!! Haven't seen the latest version of the Reflex handles, so not too sure on the adjustments to those, I use snagless myself. Your other handles are easily converted to no-snag, takes less than an hour to do a pair. With practice I take less than a half hour.
The handles on the reflex are identical in shape and size, I have to replicate the knot system from the B series to the Reflex handles they are snagless and made from carbon fiber.
Sent from my iPhone using KiteLife mobile app-
1
-
-
I have the handle that came with the reflex carbon fiber ones that are snag less they seem to be the same size but the leaders have different knots settings.
Sent from my iPhone using KiteLife mobile app -
On February 2, 2017 at 10:19 AM, makatakam said:Hi, jmaldo100, and welcome to the forum.
It would be good if you would post a photo of the handles that came with it. For the first flight, and this is a very general rule of thumb, set the bottom lines on the knot furthest away from the handles, and the top ones about the middle knot. Once you've had it airborne and can control where it's going, (this make take a couple of hours, a couple of days, or a couple of weeks depending on how easily it comes to you), you can put the top lines on the knot furthest out and try to launch. If you can't get off the ground, move the lines in toward the handles one knot and try again. Repeat until you can launch. As you gain experience you will be able to use those knots where you initially couldn't launch.
Bringing the bottom lines in towards the handles has the same effect as letting the top ones out, (adds braking effect) and can be accomplished by moving one or the other, or both for maximum effect.
Watch the beginner tutorials before you fly and you will have a much easier time of it. Watch them several times, especially setup and breakdown, line management, and tuning adjustment. Treat what JB says as Gospel. It will serve you well. You will have plenty of time to develop your own style once you master the basics. Also remember that all those twists that APPEAR to be in the lines when you lay them out are not really there and 99.9% of them will disappear when the lines are tensioned. Do not try to untangle/untwist until you have tension in the line, and keep them under tension as you remove the one or two that may be present. Watch that video and then watch it again, and again, and . . . . .
Have an experienced flyer help you the first few times out if possible. It will save you a lot of grief. Click the map tab above to see who may be nearest you and send a PM. Kite people are a friendly bunch and always willing to help someone starting out, so let us know where you are and we can recommend someone to contact, and post a photo of the handles and the kite, too, if you wish.
Lastly, browse the beginner section of this forum for plenty of additional info, and keep an eye on this topic you started, as others will surely chime in with additional advice.
Have fun, smile and don't forget to breathe.

Sent from my iPhone using KiteLife mobile app -
Try adding that step back! Tighten the lines and step back as you move the thumbs to launch position. The purpose of the longer top leaders is to give you back some of the control you lose by going too "in". Launching is just the start - why base all your setup around only one facet of flying??
Sent from my iPhone using KiteLife mobile app -
Try going out as far as you can on the leaders. Try launching, if too hard or no go, move in a knot. Keep this up til you can launch. You may need to add a step back into your launch routine to make it work. Leaving the lines out towards the ends will increase your control, especially if the wind gusts. You take control, not let the kite do as it wants!
I live in Orlando Florida and the winds here I'm not as strong I noticed with the reflex I had to move the knots closer in on the top to get it to launch. I joined club 38 I'm working on my third pin.
Sent from my iPhone using KiteLife mobile app -
On February 2, 2017 at 2:51 PM, Wayne Dowler said:Is that your kite? Not a "B" series at all, but a Reflex.
Sent from my iPhone using KiteLife mobile app -
My Reflex
Sent from my iPhone using KiteLife mobile app-
1
-
-
Hi, jmaldo100, and welcome to the forum.
It would be good if you would post a photo of the handles that came with it. For the first flight, and this is a very general rule of thumb, set the bottom lines on the knot furthest away from the handles, and the top ones about the middle knot. Once you've had it airborne and can control where it's going, (this make take a couple of hours, a couple of days, or a couple of weeks depending on how easily it comes to you), you can put the top lines on the knot furthest out and try to launch. If you can't get off the ground, move the lines in toward the handles one knot and try again. Repeat until you can launch. As you gain experience you will be able to use those knots where you initially couldn't launch.
Bringing the bottom lines in towards the handles has the same effect as letting the top ones out, (adds braking effect) and can be accomplished by moving one or the other, or both for maximum effect.
Watch the beginner tutorials before you fly and you will have a much easier time of it. Watch them several times, especially setup and breakdown, line management, and tuning adjustment. Treat what JB says as Gospel. It will serve you well. You will have plenty of time to develop your own style once you master the basics. Also remember that all those twists that APPEAR to be in the lines when you lay them out are not really there and 99.9% of them will disappear when the lines are tensioned. Do not try to untangle/untwist until you have tension in the line, and keep them under tension as you remove the one or two that may be present. Watch that video and then watch it again, and again, and . . . . .
Have an experienced flyer help you the first few times out if possible. It will save you a lot of grief. Click the map tab above to see who may be nearest you and send a PM. Kite people are a friendly bunch and always willing to help someone starting out, so let us know where you are and we can recommend someone to contact, and post a photo of the handles and the kite, too, if you wish.
Lastly, browse the beginner section of this forum for plenty of additional info, and keep an eye on this topic you started, as others will surely chime in with additional advice.
Have fun, smile and don't forget to breathe.
 I will follow up with the handle photos but they're the standard handles that came with the B series kite.
Sent from my iPhone using KiteLife mobile app -
I appreciate all the information. I did go through the video and watched everything John had to say it was very informative. I've been flying for about a year on two line kite. I own a total of eight kites which three of them are from Revolution. I have a 25-year-old rev 2 kite that Dave from revolution taught me how to fly it and I bought the new reflex and now the B2 Series. I will be going to the Treasure Island FL. event this weekend on Saturday, time to have some fun and fly the new kite.
Sent from my iPhone using KiteLife mobile app-
1
-


75x Dermer DIY Kite Kits (7/30/17)
in Current Drawings
Posted
Thank you so much !

Sent from my iPhone using KiteLife mobile app