Now to touch on one of the most challenging aspects of kite flying, light or non-existent wind! With lighter kites than we’ve ever had before, the only thing that stands in the way of flying are a few straightforward techniques and a bit of practice.
This article is targeted more so towards the beginner or intermediate flier that is looking to find their comfortability in any wind speed, but anyone might find something of use here.
I started flying in Berkeley California, where the winds average 15-20 mph during the summer and then plummet to 0-3 for a good portion of the winter months… Being a full-fledged kite addict and still learning, I still spent nearly every day at the park running around with my kite trying to make it fly at a time when they weren’t making things as light weight as they do today.
As a competitor, I’ve found the time spent flying in light wind conditions to be invaluable, providing me with the utmost confidence in extremely light winds… Sometimes even exciting me to “push the envelope”, enjoy the opportunity, and to rise to the challenge.
Ultra lights don’t quite have the same momentum when you do tricks however, so I’ll sometimes push that extra bit on a standard or mid-weight kite just to get the handling that I’m looking for… For personal use, I generally prefer kites that have a deeper sail, giving them more surface area for the same frame weight, thus more lift.
Regardless, the actual flying techniques are essentially the same in 0-3 mph conditions…
Launching
While it may seem like the simplest aspect, the launch is often an indicator of the technique you’ll be using in the air…
- If you do the usual pump back and release, you’ll give the kite a great launch into the sky and promptly take away all the lift you’ve generated upon letting your hands back out in quick fashion.
- Or, if you just start walking back as if there’s enough wind, the kite will generally not initiate sufficient lift to gain forward drive… The kite hesitates, floats, and just might go with luck.
 My preferred method in any wind condition is to launch affirmatively with a swift pull back past my hips, and walk backwards while my hands are slowly letting out… This gives lift, doesn’t jolt or stall the kite, and allows me to keep tension on the lines.
Staying in the air
 Tension on the lines, key to the whole endeavor… Once launched, I keep a fingertip on each of the lines and press against them using my fingers as sensors.
As the kite is headed in any semi-upward direction, I keep tension on the lines, perhaps moving back slightly to enhance the pressure… As the kite reaches the upper region of the sky, I’ll maintain the pressure through my turn until the kite is headed downward at which point I can relax my arms and move toward the kite with body and hands.
Again, this is the key to everything… Without rushing or exaggerating the motion, keep the lines just taut enough to hold onto your lift, and try to give on the lines only when the kite is pointed downward or you’re looking to stall.
Another technique you can apply is to give the kite a little extra tension through any turn (particularly sharp ones), giving the tension back on the downward swoop.
Gaining ground
Now, you’ve got the kite to stay in the air, but you look up and find you’ve wandered 100 feet back on your field and you’re running out of room…
Use the tension or taut lines to get the kite to the top of your wind window, all the way through your turn at the top until the nose is pointing downward. At this point start moving forward and giving slack to the lines (both equally)… Do it gently at first, you’ll notice the nose of the kite will tend to float out away from you and the tail will start to point towards you.
This position allows the kite to slide down the wind away from you, presenting more surface area to the wind it’s pressing against and slowing it’s descent.
After a few tries, you should be able to gage the amount of slack or forward running you can do before the kite flips and loses it’s orientation… When done properly, you can gain 100 feet of field back in a single jog!
Keeping your ground
Now you know how to keep wind in the sails, and get your ground back… How do we tie it all together dynamically so that you can stay within the same relative area of your field at all times?
The best visualization that I can provide is rowing a boat…
- Fly the kite straight up about 30 feet while applying tension and moving back a few feet…
- Then, keep tension while you turn downward and take a few steps on the way down only once your nose is pointed straight at the ground…
- Apply tension just before you start to turn back straight upwards, and keep the lines taut while you’re headed back up…
- Repeat as needed.
While that may seem like an overly simple thing to do in the sky, it incorporates the basic components:
- Managing your field
- Keeping the kite in the air
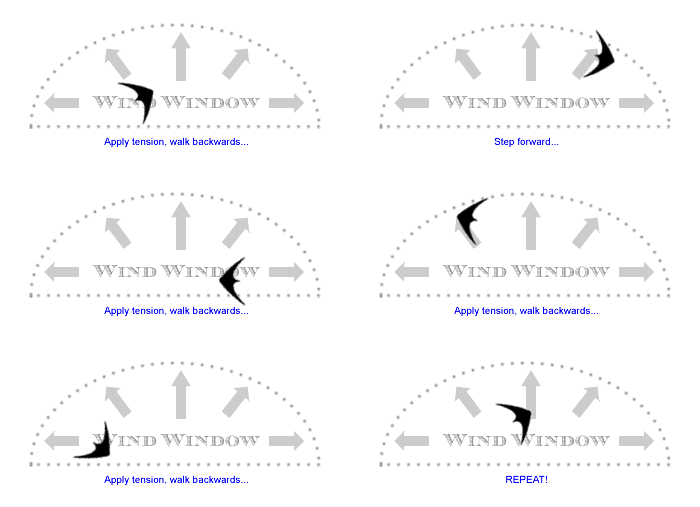
Another way this can be done is by flying an infinity 8 using the same techniques… See animation below.

If you to do either of these drills, heading up and down alternately a few times, you’ll start to feel the give and take… Like rowing a boat! Now, after about 30 times or so you might throw in another maneuver or two, applying the give and take depending on whether your nose is pointed up or down.
Powering up
Okay, so you’ve got the kite totally under control and are enjoying your new confidence… How can you “whack it” (i.e. Brian Champie), or get into the moves you usually need more wind for?
It’s about transition! As you’re approaching the spot where you want to whip out your latest high speed flight combination, take 10-20 steps backward as you begin and go through it… You’ll notice that the kite feels like it’s got 3-4 mph more wind, allowing you to be more aggressive in your movements as long as you’re moving back.
Once you’ve completed that “set”, get to the top of the window and gain that ground back… So, in light winds you’ll often see more experienced fliers transitioning between high power sequences while they move back and more subtle movements while the they move forward and gain ground, managing the same 20-40 feet the entire time they’re flying.
Another thing you can do is walk to the right while your kite is on the left, walk to the left while your kite is on the right… Thus increasing the range in which you can apply tension to the lines without using up a whole lot of ground.
360’s
Yes, sometimes the conditions are just so bloody light that it’s nearly impossible to maintain your ground, but you might be absolutely determined to keep flying, or maybe you’re backed up against the rear boundary while flying in competition… This is when the 360 comes in handy, and might very well save your skin!
Start the kite flying towards one side, in this case we’ll say the left. As the kite gets further into the edge of the wind window, start walking to the right, slowly building up to a jog… At this point I’ll generally put both my hands near one another by my left hip so that my chest is pointing more towards where I’m running (which makes fast movement easier).
As you build up speed, you’ll feel the added power in the kite even though it’s now probably outside of what you thought was your wind window… And the kite is still going!
Now as the kite starts getting around “behind” you, you should be curving your running path around so that you and the kite are essentially circling each other, and you’re always moving away from the kite… The principle of the 360 is to run faster than whatever wind is actually present. If there’s 3 mph of wind, you’ll need to run a minimum of 6 mph so that you ‘re going 3 mph faster = 3 mph wind as you come around the back side of your 360.
Bending the spoon
Those of you who are Matrix fans will understand, there is no spoon… Visualize the relatively still air as a solid jello substance, and always be pulling the kite against it or float through it. Although it’s not really moving, all you have to do is move your kite against the wind and you have power!
Like anything, the key is not to have any doubt that it’s possible… Commit to whatever you’re doing, and decide beforehand that you will apply the needed techniques before long.
I hope this has been of use to some of you… It’s hard to summate through print and pictures, but it should give you a head start until you find the time to get in some practice or spend a few days flying with others who are adept in these challenging wind scenarios.
No matter what, don’t hesitate to ask questions… Kite fliers are generally, by their very nature, generous and willing to share their experience, so take advantage!
Most of all, take those light winds and make wine… The sky is your oyster, with pearls in every aspect.
Good winds,
John Barresi

