Article by Dick Barnes of Pizazz Kites
- Overview
- Part One: Tools and Supplies
- Part Two: Cutting the Sail
- Part Three: Applique
- Part Four: Sewing the Sail
- Part Five: Making the Leading Edge
COMING LATER, Check back Often:
- Part Six: Attaching the Leading Edge
- Part Seven: Attaching the Trailing Edge
- Part Eight: Attaching the Nose
- Part Nine: Cutting the Frame
- Part Ten: Tying the Bridle
Overview
Okay, here’s the deal. This is sort of a follow up to Richard Gareau’s page with a twist. My expertise lies totally with sportkites, so we are going to build a sportkite. After we are done, someone else will author this page and we can build something else. I’m sure that Graeme Poole will help us all build a dragonfly kite, and I’m thinking that other kite makers will share their experiences in making the kites they specialize in. Who knows, maybe we can coax Ron Gibian into teaching us to build one of his masterpieces.
This is meant to be an interactive page. I will tell you everything I know about the Pizazz (that’s the kite I market) and I hope that all of you will feel free to share your experiences.
Here’s what you get: All the measurements for the Pizazz, all the sewing techniques I use, all my little tricks, and for a small fee I’ll ship you the precut sail pieces so you can sew along! (see below)
We are going to start right at the beginning and work through the final product. The pages will be set up as an interactive book so everyone can just click on parts that are of the most interest. I expect to update daily and hope we can generate some worthwhile discussion of kite making there.
The Pizazz is the property of Pizazz Kiteworks (that’s me) so you don’t have to worry about anyone whining. I do ask you though, please, make yourself a Pizazz or two but don’t sell them, that’s my job!
Here’s how to get started.
Option 1. If you want to build this kite entirely from scratch, ask me for paper templates. I will send you full scale drawings of the sail pieces. This costs you $2 plus $3 shipping in the U.S.
Option 2. If you would like me to supply you with precut sail pieces email me and ask for a precut sail. The precut sail includes all the parts necessary to complete the sail and bridle. You will have your choice of sail materials and colors. The precut sail is available in 3/4 ounce porcher nylon for $20.33, toray polyester for $21.80, and polycarbonite icarex for $25.43. Please add $3 for shipping in the U.S.
Option 3. If you would like me to supply you with precut frame pieces email me and ask for a frame kit. The frame kit includes all of the parts necessary to frame the kite and are precut to size. You will have your choice of framing material. The frame kit is available with GForce UL or Skyshark 3PT for $60.27, AVIA Super Skinny (SUL) for $66.04, Skyshark Response Zero Gold for $86.16, AVIA pultrude 2200 for $22.04, AVIA 2300 for $25, or AVIA 2400 for $25.96. If you would like just the hardware kit and use your own spars it will be $6.16. The standoffs are included in the hardware kit. Please add $3 for shipping in the U.S.
Only include $3 for shipping once. All parts will be sent Priority US mail. The template and sail pieces will be rolled, not folded.
These prices are eligible for AKA member discount.
Tools and Supplies
Tools
I sew on a 4′ x 6′ bench I made and use an old sliding glass door (less the framing) for a surface. Let me say right now, a razor blade will scratch the surface of the glass and over a period of time make it nearly impossible to cut on as the fabric is not always cleanly cut when the razor blade passes across a previous scratch. I have stopped cutting on my ‘new’ sliding glass door with razor blades and now use the hot cutter exclusively. I find the 4′ x 6′ bench almost big enough but I have it in a corner and that is entirely unacceptable.
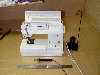 I have a Pfaff 1171 sewing machine, the dual feed is wonderful but I don’t think it is a ‘must’ for sewing kites. I use a wood burning tool as a hot gun, it is small, has a very sharp tip, and I can hold it quite close to the hot end for ease of control. For measuring and cutting straight edges I have a 4′ heavy aluminum ruler, a light 18″ stainless steel ruler and a 4′ heavy aluminum ‘T’ square that I cut a foot and a half off of so it wasn’t so long and so I had a shorter heavy aluminum ruler as well. The heavy aluminum rulers are tools carpenters use when cutting sheet rock.
I cut templates for the kite panels and I normally cut templates for appliqués that lend themselves to drawing from a template. The sail piece templates are made of formica as I will be using the hot cutter against them. The appliqué templates are made of thin plywood.
A Dremel tool for cutting spars, 6″ scissors, appliqué scissors, a stitch ripper and a hole punch just about rounds up the rest of the tools. Oh and razor blades… all over the place.
Supplies
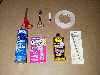 I rarely sew layers of cloth without first gluing them together. I have found that it is easier and faster to glue, then sew. On seams I use seam stick (double back tape) and on appliqué I use Duro All Purpose Spray Adhesive. The Duro is cheaper than the 3M spray adhesive and doesn’t stick nearly as well. I have found the lack of bonding ability of the Duro spray adhesive to be a large bonus in the appliqué process. After all the sewing is done I use Goo Gone to remove any residue of the glue.
I use Quick Tite Super Glue. It comes in a 5 gram clear plastic bottle so you can see how much is left and I’ve consistently been able to use the entire bottle of it without it drying up or gluing itself shut.
I use a quilter’s pencil from Dritz for marking on the kite and drawing the appliqué. It is a light gray color and shows up well on everything but white and light gray. It washes off quickly in warm water and erases with a gentle eraser if you need to correct something while you are drawing.
Kite Supplies
The sail cloth we are using is 3/4 ounce Porcher rip stop nylon. Porcher is a soft, uncoated, 62″ wide sailcloth resembling Carrington. The nose of the kite is 3.9 ounce black dacron with a layer of kevlar sewn inside. The leading edge tubes and the trailing edges are 1.5 ounce rip stop nylon. The frame is AVIA GForce UL with APA leading edge fittings, JACO standoff connectors, .098″ mcr for standoffs, and a .2100″ AVIA pultrude upper spreader.
All the kite materials except the Porcher rip stop nylon are available through Kite Studio.
Cutting the Sail
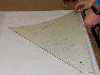
As I mentioned earlier, I hot cut all of my sail pieces. The Pizazz sail consists of a center sail piece and three panels on each wing. To ensure that the center sail piece is symmetrical, I fold the cloth in half and cut from a template that represents one half of the center section.
In this image I have the cloth folded and I’m aligning the center of the panel with the fold in the layer of cloth.
Once I have the template in the proper place I cut the folded layers of cloth with the hot cutter.


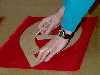
I cut the wing panels in a similar fashion using one piece of cloth folded in half. That way I cut two pieces of sail at the same time and use them both on the same kite. If you look closely at this picture you will see that I am making many of the same wing panels. This reduces overall waste of the cloth. I’m sure many of you know that cutting one kite at a time can be very wasteful.
It’s slow and painful but for long straight cuts I use a straight edge. As nice as my table saw is for making templates for some reason it always seems to have a bow in it.


If you are interested in sewing along as we go along, and don’t want to go through the cutting process, I have several options available from precut sail pieces to an entire precut kite.
Appliquéing the Sail
I appliqué the sail pieces before I sew any of them together. With that in mind we will discuss appliquéing next.
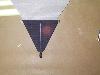
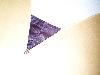
The appliqué that we are doing on this project is a large raindrop shaped object. It is a two color appliqué, one color being the color of the center sail and the other color matches the upper wing panels. I always add a layer to the back of the sail that matches the color of the front layer. That way the appliqué looks the same from the front and back.


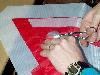
First I cut out two pieces of red cloth 15″x25″ making sure the grain of the cloth is running the same direction as the grain of the sail. Taking the layer that I will draw on, I carefully measure and find the vertical center of the cloth to ensure the appliqué will be drawn straight on the cloth.


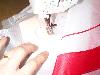
I sew the appliqué seam with a 4 mm wide zigzag and normally have the stitch length set to 1.5 mm. At this point I work against some conventional wisdom. With the cloth lightly glued together I sew first around the outside of the appliqué. This leaves me a little safer IMHO that I’m not going to disturb the appliqué sewing tight corners later. (This appliqué doesn’t have any tight corners, however.)


This completes the preparations to the center sail and we are ready to start sewing the sail together.
Sewing the Sail Part 2
Sorry about the long delay between chapters.
In similar fashion continue aligning the sail pieces. Lay the lower two wing panels face down on the surface and put seam stick on the back of the panel. Place the upper wing section on top of the lower two face up. Then sew, cut away, fold and finish the seam.
The templates for the wing have a built in error, hence so do the wing sections. We will correct this error now. The middle wing section is longer than the lower wing section and this will be noticeable at the wing tip. Lay a straight edge along the leading edge of the wing from the top of the lower wing section to the bottom of the upper wing section. You will notice a small amount of cloth extending beyond the straight edge. Cut this off using a razor blade or hot knife. This should be a straight cut making a smooth edge between the upper and lower wing sections.
Once both wing pieces are assembled lay the center sail face down on the working surface and apply seam stick to the edge. Next place the wing on the center sail face up. The three images above show the proper alignment of the wing sections. Again, due to minor sewing errors the wing panels may not align properly. If everything is correct the upper tip of the wing should cross the top of the center sail as shown in the center picture. The bottom of the wing should cross the lower portion of the center sail as shown in the picture on the right. If this doesn’t happen, don’t worry too much. The important thing is to align both wings on the center sail so they are even at the top of the center sail. Leave any discrepancy at the bottom. Sew the wings to the center sail just as we sewed the wing sections together. Note here when you roll the seam between the center sail and wing section you have two choices. One being to roll the seam toward the center, the other being to roll the seam away from the center. There are two considerations here. If you have a lighter colored center sail than wing the seam doesn’t look as good rolled out. The second consideration, believe it or not, is it affects the way the kite flies. Rolling the seam toward the center sail gives the kite a little more stability and flies a little more precisely. That has to do with the position of the standoffs. We will discuss that later.
Once you have the wing section sewn on it should look like this. If the bottom of the seam doesn’t match exactly, trim the excess off in a smooth curve. Sew the other wing on and we have the sail completed and are ready for the leading edge.
Making the Leading Edge
the leading edge strip is 3″x62.5″
First let me tell you that when I sit down and seriously make leading edges it takes me 40 minutes to make the leading edges for one kite. This isn’t a quick project.
The black 1.5 oz rip stop nylon didn’t photograph very well so I’m going to be making some soft purple leading edges. I’ll try to make sure that I don’t confuse anyone. These first few steps are important to anyone that is making leading edges from sail cloth rather than 3″ leading edge strips.
I always put reinforcement material around the leading edge cut outs. This reinforcement material goes inside the leading edge. For 3/4 ounce leading edges I make the reinforcements from two layers of white 3/4 ounce rip stop. To do this I lay two layers of material down, one on top of the other and hot cut it into 4″ wide strips long enough to span all the leading edges I’m making at the time and have a little overlap. It is very important to hot cut these pieces as it seals them together so it is effectively one layer of cloth. In this example I am making two sets of leading edges and each leading edge will be 3″ wide. This is a 14″ wide piece of cloth. We will need two strips, one for the upper leading edge cut outs and one for the lower leading edge cut outs. In this example I am making 4 strips 4″ wide because that’s how much cloth I had laying around and because I told rodbuggy I’d send him some. I use white because it shows the least when the kite is in the air.
For making 1.5 ounce rip stop nylon leading edges you will need two 3″x62.5″ leading edge strips and four 2″x4″ 3.9 ounce dacron reinforcement pieces.
Start out with a leading edge strip 3″x62.5″ with nice square ends. In these examples I started with a 12″x62.5″ strip and later cut it into four 3″ strips. To put a nice end on the wing tip end put 1/4″ wide seam stick along the end and fold it over then sew it. Once the end of the leading edge is folded over your leading edge should be 62.25″ long. Measure up the leading edge strip from the wing tip end to locate the areas to reinforce for the cut outs. Mark these places. The lower leading edge reinforcement is placed between 18.5″ and 22.5″ up from the wing tip. The upper reinforcement is placed between 47.25″ and 51.25″ up from the wing tip.
If you are using 3″ 1.5 ounce rip stop nylon fold it down the center the entire length of the leading edge. Then position the 4″x2″ 3.9 ounce dacron reinforcements over your marks (centered from side to side). Hold them there with seam stick. If you are cutting your own leading edges place the 4″ wide strips we made earlier across your leading edge material over the marks for the leading edge cut outs. If you are cutting your own leading edges you should have a strip of material 6″ wide and is now 62.25″ long (this would make two leading edges). To hold this material in place I hot cut the ends of the reinforcement material off just at the edge of the leading edge bonding the reinforcement material to the leading edge strip. I also partially hot cut through the reinforcement material at the center where the two leading edge pieces will eventually be separated.
At this time sew the reinforcement to the leading edge. Remember sew the reinforcement to the inside of the leading edge pocket. Use a zigzag stitch to sew the reinforcement on the leading edge and sew as close as possible to the edges as you can. Sew as close to the edge of the reinforcement as possible so the spar has no chance to get lodged between the leading edge and reinforcement when you frame the kite. It is only necessary to sew across the reinforcements, not all the way around them. If you are making leading edges from cloth instead of leading edge strips you can separate the leading edges now with a hot cutter.
Once we have the reinforcements sewn on and the leading edge pockets folded in half, we are going to taper the ends. The left hand picture shows the wing tip end. Measure over 28 mm from the fold and make a mark. Lay a straight edge from the mark up to the beginning of the lower reinforcement (18.5″). Hot cut along the straight edge. This tapers the wing tip and seals the leading edge pocket closed. On the nose end of the leading edge pocket make a mark 32 mm from the fold and taper that end back to the top of the upper reinforcement (11″) again sealing the leading edge. Now lay a straight edge from the upper leading edge reinforcement to the lower leading edge reinforcement approximately 1/4″ in from the open edge. Hot tack along this line to seal the remainder of the leading edge together. This will effectively give you one piece of cloth to sew to the sail. Don’t worry about being extremely neat with this hot tacking as this part of the leading edge will be rolled under in the seam.
The leading edge cut outs are 3″ long and 1/2″ deep and should be centered on the reinforcements. I have a template I use for this purpose. Hot cutting these cut outs seals the reinforcements to the leading edge. It also seals the leading edge pocket shut and makes it far easier to sew to the sail. Open these pockets later when you put the spars in the kite.