A few years ago, I showed up at a local kite festival, all hell-bent on competing for the first time in many years. As had been my custom for years, I was on short lines, likely a 60-foot set. This was what I usually flew on, and I’d be surprised if I owned a set of lines that was past 80 feet at that time and my all time favorite set of lines was a fifty foot set. Fast forward to now and I was sorting out my line bag, and nearly all of my many line sets are 120 feet long!
My oh my, how times have changed. You see, at that competition, John Barresi was mentoring me and he jokingly scoffed at my short line set, “Brother, you need to go onto longer lines”. The idea being that with the extra length, you have much more space in the sky for completing the compulsory figures and making magic with your ballet. This made sense to me, especially after watching him fly and I promptly moved to longer lines for all of my flying. Of course, in early 2006, I’d JUST ordered a new set of 100 foot lines and not long after they arrived, word came from Europe that in order to fly with the Euro teams on our upcoming trip to Berck, we’d need to be on 120 foot lines. So, naturally, more money was spent and 120 foot lines were procured and voila, I never moved back from that length for nearly all of my flying, whether it was on my own, or with iQuad.
Of course, we’re also usually flying in places where such line lengths are easily handled, whether it’s a nice open beach somewhere or a large field. But, what about the times when you are in a much more confined space?
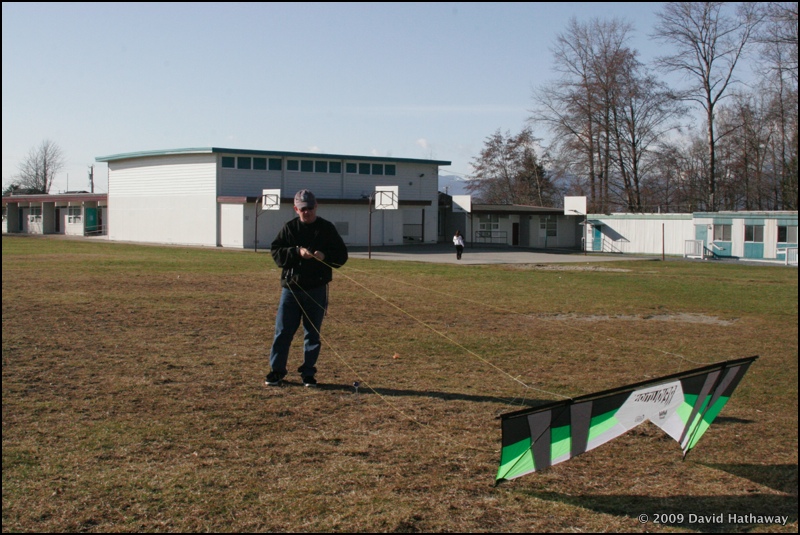
On a recent trip to Mexico, I found myself in exactly that situation, a smallish beach and a line bag full of 120-foot line sets. An hour later, I’d managed to splice a 120-foot set into 2 60 foot sets and I was good to go! I suspect I could do an entire article on how to quickly half a line set but, in this case, lounging poolside, I merely took my time with it and answered more than a few queries of “what are you doing with all that string”. Once I had completed the sets, I took one of them out onto the beach for a quick spin.
And, what a fine time I had flying on those short lines. Everything happens a little quicker and of course, the kite is visually much closer as well. A very “immediate” sense of flying, this is an excellent way to work on sharpening up your talents and flying skills. If you have been struggling getting a clean set of clock turns down, a few hours spent working this out on shorter lines will do wonders for your skills with this, guaranteed, and when you move back to longer lines again, you’ll have a much easier time with it.
3D concept…
But, the gist of this article is to look even closer than 60 feet and discuss some techniques for what is called 3D rev flying. The idea behind 3D rev flying is fairly simple, you interact with the kite itself, by tossing it to get it into the air, and pulling it back to yourself to catch it.


As far as I can tell, the basics of 3D flying began with Dave Brittain, and were initially brought to light by a short video that Revolution released in the mid 90s (They may in fact still have copies of this video, check with Revolution directly!). Many of the techniques used were also adapted to indoor rev flying as well and in fact, form the basis of all indoor Rev flying, but, for now, I’ll look specifically at using this technique outdoors.
Kite and bridle…
Lets look at the kite itself to begin with. While any Rev will work for this, the ideal ones are either a Rev 1.5 or a Rev II.
You can use the kite as is, however if you intend to do any large amounts of 3D flying, I’ll recommend a few modifications (I have one 1.5 that’s specifically set up for this in my bag most of the time!).
First off, removing the bridle can solve a lot of potential issues with tangling. Simply remove it from all six points and store it away neatly so you can put it back on at some later point. This will markedly change the handling of the kite but, for 3D flying, this is definitely an advantage, You may experience much quicker reaction time with some maneuvers as the lines themselves are now “directly” connected to the frame, although the fine controls (i.e. clockwork) aren’t as sensitive (slightly larger inputs required with no bridle) due to the control points not being as close to each other on the kite end.
But, here comes the first problem to be solved, how does one attach the lines to the kite without a bridle being in place? There’s a few approaches to this.
The simplest method is to just snake your lines through the top and bottom end caps directly, using a larks head knot to secure them to the end caps. While this works reasonably well, it’s time consuming to swap the lines on and off, so unless you intend to dedicate a line to this, there’s a better approach.
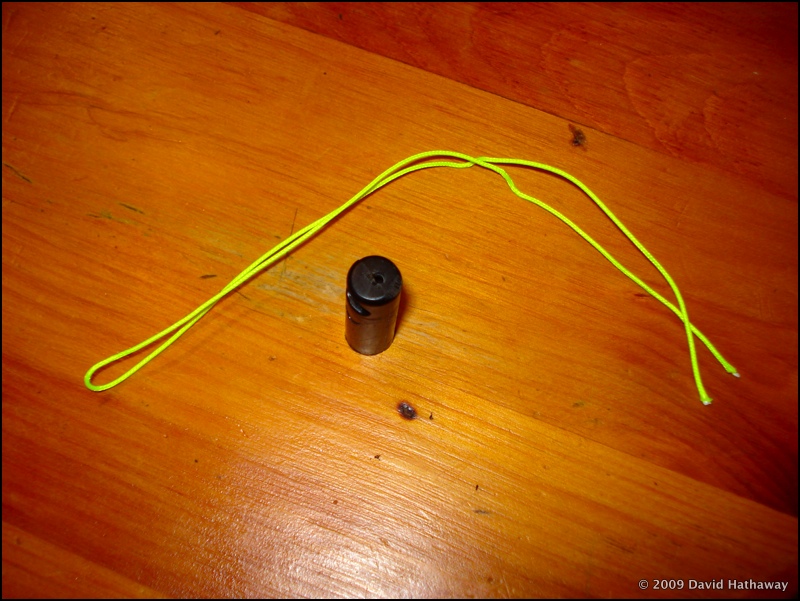
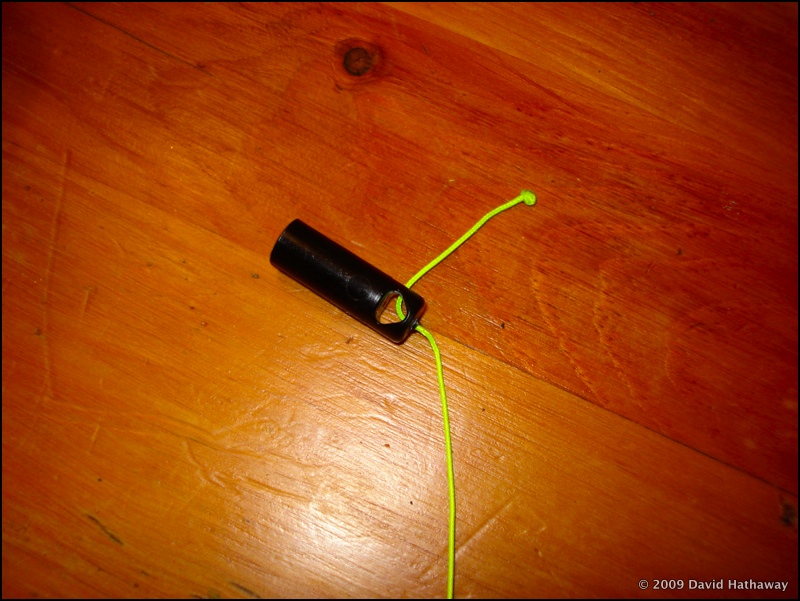
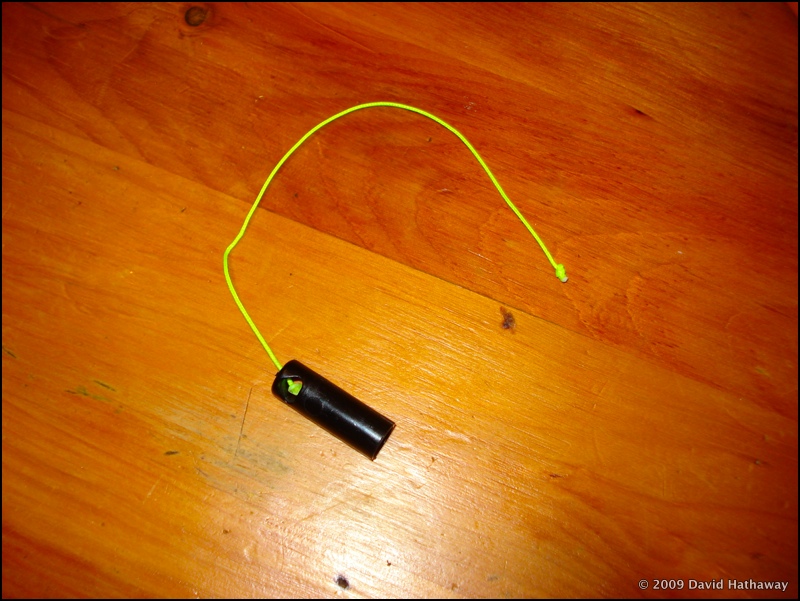
Clean end caps, less snags…
In the picture below, you can see how I’ve treated my end caps on my “dedicated” 3D kite. I took a standard rev end cap and drilled a hole it the top of it. I then threaded a short piece of sleeving through the hole, knotting it so it stayed on the end cap, and put another knot at the other end of the cap in order to have a spot to attach the lines to the kite. You will want to make all four leaders identical in length, and not too long, roughly 4 inches of extension from the top of the cap.
When Revolution introduced a 3D flying kit, it came with 4 end caps, setup identically to this. The kit also came with a set of handles where the leaders came directly out of the top of the handles, reducing the possibility of getting tangled on the link that holds the leader on most Rev handles, however they were the older, shorter Rev handles, and thus, I never made use of them myself.
But, as I mentioned, there’s no reason why you can’t simply work on any of this with a stock rev, bridle and all. Go to the trouble of conversion if you find a real affinity with flying like this, but, feel free to just try it out with any Rev in your bag.
Choice of lines for 3D flying…
With respect to line lengths, I find the ideal length to be about 25 – 30 feet of line, and ideally 90-pound line. 50 pound will certainly work however, the wear and tear on the lines is much greater and I’ve found that 90s take that abuse much better, especially of you are out on the streets flying on pavement or concrete. Just, uh, watch out for cars please. For the pictures shot here, I used a 20 foot set that was handy. For wind, anything from zero to 8mph works just fine and as you get more comfortable flying this way, even higher though, I’ll point out now that catching Revs 3D style in high winds can be very, very tricky…
Breaking down the throw…
So, lets assume you are all setup and out on a field, street, beach with your kite ready to go. We’ll look at the hand launch first. The photos probably illustrate this better than I can describe it in words, however here’s the basic approach that I use.
 With your back to the wind, put both handles into your left (left handed flyers can simply reverse the positions). With your right hand, hold the leading edge tip of the kite, with the kite facing out, and with your left hand (that’s also holding the two handles), grab the middle of the leading edge, right around where the middle bridle point connects.
 You want to hold the sail so that the logo is facing down towards the ground and before you contemplate doing anything else, get a quick look at the kite and make sure you are not standing on any lines, or, if you have a bridle in place like I do in these pictures, make sure the bridle is hanging down with no tangles either. Nothing will stop a 3D throw faster than getting tangled up beforehand!
Relax, take a deep breath or two.
 To launch the kite, picture yourself throwing a javelin, You will be pushing the kite out with your right hand, the one that’s on the leading edge end cap. Your left hand is merely there for balance at the start of the throw. Push the kite forward but, at the same time, angle it slightly skywards as well, by roughly 10-20 degrees. And as one final touch, just as the kite is about to leave your right hand, give it a wee tiny spin towards the left, just a very light one.
What this does is setup the kite to begin turning around so that when it reaches the end of the lines, its mostly in position to start flying already. Also, the slightly skyward angle is critical as well, it allows the kite to keep enough height to reach the end of the lines. With a little bit of luck, your first throw has resulted in the kite being at the end of the line length, so now, simply step back and start flying, of course, making sure you pass the right handle back into your right hand.
 It should be stressed again that critical portion of this throw is making absolutely certain that your lines aren’t underfoot, spooled around an ankle, hooked on a belt or a weed… Also, before you throw for the launch, take a quick look at the leaders on your handles, making sure that everything is hanging freely and that the handles are positioned so that you can easily pass that right handle over immediately after the throw.
While these seem like a lot of steps when written out, the entire process becomes very easy once you have done it a few times. How hard you have to push the kite out depends on a few factors. Wind speed being one, the lighter it is, the more of a push that’s needed. In higher winds, the kite will easily glide out to the end, but, in lighter winds, more coaxing will be needed and you may wish to adjust the angle of the kite pre-launch a bit as well, moving the angle up a bit so as to have a longer distance to glide.
Line length is involved with this as well, with a short line set, i.e. 15 feet, it doesn’t take much to get the kite out far enough to begin flying, but the longer your lines get, the trickier it becomes, hence why I find using 30 feet to be about the maximum for doing a lot of this flying. While I can throw a Rev out on 60-foot lines, given there’s enough wind to take it that far, much further than that requires either a lot of arm strength and a bit of a run, or really long arms like John’s.
Breaking down the pull and catch…
Now, for the even trickier part, the catch! This is the part where you will either look like a hero or, a bum. I’m usually the latter. Catching a rev is really a three step process and, the quicker you can do all three things, the better luck you will have with it.
 With the kite as close to directly overhead as you can manage, you’ll once again pass your right handle into your left hand, holding them both. With your now free right hand, reach up and grab both of the top lines as far up as your arm will reach and give a short tug downwards. What this will do (dependent on how much wind there is…) is it will bring the leading edge down towards the ground and the kite will fall to the ground.
 The key here is to somehow position yourself so that you are in between the kite and the ground that it’s now rushing towards! As the kite is approaching you, reach forward with your right hand. Ideally you are looking to have your hand grab the kite near the middle of the leading edge and as you make contact with the kite, bring your arm down so that it cushions the landing.
 Sounds straight forward enough, doesn’t it? And, really it is, once you’ve done it a few times. To start the whole cycle again, simply grab the middle of the leading edge with your left hand (which contains both handle still from your catch), move your right hand back to the end cap and repeat the throw we talked about earlier in this article.
If you play with this for an hour or so, it’ll become crystal clear how to reliably do this, more than anything else, the biggest thing that will ease the learning curve is to always watch out for potential line tangles at the launch, that’s the point where most disasters will occur. With your new found skills at throwing and catching a Rev, you will be well prepared to fly in just about any situation you can imagine!
Good luck and good winds,
David Hathaway