Search the Community
Showing results for tags 'speedwing'.
-
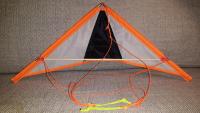
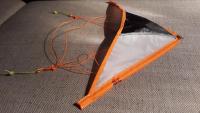
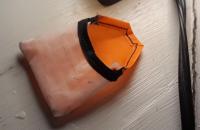
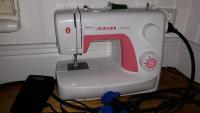
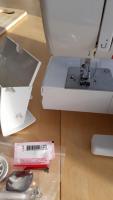
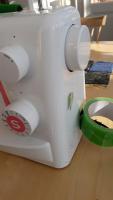
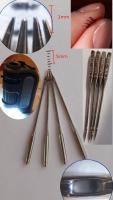
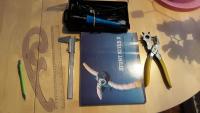
OK I know, this and that person made a few stitches into something kite like, that is on a larger scale quite small news - but not for me. And that is what the below is much about - a rookie's perspective on kite sewing. A small beginner practice project to get going and to determine difficulties. The span width of this mini speedwing is 34.5cm. Trailing edge hem turned out to be problematic. Another very small beginner practice project to get going and to determine difficulties. This truncated mini test kite bag had too little material when folding the lid around seam. Also, how should one hide the seam on the inside close to the opening? Why build such a small kite? The main reason is to practice and identify the problematic details/procedures while wasting close to a negligible amount of material. It also makes it easier to relate to texts like ( https://sites.google.com/site/kites4all/home/kite-sewing-101 ) and provide a better motivation and focus when reading up on the craft. If you start by doing early on, your eyes might also open up when studying your own (purchased) kites and their designs. The main remaining difficulty with the this kite project turned out to be to make the trailing edge hem so that it is in the same plane as the sail. The lesson from making a mini test bag is that when folding fabric over seams, more material than you originally thought might be required. I don't believe that absolute beginners (like me) are an extra good source of knowledge other than that that they bother about bringing up topics and things that they wonder about that the more skilled ones don't. Possibly the lack of knowledge of how things "should" be done can lead to that new approaches are tested. I also believe in sharing what didn't go so well so that it can be avoided. Therefore also images of test pieces, failures and dead ends will be included in below (future) posts. The methods displayed here is what I tried when making a first time mini kite. Suggestions?: Don't hide in the corner - Sing it out! Yes this is a cheapo, plastic, budget sewing machine equipped with a slightly to thick needle for the ripstop of this model speedwing. Yet, being a kite sewing rookie, I didn't feel limited by the tool. Perhaps it is because I've never seen high quality and fancy features sewing machine and is therefore blind here? Speedwing kite - what was (?) patented (anybody knows)? First of all did, I chose to do non free patented kite? I couldn't find any patent document with searches like "speedwing kite patent", "speedwing expired kite patent"... I don't know if there are any patents today, but I wouldn't think so. Why? Because it was already mentioned as a patented kite in Stunt Kites 2 by Servaas van der Horst from 1994, quote: "Since certain aspects of the Speedwing are patented the kite may only be built for your private use". The patents seems to be at least 24 years old. This post ( http://www.kites.tug.com/Archive/kites/potpourri/speedwing.adjustment.tips ) dates the speedwing bridle patent to older than 15th June 1993, soon 25 years ago (and it also give advice on tuning the Speedwing bridle). In any case older than the 20 year limit ( https://en.wikipedia.org/wiki/Term_of_patent ) and if this would be a design patent the valid time would be even shorter. If the patent is expired, then web pages like this (as of February 2018): https://www.kiteplans.org/planos/speedwing/speedwing.htm works like a lost fishing net (no matter how good the intentions were), lying tangled at the ocean floor needlessly suffocating swimming fish for years to come, by stating it is patented. Only recently I've seen speedwings being offered commercially, Cross Kite's Speedwing X1 and X3 or De Paddestoel Speedwing Progress. Statements of patents should be published with an expected expiration date or filing date IMO. Also it is desirable that it is thoroughly specified what is patented (or a link to the filed patent). How wide a patent is is of importance ( https://arstechnica.com/tech-policy/2018/03/why-the-roots-of-patent-trolling-may-be-in-the-patent-office/ ). List and discussion of tools/equipment The Sewing Machine This small compartment was very handy to keep the sewing machine gear in. A handy needle threader holder made out of construction polyethene/polyethylene foil tape. The not so old sewing machine was a Singer Simple 3210. The Singer Simple is very plastic but light to move around - can be slid on the table almost too easily. I gave a little more than 130 USD new for this tool. There are not much extra bells and whistles I guess, but I like the the storage space inside for small stuff that came with the sewing machine. An arrangement that I've found handy is to have the needle threader attached to a construction foil tape sticky side out tube on the right hand of the sewing machine. Finally, no matter the model of sewing machine, don't sit double folded over it for extended periods of time - put a couple of large books under it if necessary so that you sit comfortably when working. Some handling hints: Balance upper lower/thread tension and set quite low. Needle up actions: Starting/stopping and changing backwards/forwards direction. However never change direction by manually rotating the wheel backwards - the wheel should be turned against you always. When making a sharp turn, lift the presser foot with the needle down and rotate the fabric around the needle. Use tape or glue to secure the glossy/slippery ripstop before sewing. If you would use sewing pins to hold the pieces together, the holes after the needles would remain. The needle Not so sharp, surprisingly blunt needles - the sharpest of them (all 90/14 machine needles in the above image) was the one I had been using all the time. It was possible to see the reflection from the window in the tip, which was not possible or hardly not possible with the sharper (and not in the above image collage) hand sewing or sewing pins that I had. To the left in this collage is the microscope used here. After sewing the kite I looked into which needle I had been using and the state of the needle tip after the kite (and other mostly practice stuff pieces) and paper sewing. In this project I used the regular point (style 2020) needle that came with the sewing machine. It was of the dimension 90/14 (of a scale going from 60 to 110 (European standard) or 8 to 18 (American standard). A regular point needle will will go into the fabric threads, while a ball point style needle will go between the fabric threads. The ballpoint needle seem to be good for knitted fabric ( http://www.singerco.com/sewing-resources/machine-needles ). In the Make Magazine web-site I found a link to a graphical cheat sheet for choosing a machine needle ( https://makezine.com/2013/11/20/infographic-choose-the-perfect-sewing-machine-needle/ ): http://www.sewingpartsonline.com/blog/finding-perfect-sewing-machine-needle-infographic/ . The needle size table there seems to suggest that I instead should have gone for a finer needle than the 90/14 needle that is for slightly thick fabric (like flannel). Not until the kite was finished I examined how sharp or should I say blunt the needle tips were - no needle (the one I had been using or the spares - all 90/14 needles) tip would puncture your skin unless you applied some force. The point diameters were between about 0.14-0.22mm and the light from the window could be reflected in all of them. Quite unexpected was that the one that I had been using all the time was the sharpest! It had slightly more than half the radius of the bluntest (spare) needle! It appears like all the times I did practice stitches and practiced adjusting the thread tensions while sewing in paper didn't do any harm to the needle tip. I guess that one should change the needle and use a matching one when doing the much thicker nose and LE dacron. The microscope used here was a mini and budget one bought at a sale for about 7USD. With some practice it is possible to hold the camera/mobile so that the images can be obtained. Other Tools Some tools used for the project. The French curve and the caliper belonged to my father: A wood burning iron pen tool - for hot cutting the ripstop. Screw the tip in properly to conduct the heat well. A revolver single-hole punch pliers. Was handy when making the card board template for the opening in the sail for the spreader fittings. A french curve template for drawing the curve when making the rounded panels that will give a the sail a camber. A caliper and (folding) ruler for bridle measurements. An angle hook (instead of a non-existent set square) A thick thread to use instead of a compass (that was needed due to the lack of grid paper). A pair of scissors. A "lead" pencil to draw directly on the ripstop when "cold cutting" with the scissors. A book: Stunt Kites 2 by Servaas van der Horst from 1994 A kite: Speedwing X1 - a nice 3D reference. To be continued...
- 16 replies
-
- 3
-

-

-
- kite making
- blunt needle
-
(and 3 more)
Tagged with:
-

20 first minutes of Speedwing - a really short session for a change
Exult posted a blog entry in Exult's Gentle Breeze
Mon Dec 25 13:00:00 CET 2017 GB, Forecasted 4m/s (gusts 8m/s) Cross Kites Speedwing X1 25m 38kg lines Looks small (113cm span), but is capable of surprising you (much like the Monty Python monster rabbit https://www.youtube.com/watch?v=cCI18qAoKq4 ?). Looks wrinkled as well? Don't worry - once in the air everything gets smooth. Conditions/background: Quite OK wind, but I still wouldn't hesitate to trick trickable kites. Rain on frozen ground... My flick flack exercising earlier during the day felt a bit stalled, so switching to something completely new felt like a fresh breeze. Much is speedy about this kite: Assembly is just one spreader. No standoffs. No battens. No bridle/standoff tangle. Nose back/forward bridle adjustment is only one knotted line/larks head. Speed (obviously) forward and angular speed (though not necessarily very tight/small radius). So, except for the above, what is this kite anyhow? - A no spine speed kite with a deep (strange looking) bridle! Bought it mostly to see and learn how it was made. First launch, nose angle was medium setting - no problems to launch. No problems to control - until getting close to the edge of the wind window. Kite just tumbled out of control to the ground. No standoffs - didn't even try to avoid the walk of contemplation therefore. I guess there could be two reasons for the difficulties here. If you have no spine, you don't have this flatter area around the spine to fly on when the flow around the wing tip fails to function at the edge of the wind window (think of the varying angles of attack along the span of an ordinary DLK). For the Speedwing the whole wing seems to fail at once it appears. Add to this that you are likely to have some momentum forward (due to the high speed) when you enter the edge of the wind window, driving you a longer bit into it than when using trick kites. Also when the sail fails, there are no standoffs that holds it in place, so you can more or less pull the lines and frame, but there is little effect on the sail once it goes non-filled. As you might have guessed, stalling and tricking - no success there. Stayed away from the edges and more trick attempts and had no further problems when using the medium nose back/forward angle setting. A larks head knot under a bridle setting knot gets you the best of two worlds. First an easy launch. Once in the air the kite starts to pull and the larks head slides out to the outmost knot. Now you are in nose back "speed kite mode". It felt "fresh", speedy and a pull that "shouldn't" be in such as small kite, but I wanted more, so I adjusted the nose back. The following start then failed - just tumbling around with no forward drive. Then (I'm proud to say) I got an idea. Why not adjust the nose forward to the medium setting, but instead put the larks head just under the mid one of the overhand knots in the nose. During the launch the nose was enough forward to give a simple launch, but in the air when the kite started to pull, the larks head slided down to the outmost knot giving the kite a nose back speed kite like angle - and this just worked out of the box (I'm sure such a simple and efficient fix must be a standard launching method?)! The turns got tighter after the adjustment, but don't make them to tight to preserve full pull/speed. In gusts the lines begun to sing (even in the centre of the wind window) and the sail gave a swosh like sound (much like when powering up a Rev QLK without having a flapping trailing edge). Normally for DLK trick kites I get the singing when "parking" them at the edge of the wind window (for the Speedwing I just avoided the edge because the kite had just fallen out of the air there previously). The kite was quite easy to control, not at all like my few and very short attempts with the Atrax. Even some limited (and quick) figure flying was possible: straight lines, 180 deg turns, squares, circles, figure eights. After a while I begun to think how to land it. Stalling didn't seem to be easy, so I flung my arms forward to kill the forward drive. It worked well, say 5m from the ground it kind of entered a mode resembling the tumbling start when the nose had been adjusted in this nose most backwards position. To recover from the tumbling it was sufficient to pull one line rather much for a moment. I guess the angle of the kite to the wind changed so it got some at least sideways drive. How the nose of the kite caught up with the direction the kite was going in I didn't get even at the time. Returning to the landing attempts, I just flung the arms forward once again but without making any tumbling recovery attempt. The kite then tumbled to the ground. The disassembly was even quicker. When the kite had tumbled down to land, the only spreader had already slid out of the fitting on one side. Much wind a problem? - No I look forward to more of it! The kite is small so it could be in the bag as some kind of high wind insurance, though I should have some slightly longer and stronger lines as well for the really windy days. And who knows, getting enough experience with the Speedwing, I might later even learn the Spiderkites Atrax. I was quite happy with the session - 20 much interesting minutes where much was not familiar.
