SegelFlieger
-
Posts
45 -
Joined
-
Last visited
-
Days Won
4
Content Type
Profiles
Forums
Gallery
Downloads
KL Shop
Blogs
Articles
Everything posted by SegelFlieger
-
 I should have included this information in my post... Two chain washers weigh 1.7g (.06 oz). My new kite weighs 230g (8.1 oz) -> rev Mid-vent equiv with two-wrap rev rods; shock cords are not trimmed yet. The addition of two chain washers will only increase the weight of the the kite defined above by .7% I like the field-fix idea . Considering a tear as I experienced, a bottle cap washer with two holes could allow one to continue to fly; it would support the vertical displacement of the shock cord loop against the remaining Dacron and there would still be plenty of meat left on the horizontal portion of the LE end for the required shock cord tension to the rod end. Add a pocket knife or multi-tool to the things you should bring along with you for emergencies. I plan to. Make sure the tool has the equivalent of an awl or pointed knife tip to make the holes. Thanks Mark. SF
 -
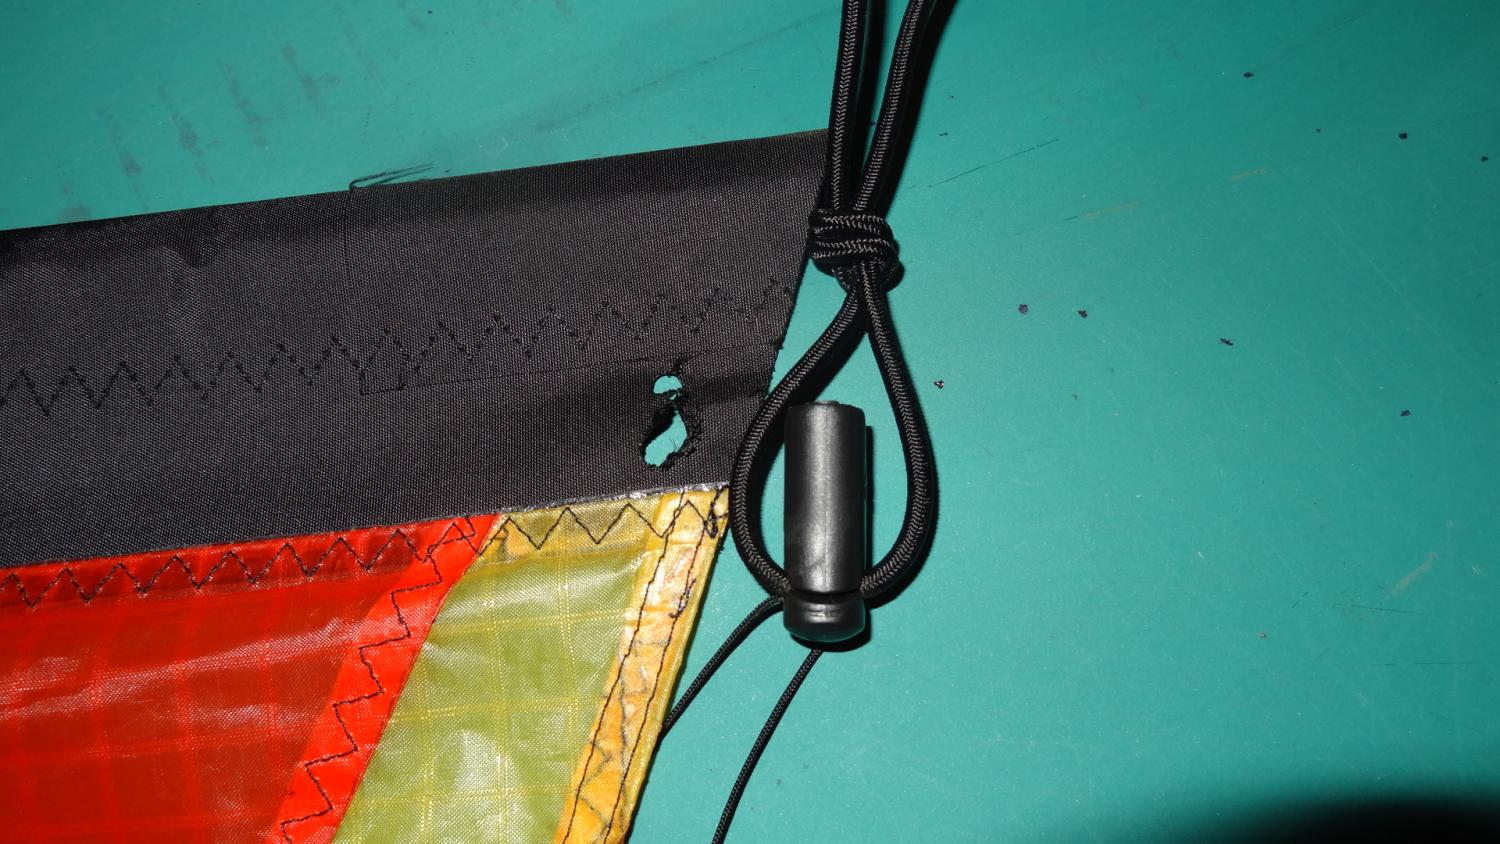
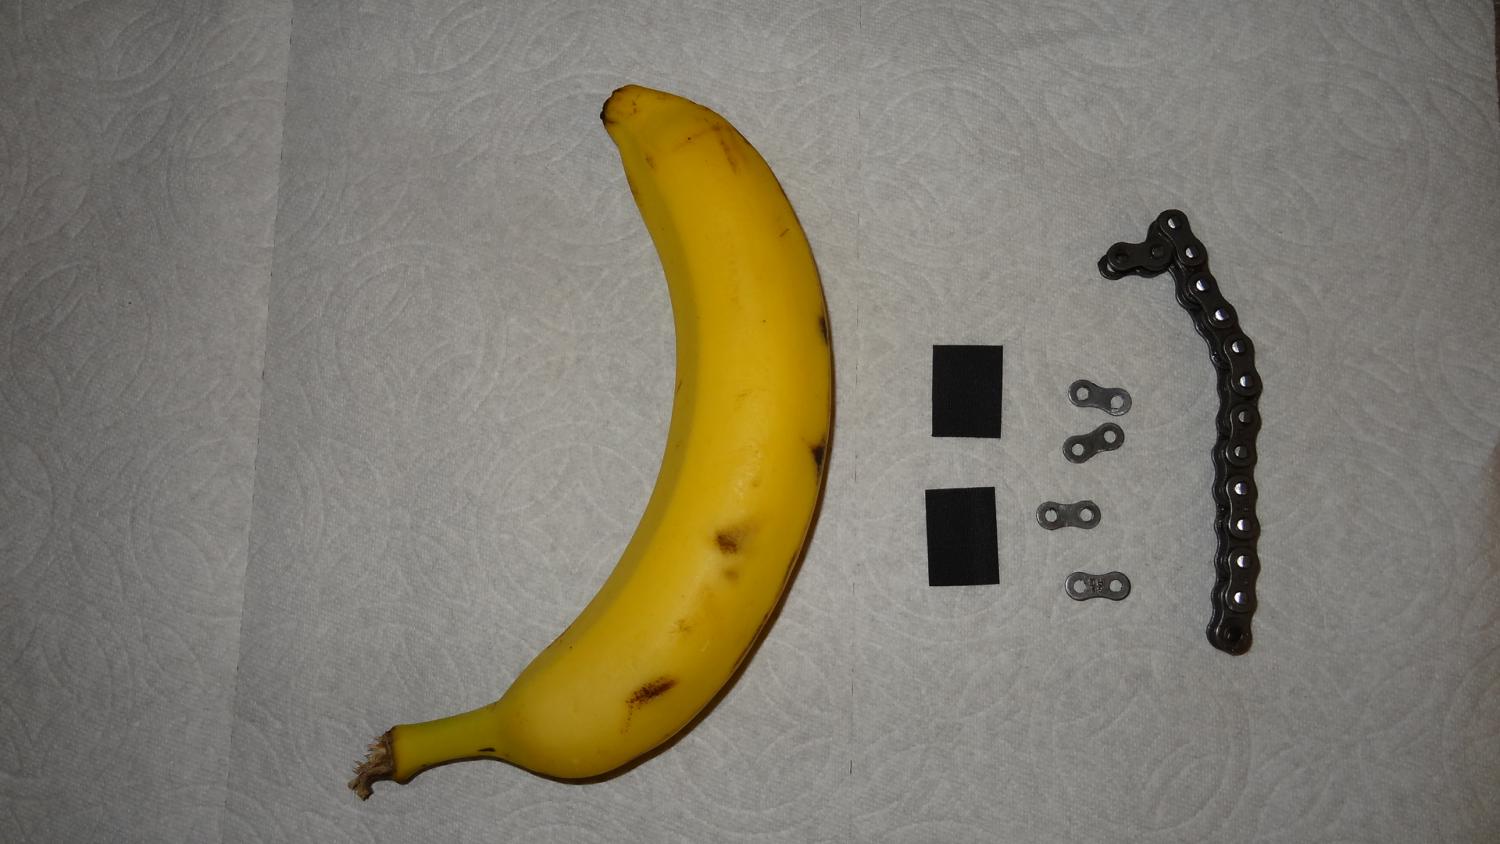
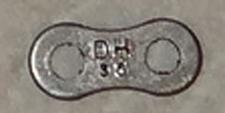
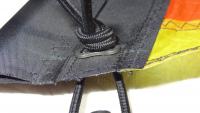
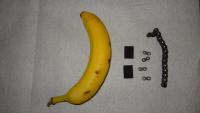
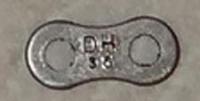
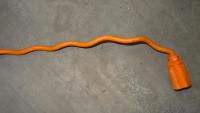
My kite was recently damaged by wind conditions that were too strong for my sail choice that day; I had become overly anxious to fly a kite that I had built this winter and had been eagerly waiting for an opportunity to fly. As a result of this mistake, the shock cord that attaches the leading edge rod to the sail, tore the Dacron tab between the two holes in which the cord passes through and is tied in a knot on the backside of the LE. I admit that this happened because of a slight design flaw in making a leading edge out of one piece of Dacron and using holes to replace the screen mesh. In my design I chose not to extend the end tab to the sail, which is how the example LE appeared to be made. In repairing the damage I also came up with an idea to improve the shock cord attachment to the LE. I have always been bothered by how the two holes and knot "bunches up" the LE at the end distorting the top edge of the kite as a result. I wanted to find a reinforcing washer that had two holes in it spaced the same distance as the holes in my LE. The washer had to be light weight, rigid, have the holes spaced properly, and have a hole diameter to match that of the shock cord. "Is that too much to expect?" you might ask. Well I thought so too and was considering making the washers myself... however as I imagined "re-purposing" things that Aren't washers to Be washers I came up with this solution: This is part of a chain link for a standard #35 drive chain. Once I recognized that the shape of the outer links might be a solution I found a chain size chart that gave the specifications for a variety of #'d chains. The #35 had hole spacing (i.e. Pitch) of 3/8" with hole diameter (i.e. Pin diameter) just slightly larger than 1/8". This was a perfect match for what I had imagined! So after repairing the tear with two pieces of Dacron (one on each side), using the new washer, and a banana (carry over from my "You Know You're a Kite Nut When..." post), I made the modification to both sides of the LE: Items used for the repair. The repair completed. The LE is no longer distorted at the ends and the tear that occurred between the two holes will not happen again. I plan on adding the washers to my other kite sails. Hopefully this idea might help some of you as well. SF


-
You might be a Kite Nut when you check “Windfinder” every day to find a 1 hr window that is flyable in your area. Spokane WA has very sporadic wind for kite flying. Last Saturday it rained all day, as predicted in the news. According to Windfinder it was supposed to be very windy and rainy, but at 3:00 PM the rain was supposed to stop and the wind was supposed continue to be strong; too strong it turns out. I was out running errands that day, with my kite bag in the car and at 2:45 headed to the field. 3:00, sun came out, wind was there, and I had about an hour of flight time before my kite broke. And the rain started again. Some would think but instead I felt I was able to practice some things that I have been waiting to improve on all winter, waiting on some proper wind to do so… Worth breaking a kite for. My kite breaking revealed a weakness in the design that allowed me to create an improvement to keep it from happening again. Also worth breaking a kite for. I am now fixing my kite using “Go-Cart” drive chain parts, Dacron, and a banana to do so. After all, I am a Kite Nut (ok, not a banana, but the rest is true). I hope to share this experience with you all in another post when my repair is complete. SF
-
If you decide to call Skydog, ask for Jim Christianson. He was the "artist" for "Go Fly a Kite", designing the catalogs and kite colors for each season. He is now the founder and owner of Skydog: See the "Design" topic below in the following link: http://skydogkites.com/aboutus/whychooseskydog.shtml Interesting archived NYT article here regarding Jim's color choices for sail design and the history of the Go Fly a Kite company: http://www.nytimes.com/1997/04/13/nyregion/tying-a-string-to-the-wind-to-the-universe.html Jim could probably even tell you the story behind the color choices in your kite. SF
-
Hello and welcome Nekoshi. I am am not a dual line kite expert but I do have some old catalogs and magazines dating back to the late 80's. On the back of a "KiteLines" issue Vol 6 No. 2 (summer 1986) there is an add for "Go Fly a Kite". The phone number is 1-800-243-3370 and they are in CT. This number is now associated with Skydog Kites and is current. It may be the same business as they are also in CT and report that they have "25 years of experience" they may be able to identify your kite. I'd give them a call and see if they can help you with your question. here are some links: http://www.kitetrade.org/memberprofile.asp?name=Skydog_Kites%2C_LLC&id=777 http://skydogkites.com/ Hopefully this helps, Regards, Segel
-
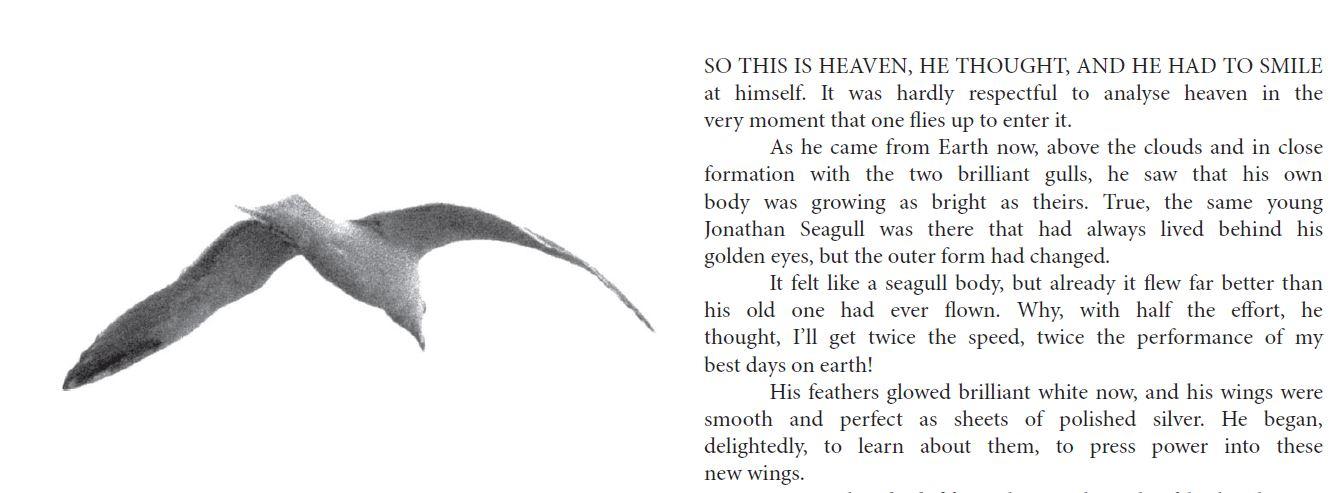
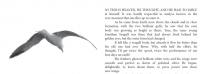
I did not know Rich, but I have experienced the community in which he was/'is' a part of. As a result I feel a loss. I would like to share this quote from the book “Jonathan Livingston Seagull” in remembrance of Rich: Jonathan's thoughts to himself after "transcending" in the story... May you enjoy your new wings Rich ... SF
-
KiteLife chat phasing out...
SegelFlieger replied to John Barresi's topic in News from the Webmaster
I would greatly miss the chat feature of KiteLife if it went away. This is one of the only two “live” social interactions I am able to have with other kite enthusiasts. The second being a fellow kite enthusiast here in Spokane who was referred to me on a “chat night” session by dragonfish. He is now a great friend and flying companion. For that I am VERY grateful and I try to participate every "Wednesday Chat Night" with the intention that my social interaction might be of use to others as well. Every week I look forward to “chat night” and I am disappointed when I can’t participate. I am looking forward to a change, or no change. SegelFlieger -
Carbon Tubing Dynamic Response Test
SegelFlieger commented on SegelFlieger's blog entry in SegelFlieger
Thank you for your comments Edmond. The intent of the blog was to provide dynamic response data for each rod independent of a sail as stated in the summary. This blog was intended to stimulate further discussion on frame/sail selection here: http://kitelife.com/forum/topic/7329-carbon-tubing-comparison/ As you mentioned, there are obviously other factors involved when you are flying a frame with a sail, but how do you decide how to tweak it? perhaps the data that I have presented might provide some insight. You have already introduced two very important points, friction in the sail and tension on the frame. I look forward to reading further comments from you in the forum. Regards, S.F.- 3 comments
-
- 2
-

-
- frame selection
- frame design
- (and 2 more)
-
This is great to bring experience to the table, especially when similar technologies are concerned. My similar experience is regarding the winding of long audio cables or wire which it is very important to remove the "twist" from the line when doing so or you will have a tangled mess and risk ruining the cables over time; no need to describe the technique to avoid a twist (I call it the roadie twist). A well-used orange extension cable (not properly re-wound) comes to mind with the cork-screw funny shape at the trailing end. I can't control how other "people" unwind and rewind it when they use the leaf blower . However, with long kite lines a twist is deliberately introduced into all your lines as you wind your lines onto a card. Hold the card in one hand and just twist all the lines around it as you walk towards your kite never moving the hand with the card. It doesn't even matter if it is neat or not; but neat is nice . Do not worry about lines overlapping each other. When you unwind the lines you do it the same way, card in one hand and let the lines pay-off. This untwists the lines. Using this technique you may have some weird things happen when you have unwound your lines. Pull tension to undo phantom twists caused by line compression in storage. If you are flying with quad lines then determine if you have twists between line pairs; rotate your handles one way or the other to see if the twists get worse or better. Once both line pairs have been separated then you may have twists in each line pair. Using the same technique, rotate your handles until the problem is corrected. All of this doesn't really take too much time. The other problem that can occur is that one line pair has found itself inside the other line pair. This is the weird problem. In this case you just stake your handles with the kite under tension and work the tangle back to the handles. Most times you can figure out what needs to be done but if you can't, undo the lines from one handle and work the tangle out, then reconnect the lines to your handle. If you use this technique you should be able to set up or tear down your kite in 5 minutes or less. Regards, S.F.
-
Carbon Tubing Comparison
SegelFlieger replied to SegelFlieger's topic in Adjustments and Modifications
I just posted my blog Carbon Tubing Dynamic Response Test Be aware that this is my first blog. Let me know if you have trouble with any links or pictures. I look forward to discussions that follow. Regards, S.F. -
Summary: A static deflection test was previously performed on several carbon tubes allowing them to be compared based solely on “stiffness”, or the “spring constant” for each tube. A link to the discussion can be found here: http://kitelife.com/forum/topic/7329-carbon-tubing-comparison/ Experienced Rev fliers have responded with comments regarding the “reflex”, or response of the carbon tube frame being more important than the “stiffness” or weight of the frame. Experienced fliers select a preferred frame based on wind conditions and the selection of sail type (vent options: none, mid, full). Additionally, modifications may have been made to the “stock” sail design to improve performance of the kite. The data presented here represents the dynamic properties of a carbon tube independent of a sail. The Data: Let's get right to the data! Here is a link to the current Excel spreadsheet with both static and dynamic test results for the rods that I have tested. A copy of the table is included in this post but does not let you sort by manufacturer or characteristic. http://www.donkush.com/CarbonTubeProperties.xls here is a copy sorted by 1st Amplitude 5” Perturbation: Here is a copy of the worksheet "Deflection and Reflex comp" which compares dynamic measurements with the commonly used Rev 3-wrap rod with silver label: A positive % means that the test value for that tube was greater than the Rev 3-wrap test value. Likewise, a negative % means the test value was less than the Rev 3-wrap test value. Discussion: Specifications for carbon tubing that you purchase for the purpose of constructing or modifying a frame combination yourself only include tube ID and OD dimensions, and an overall weight. Some tubes and frame sets will only provide a model ID and no other information. The more experienced kite flier or builder will be interested in more information than this. Hopefully the tests that I have conducted will be useful to you although you will see from the pictures that I don’t have a NIST certified lab. I was able to conduct these tests with readily available household items (for me these were readily available ) and a little ingenuity. Description of the Carbon Tubing Response Test: A 31” tube was secured at one end of a test table by a ferrule allowing a full 31” section of tubing to be deflected and oscillate. The 31” length was deflected by 5”, released, and allowed to oscillate until it settled. The amplitude of the first vibration response was measured in inches. The frequency of vibration was measured in HZ (cycles per second), and the settling time was measured in seconds. (settling time is defined as the time it took for the tube to stop vibrating after the initial disturbance). Test Table Picture: The measurements were taken using audio technology. A small wire (whisker) was fastened to the end of each tube that was tested and a small microphone was placed exactly in-line with the stationary tube. As the tube oscillated past the microphone it recorded the impact of the whisker. Since the audio was sampled at 44.1 KHz the data is quite precise. Frequencies and settling times were analyzed using audio editing software. Data Sheet Picture: A data sheet was used for each rod tested. The data was recorded and then entered into the excel spreadsheet that has been posted. Sonic Performance Pictures: Multiple tests were performed on each rod and the results were averaged. Here is an example of a rev 3-wrap rod showing 3 response tests: Here is a picture of one test with markers drawn at each impact of the microphone. Two impacts define the Period in seconds. 1/Period defines frequency in Cycles per Second known as Hz (see highlighted and circled value in the picture). In the case of a 3 wrap rev rod the Period is .062 seconds on average and the frequency is (1/.062) or 16.129 Hz: The first amplitude deflection however was measured manually. A toothpick was held perpendicular to the testing table and at the end of the tube. The toothpick was adjusted until the tube barely touched it during the first amplitude deflection. I don’t have a picture demonstrating this test but here is a picture of a sample test sheet showing where the first reflex of an example test sheet for the 3-wrap rev rod where the first amplitude was marked. It is at the end of the perpendicular line drawn from the Centerline (CL): What does this all mean? Hopefully this information is useful to you and can inspire further discussions regarding frame preferences and sail choice in the forum. I will offer my initial interpretations of the data with hesitation because I know that many of you will have your own observations... Again, Wind Speed, Sail Choice, and Sail Modifications are all factors in the kite’s response and performance. Frequency test: The frequency test results are very similar between each rod with the exception of the SS P400 and the Rev 3-wrap Green-stripe. Almost all the rods oscillate at a slightly lower frequency than the Rev 3-wrap. The frequency value could indicate how quickly the rod, when used in a sail, will try to return to a static position after a disturbance. Perhaps a point for discussion… 1st Amplitude Response from 5”: This test possibly indicates how “springy” a tube is. A large 1st amplitude would indicate that the rod wants to flex easily. Perhaps this would give you a very “bouncy” experience when used in a sail. Silver Race rod test results would indicate that they would seem considerably less bouncy than the 3-wrap. The SS P-90 is the bounciest of all which I would agree from my experience. Settling Time: This test would also seem to indicate how quickly a rod will return to a static condition after a disturbance. It adds another dimension to the frequency characteristic that describes how quickly the amplitudes during oscillation diminish to zero. Race Rods and SS PX tubes have a shorter Settling Time than the 3-wrap standard; this has me curious now and perhaps my first question back in the forum: For those of you with SS P-3X frames, how do you compare this frame to the Rev 3-wrap? The SS P400 seems like it wants to vibrate forever! Well, I will end this blog now and look forward to continued discussions in the forum. S.F.
- 3 comments
-
- 6
-
-
- frame selection
- frame design
- (and 2 more)
-
Carbon Tubing Comparison
SegelFlieger replied to SegelFlieger's topic in Adjustments and Modifications
This is all great information! Thank you. What I hope to present with my test information is the dynamic response characteristics of the carbon tubes alone, independent of the sail choice. The sail that has been chosen to use with the frame will definitely change the “reflex” characteristics of the entire kite as it restricts (dampens) the motion of the frame as it responds to input. Modifications to the standard Sail/LE designs are also a part of your experiences and choices for sail and frame combinations. This will certainly influence your choice of combinations for frame/sail when you fly under a variety of wind conditions. I plan to post my blog regarding the “Carbon Tube Dynamic Response Test” next week (delayed at the moment by visitors for the holidays). Perhaps after this information is posted we can see what you have to say about the following: First… comments regarding the dynamic response test data that I present. Second… perhaps we start another thread regarding sail and frame selection; including any modifications to your sails and leading edges and how these enhance the performance of your kites. Again, thanks to all of you for your input regarding this subject. S.F. -
Carbon Tubing Comparison
SegelFlieger replied to SegelFlieger's topic in Adjustments and Modifications
To address the “flex” vs. “reflex” characteristics of carbon tubes I have created a carbon tube “dynamic response” test that quantifies 3 dynamic properties of each 31” tube that was measured: 1st Amplitude from a 5” perturbation (inches) Frequency of vibration (Hz, cycles per second) Settling time from a 5” perturbation (seconds) There are currently 10 different tubes in my sample set. Before I present the results of the test I would like to hear from some experienced fliers regarding what you prefer in the “reflex” of your kite frame under 4 wind conditions… the purpose being that I might be able to add a commentary to the test results that explains your experience. Here is a question: Considering “reflex”, “snap-back”, “recoil” (all meant to be descriptions of the same thing), which frame do you prefer under the following wind conditions? Very Light Wind (0-2.5 mph): Light Wind(2.5-5 mph): Medium Wind(5-10 mph): High Wind(10-15+ mph): A report of my testing will follow “your” responses (pardon the pun), perhaps explaining what you experience when you fly a certain frame and will be posted as a blog. I look forward to hearing your responses. S.F. -
Carbon Tubing Comparison
SegelFlieger replied to SegelFlieger's topic in Adjustments and Modifications
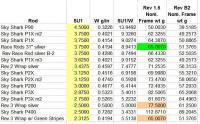
I have added some new measurements to my carbon tube comparison chart. First of all I would like to note that I have sorted the list by the SU1 (Stiffness Unit Version 1) column so that decisions to use a frame of each design would be based on frame stiffness. Again, total nominal Frame weights are based on 5 ea x 31” spar length for Rev 1.5 or B-Pro , and 5 ea x 24.5” spar length for the B2. Total frame weight does not include ferrule weight as you may choose your own ferrule when building your own frame. The additions to the chart include the Sky Shark P400, additional measurements for a new batch of Sky Shark P1X, and also the addition of a Revolution 3 Wrap “green stripped” rod which is a apparently newer version from Revolution. After measuring the Revolution 3 Wrap “green stripped rod” I have to say that I am very impressed with its characteristics. A frame built with this rod will be the stiffest rod shown in my list but has the same frame weight as the “silver” race rods and the Sky Shark P1X. The total frame weight difference is 12.5g or 16% less weight for the “Rev 3 Wrap green striped rod” compared to the original Silver 3 wraps rods. Considering that “Frame Weight” is the largest contributor to your total kite weight (~40%) when flying an Icarex (PC31) constructed non-vented sail, this frame would allow a ”Light Wind Flyer” to have a stiffer response and a “High Wind Flyer” to have a stiff frame with a “light kite” response. Here is the updated chart: in case the picture can't be enlarged, here is the chart again in text format: Rod SU1 W g/in SU1/W Rev 1.5 Nom. Frame wt g Rev B2 Nom. Frame wt g Sky Shark P90 4.5000 0.3226 13.9492 50.0030 39.5185 Sky Shark P1X m2 3.7500 0.4021 9.3260 62.3255 49.2573 Sky Shark P1X 3.7500 0.4154 9.0274 64.3870 50.8865 Race Rods 31" silver 3.7500 0.4194 8.9413 65.0070 51.3765 Rev Race Rod silver B-2 3.7500 0.4286 8.7494 66.4330 52.5035 Sky Shark P1X m3 3.6250 0.4021 9.0152 62.3255 49.2573 Rev 2 Wrap silver 3.4375 0.4597 7.4777 71.2535 56.3133 Sky Shark P2X 3.1250 0.4516 6.9198 69.9980 55.3210 Sky Shark P2X m2 3.1250 0.4740 6.5928 73.4700 58.0650 Sky Shark P200 3.0000 0.4677 6.4144 72.4935 57.2933 Sky Shark P3X 2.8750 0.5323 5.4011 82.5065 65.2068 Sky Shark P3X m2 2.7500 0.5265 5.2232 81.6075 64.4963 Rev 3 Wrap silver 2.5000 0.5000 5.0000 77.5000 61.2500 Sky Shark P400 2.5000 0.7282 3.4331 112.8710 89.2045 Rev 3 Wrap w/ Green Stripes 2.3125 0.4194 5.5138 65.0070 51.3765

-
Carbon Tubing Comparison
SegelFlieger replied to SegelFlieger's topic in Adjustments and Modifications
I am also curious about the difference. Given an opportunity I will test them and post the results. I also agree about the spine orientation taking a natural position while the frame is under load. However, friction in the leading edge pocket, ferrules and connectors can complicate the process of "natural spine orientation". I suspect it doesn't really matter that much compared to the dynamic complexity of the sail as you fly. -
Carbon Tubing Comparison
SegelFlieger replied to SegelFlieger's topic in Adjustments and Modifications
These measurements were made with Rev rods with the silver labels and feather insignia. No green band on either side of the label. -
I know I am getting in on this discussion late but I thought the following information might still be useful. I am in the middle of replacing 6 existing vents in a rev-style kite that I made after noticing how the rev kite sail stresses when under wind load. The screen material used for the vents is directional in regards to strength under tension. It is strongest when it is stretched perpendicular to the sides of the squares in the mesh (actually very small rectangles in most cases). Stretching the material diagonal to the squares makes it behave like a giant "rubber band"! When deciding on the original orientation of the mesh weave I predicted that most of the tension would be in the direction of the leading edge but it was obvious after watching the kite fly in strong wind that this was wrong. It made the kite feel "springy" and you could see the material "gather" across the vertical spars at the bottom 2/3rds of the kite. The tension for the bottom 2/3rds of the kite appears to actually pull from the angled sides of the kite towards the center. I have replaced the vents in the lower 2/3rds of the kite in this orientation and will be looking for some strong wind to test the mod out and see if the "springiness" goes away; I suspect that it will. In the case of the standard revolution panel designs, the entire vent, from the bottom edge to the leading edge, is oriented with the sides of the mesh squares towards the sides of the kite sail. My sail design panel layout is quite different than this but the location and shape of the vents are very similar; they just cross multiple panels and I have sewn each vent individually into each of these panels.
-
Carbon Tubing Comparison
SegelFlieger replied to SegelFlieger's topic in Adjustments and Modifications
This was a very interesting video. I bet a spine does exist in all rods or tubes. Since the sections of tubing used for kite making are quite short compared to a fishing pole and are very stiff, relatively speaking, I think that it would be hard to measure. A spine would be really hard to keep track of when assembling a kite. Regarding the pultruded carbon tube that you have (and what's worse than keeping stuff is throwing away stuff and later wishing you hadn't)... Carbon wrapped tubes are made using a more precise process than pultrusion. I'm not an expert on the subject but I have spoken to the owner of SkyShark a few times. Carbon tubes are made by wrapping a carbon cloth impregnated with resin around a mandrel and then cured. After a tube is cured it is then precisely sanded into the desired outside diameter of the tubing. The mandrels used for this specific purpose are expensive and SkyShark has invested a lot of money in the proper tooling. I have been told that some manufacturers do not buy the specific tooling but use "drill bit" rod stock for mandrels (less expensive); you might be able to tell which manufacturers these are because the inside diameter of the tube is not the standard .244" . A roll test is a good indicator if your tube is not uniform. If you roll it on a flat surface there should be no wobble and it should roll freely. Well, I am off to WSIKF tomorrow but I look forward to discussing or answering any questions when I return. -
Carbon Tubing Comparison
SegelFlieger replied to SegelFlieger's topic in Adjustments and Modifications
Thanks for your comments Exult and Stuart! I'm glad that you find this information useful. I intended for SegelFlieger to translate as "Sail Flyer". Perhaps my translation to German wasn't proper. I wanted to choose SegelMacher as a name but thought that this was more of a "flying" community so I thought I would adapt. I have a lot of experience making kites; and I am always learning. I have no experience with gliders though. In reply to your comments Exult: The 1 lb weight was chosen because I had one on hand. I also had a 2 lb weight and was concerned about breaking the tubes at the ferrule when I saw how much they flexed. 1 lb seemed about right to give enough deflection to make a measurement; a smaller weight would not deflect the tubes enough to give accurate measurements. The 37" lengths of line suspending the weight were chosen to be as long as possible without having the weight touch the ground for the least stiffest tubes. I used a tripod to balance the tubes at their center while making a measurement. I agree that the SU1 value is confusing since a larger number means less stiff. It's confusing like the gauge naming of electrical wire (14 ga is larger in diameter than 22 ga). Too late to change that now, it would only be more confusing :). The PX series of Skyshark tubes replaced the P series as you probably already know. A P2X is supposed to be very similar to a P200 performance-wise but in appearance the PX series has a checkered appearance and the P series has a solid color appearance. You are right "measuring is knowing"... that's how they measured in my test. Nice to meet you! -
After several Chat discussions with other Kite Life members I was encouraged to share the following information: Carbon Tube Deflection and Weight Comparisons I have created my own standard method for measuring stiffness-to-weight ratios for carbon tubing commonly used for sport kite construction for my own personal use as a kite builder and hopefully this information will be helpful to others who would like to build or mod their own frames. In this report you will see how my testing of a group of commercially available tubes compare against this standard. Any frame material can potentially be compared using this test. Test Definition: A deflection test has been defined to measure the standard deflection of a 62“ length of carbon tubing suspended with a fulcrum at it’s center-point, 31”. This length was chosen for convenience since it represents the length of two standard revolution 1.5/B-Pro spars. A 1 pound weight is suspended against a 62” length of tubing. A fulcrum is placed at the center of the length to suspend the tube vertically; a loose or permanent ferrule is used to connect multiple sections of tubing and is placed in the center for the measurement to create the 62” length. The 1 pound weight is suspended with 37” of line on each end of the 62” length forming a triangle with 37” sides. A second line is then attached to each end of the 62” length of the tube being measured to create a parallel line beneath the bow that is created by the weight. The distance from the center of the tube to this line is then measured. The weight of the tubing is calculated without ferrules. This defines the nominal weight of the tube in g/in. SU1: Stiffness units (version 1 is where the 1 comes from in SU1) are defined by the amount of deflection at the centerline of the 62” bow and are in units of inches. W: is the weight of the tubing sample used in g/in. This is a measurement of the tube without a ferrule. These results are the average of several tubes. SU1/W: represents a stiffness-to-weight ratio and can be used to compare other tube materials. This becomes the standard for comparison in my chart and the chart is sorted from the highest value to the lowest value. A high value means that the tube will weigh less but be less stiff (more deflection). A low value means that a tube will perhaps weigh more but be more stiff (not deflect as easily). For frame weight comparisons, nominal weights were calculated for a Rev 1.5/B-pro frame and a Rev B-2 frame. Nominal weight values do not include the weight of ferrules or adhesives. Note: m2 stands for measurement of a second group of tubes. in case the picture can't be enlarged, here is the chart again in text format: Rod SU1 W g/in SU1/W Rev 1.5 Nom. Frame wt g Rev B2 Nom. Frame wt g Sky Shark P90 4.5000 0.3226 13.9492 50.0030 39.5185 Sky Shark P1X m2 3.7500 0.4021 9.3260 62.3255 49.2573 Sky Shark P1X 3.7500 0.4154 9.0274 64.3870 50.8865 Race Rods 31" silver 3.7500 0.4194 8.9413 65.0070 51.3765 Rev Race Rod silver B-2 3.7500 0.4286 8.7494 66.4330 52.5035 Sky Shark P1X m3 3.6250 0.4021 9.0152 62.3255 49.2573 Rev 2 Wrap silver 3.4375 0.4597 7.4777 71.2535 56.3133 Sky Shark P2X 3.1250 0.4516 6.9198 69.9980 55.3210 Sky Shark P2X m2 3.1250 0.4740 6.5928 73.4700 58.0650 Sky Shark P200 3.0000 0.4677 6.4144 72.4935 57.2933 Sky Shark P3X 2.8750 0.5323 5.4011 82.5065 65.2068 Sky Shark P3X m2 2.7500 0.5265 5.2232 81.6075 64.4963 Rev 3 Wrap silver 2.5000 0.5000 5.0000 77.5000 61.2500 Sky Shark P400 2.5000 0.7282 3.4331 112.8710 89.2045 Rev 3 Wrap w/ Green Stripes 2.3125 0.4194 5.5138 65.0070 51.3765 MODERATOR UPDATE: