Leaderboard
Popular Content
Showing content with the highest reputation on 11/29/2018 in all areas
-
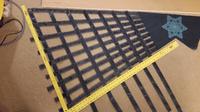
A new 1.5 mesh based on the Challenge PolyMax and a touch of Icarex Light Blue scrap. Hoping to make this a higher wind kite. Made my own 1" strips from the poly this time instead of using tails. I may open the mesh pattern a bit but you get the idea. Playing with some of all I've learned. You can see a touch of Mesh, A touch of Poly, and a hint of Perspective. Except for the snowflake entire sail will be the Midnight Challenge PolyMax. I'll also be edge binding in the same material. LE will be my normal White.2 points
-
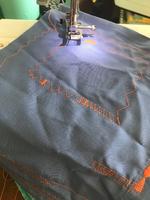
When I had my machine tuned up the guy showed me the weak points on the machine. While it is mostly metal (Bernina 830 vintage) it does have some plastic inside, including two parts that are gears. The repair guy taught me that if you are gonna buy a used machine you should open it up and hand crank the machine while you look at each gear for condition issues. Don't buy if you see irregularities in the gears. On my machine everything is good for now, but he said those gears are not made anymore for my machine and if they break I am SOL. If that happens I may have to do a crash course on 3d printing. [emoji6] Sent from my Moto G (5) Plus using KiteLife mobile app2 points
-
next time you get a chance,... examine one of the master's kite building effort up close & personal,.. see how Ron Gibian does it? What is his seam width,.. how many stitches per inch, .... do you want "black" on both the front and the back sides, like him? The Randy Tom method (sew all the fabric colors together for the entire sail, then front and back cut out the appliqué pieces until you're left with just a single thickness). Wastes huge amount of fabric, but nothing can slip/slide/or wiggle out of alignment, there are no hot tacking holes either, no gummed-up sewing machine, your efforts are expensive but completely perfect, like your own national entry into the AKA building comps? Some folks (Lam Hoac) "mount" all the colors onto a white carrier piece of fabric, easy to see the lines, simple to butt the pieces and an accurate fit of the appliqué based upon experience. Now you have to hold those pieces in position as you slide thru the sewing machine. What is your solution?, masking tape, hot tacker, spray-mount adhesive, water adhesion thru a capillary action? You do NOT back-cut out the backing layer, the white stays one piece. Ask Lam for a black kite and oh how he howls, back-cut out the backing layer yourself and now he's concerned if you did a good job,... "cause his name is on it!" Did you know you can make the entire kite with no sewing at all? 3M's 9460 VHB adhesive tape,... I've flown single skinned quads of this construction method for 3,000 hours. Guess what?, no weight of the thread, no excess overlapped seams, no perforations (sewing needle holes) to promote early failures. It is not faster, just another choice to be made as a builder. Here's a word to explore,... if a dualie sport kite is your interest: catenary cut,.... that's where you adhere a curved surface to a straight edge, thereby making a 3 dimensional shape w/o any framing to force that shape. Like a tent instead of a tarp. Who's the master of this technique?, Ken McNeill, blue moon kites. Until you have personally experienced a kite built this way, ...... anyway, more options to consider as a builder. If I wasn't so impatient I'd be making my own kites too, alas I know my own serious flaws and deal with 'em, accordingly. I will pay for expert production by a true master class builder who signs their work and backs the product.2 points
-
Remember when making another no 2 snowflakes are alike LOL. Very cool!!1 point
-
Taz is a whirling little dirvish type dude from Tasmania.Some think he came from King Island, others say Flinders Island.They all agree though that he's a pesky little bugger that will make off with any unattended kite he sees.Most to never be seen again. Legend says he travels the world searching for kites that catch his fancy. Upon his return home he stashes them in a hidden lair somewhere around Cradle Mountain. Many have searched for this mythical stash of kites. Some sadly have never returned.Oddly enough Robert Brassington the world renowned Tasmanian kite builder has never lost a kite to the Taz.This has led some to speculate that Robert himself may indeed be the dreaded Taz.Personally I think Taz just is just Taz. Having a tremendous amount of respect for his fellow countryman I think he's just chosen to leave Robert in peace.Be very wary of the Taz. He is very machine like in his kite acquisitions.1 point
-
Okay now I got to put together some kites side by side and REALLY look at the BMK Mongoose. Extremely pleased with it. The Mongoose feels very silky to me and haven't understood why.Now maybe I will 😊.Took awhile but I got a descent Pfaff 1122 for $58.00.Needed a good cleaning so I followed some you tube tutorials. Doesn't have the walking foot but that can be bought.I think a lot of the newer model machines plastic parts are to eliminate the need for most oiling. Some of it's cost but some makes sense ,weight etc..Some of the older machines(60s,70s) I researched that were on the list were White from England, Singers made in the U.S.and Canada and the Kenmores made in Japan.Some really nice ones in my area for less than $100.00. Going back to the 40s and earlier some are just stunning to look at.Went the Pfaff route because of the popularity amongst kite builders and not knowing a thing.The 1122 is considered fast for a newbie and have found controlling it a little difficult. Won't be long and that won't matter.Should last a good while. Been looking for a large sewing cabinet to make feeding easier. Lots of smaller ones at good prices. The bigger ones get a little pricey. My sewing room got delayed but it won't be long. Watch the classified free section. Amazing how much free glass pops up for your cutting table.1 point
-
First of all..abandon the imperial system and use meters. 😉 it’s much easier. Buy a spool of LPG or similar, plant a stake in you flying field, unroll the line walking backward and count your steps. One step is roughly one meter. Or you can be more precise and actually precisely measure your step or the line with a long measuring tape. Repeat the process again for a quad set, making sure you check all 4 before tightening the knots My standard has been so far: 45 meters for team / Pair flying. You want all the sky. 35 meters for single flying comp. 30 to 20 meters for trick flying. I rarely fly shorter than that. Once unrolled the spool on one hand and the line in the other you should have 2 lines ready to be cut at the ground stake and at the spool of course. Hold the ends together with a simple knot , cut at the stake. You have 2 equal lines. I use old bridle line for sleeving, I cut 4 equal pieces and sleeve them in at each end better if you have 2 colors. Tie your loops and you should be good to go make sure to check from time to time if they are still equal. It depends on which side you pull more often tricks1 point
-
I had nice session w/Dugard on his, assembly was unique, easier in wind with my assistance holding edges. It was different, but certainly a great time, doing somethings easier or impossible with a flat quad. We had enough wind and open space (sandy point state park) to honestly evaluate and compare flight dynamics. Paul also had a stock DJinn and the new 3 rivers wing, whereas I had set-up a Phoenix Ash w/French & sticks framed in SS. Swapped back and forth for a few hours, merits for each example, packed up double-quick and headed home before the downpour that lasted 48 hours!1 point
-
1 point
-
My recommendation? a lightly used Pfaff mechanical machine is what to seek-out, USED it has a "walking foot" which grabs the fabric like the jaws of a pliers, from both the top and bottom. That makes a huge difference when you finally begin working with super slippery material like Icarex and a seven foot seam! I've seen kites made with just a straight stitch (as opposed to the triple stitch zig-zag, as that was all that was available on that old model, almost like a manual with the foot pumping mechanism. After my first kite sewing retreat struggle, I gave that machine away, promised the bride we'd never own a kite I couldn't acquire w/VisaCard, but eventually a bunch of great kite builders in my local club forced me to learn how to do it myself. (particularly Dave Ashworth, he only flies stuff he built himself, never the same twice!) That Pfaff led to an even greater appreciation for the workmanship of a true master builder, such as Shook or Bazzer. I took lessons from a guy who owned 7 different brands, each time I had to learn a new one, you learned what features were most desirable and then I found machine that could provide those desired functions as a reasonable cost. Low bottom bobbin warning, needle down/stop locking, walking foot, a fitted table so more of the fabric is flat going thru the machine. Lettering and advanced (Kewl) stitching features are a computer as opposed to a mechanical feature, costs will also increase accordingly. no one will EVER care as much as you yourself do when building YOUR kite, but that doesn't mean you can't get something made as a custom, perfect and your way, for a little bit of extra cost, try ASKING for it. The best thing about doing it yourself is the sense of satisfaction when folks converse about your creation, or enjoy flying it themselves. Changing something for testing purposes?,.... what happens if? Being a builder make these considerations fun to explore, most resulting in failure, but occasionally you hit a home run with the bases loaded. These are magical moments to savor or share. Being a builder allows you to work cooperatively too. From my experience this is the single most rewarding activity in kiting,... your entertainment choices may vary -plm1 point


