Leaderboard
Popular Content
Showing content with the highest reputation on 09/01/2020 in all areas
-
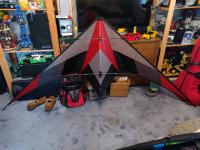
Skyburner promised beauty and performance, and they delivered. The Tica 2020 is visually appealing and masterfully built, but the performance is even more spectacular. I've had my Tica out 3 times now. The first time was in low and bumpy winds (0-2mph), better suited to the Pro Dancer SUL or Zephyr. I struggled to keep the Tica airborne, but it was possible to to get it to fly, just with a lot of effort. The second time out was in high and gusty winds (15-30mph) that my Silver Fox 2.5 Vented excelled in. I was stupid to take the Tica out in those winds, but it handled gusts well enough and (luckily) didn't explode. My third time out with the Tica was the proverbial ticket! Winds were low and smooth (2-6mph), and blowing in just the right direction for my partially treey field. This is where the Tica came to life. Straight line tracking and 2D flight we're smooth and predictable, while 3D flight was far more graceful than anything I've been able to achieve in any of my other kites. Axels, which I can do with maybe a 30% success rate on any other wing in my collection, looked like they were being done by a seasoned pro. Ground recoveries are excellent on the Tica as well. Cartwheels are effortless, pop-ups are predictable, and even the dreaded belly-down-nose-in dead man's position is recoverable. My only criticism of the Tica, is that it is hard to get it to lay on it's back or do a back flip. This is more than likely do to my limited experience, but I'm thinking a little more weight at the tail might improve this. I will be experimenting the next time I have it out. If you've been considering buying the Tica 2020, just do it. You won't be disappointed. Sent from my ONEPLUS A6013 using KiteLife mobile app1 point
-
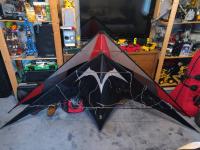
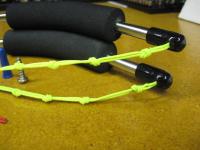
Hopefully this version gives a bit more insight into the LE Construction. 1.5 sized and lime green for visibility.1 point
-
They didn't seem nearly as slick as the lines they were replacing and they tended to wear and fray much faster..1 point
-
1 point
-
Thanks for the info. I ordered the standard Mamba and will get a different dedicated SUL kite for the 2-5 mph wind range.1 point
-
That's the standard. As with the WidowMaker, I don't see the use of having an UL. Both fly down to about 3mph while still being able to trick. Sorry to hear about your UL, is it totaled ?1 point
-
I’m on the fence with the new tica. Honestly after the Solus, I’m hesitant about any kite claims Devin makes. I flew what was supposed to be the final prototype of the Solus and pre ordered based on that flight test. What I got was worlds different and I had to do some tuning, as RobB well knows to feel like I didn’t waste $700. There’s a few people I trust that have flown the tica I’m going to talk to before I make the leap. I have flown the original tica and it is an amazing kite. Sent from my iPhone using KiteLife mobile app1 point
-
If they're anything like the WidowMakers, there will be no use for an UL. The standard flies well down to 3mph with tricks, I can't see needing an UL for a wind range of 1-2mph.1 point
-
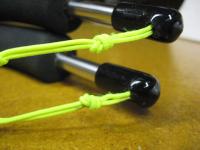
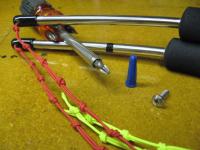
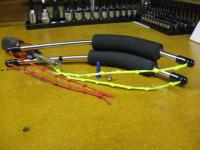
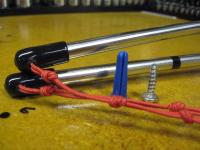
OK Duane, you've got the Pros in here now - listen up - these guys know what they are talking about. As for me, I'm just a tinkerer, with a bit of mechanical knowledge, and the tools to back it up. I really enjoy improving, improvising, and revising, already great ideas, and there are tons of them out there. If only I could fly a Rev, so well. As for the "Watty Way", my mistake (sorry Watty, but you did make the video), and I suppose that is what I remembered. I do remember that the original idea came from, "Stone in the Shoe Bob", so credit given, where credit is due (sorry Bob). No harm intended, only thanks - Bob, thanks for the idea - Watty, thanks for the video. As they say, a picture is worth, well, a lot. Ok, so now it's the "Stone in the Shoe Bob" method. Either way, thanks guys. Now, as JB has pointed out, the length issue is probably a personal preference. I'm sure that for the seasoned Pro, the slightest change in length, and/or diameter, is extremely annoying, however, for the novice / newbie, it may not be, quite so critical. I would suppose that whatever feels comfortable to you, would surely suffice. I hope JB will agree with this. So, as for the dilemma, "Do I cut the handles down to the original length, or do I let the length, fall where it may?", my advice on that would be to fix a set of handles, using the "Stone in the Shoe Bob" method (as illustrated in the "Watty Video"), then take them out for a flight, or three. If the length feels too long, awkward, or unwieldly, then it's simple enough, to go back to the work bench, take them apart, and cut them off at the inner edge, of the original holes, where the rings used to be attached (side of the hole, closest to the grips). After the cut, smooth off the rough edges, ream out the ends, and reassemble everything. This should put you back to within 1/16" to 1/8", of the original length - Voila! No snag handles, original length !! After all, it's a lot easier to shorten a set of handles, than it is, to lengthen them (now surely that make sense, doesn't it?) Just for ease, of you that may be reading this, here is my original post to "Stone in the Shoe Bob", concerning his revision, which originally appeared, over in the Revolution Kites Forum: Hi Bob, I was reading about your handle modifications, using the drywall anchors and the screws, which would enable one to rid themselves of those annoying metal rings, on the ends of the handles. A while back, Watty Watson sent me a video that he obviously put together, to help me understand his explanation of this procedure. I thought it worked like a charm. Now, I see, where you have now, gone back and reversed that modification, on the upper ends of your handles, and reattached the metal clips. I believe you said this was due to the additional handle length, which is created, by this particular modification. Now, I've got a stupid question. If this additional length is a problem, why not just cut off the top end of the handle tubing, maybe .25" to .50", or whatever seems to be right, and put you modification back as it was. I mean, that is such a clean and trouble free modification, and those clips (hog rings) are really a pain. My thoughts would be to cut the tubing, immediately below the holes, where the metal clips were mounted, and then reinsert your anchor and screws, as you had previously done. This should put you back, very close to the original handle length (+/- 1/8"). Surely you've got several sets of handles, just lying around, that you could experiment with. I hope I haven't misunderstood your point, but I think I'm hearing what you were saying correctly. Just my thoughts on the issue. Also, as for me, I suppose that I'm not quite as tuned in on the Rev, as you may be, and obviously, I haven't been flying long enough, for that small amount of additional length, to be a bother. Maybe one day, I'll get to that point, but for now, I'm just very happy, with your idea. Thanks for sharing it ! Now for my additional two cents - For those of you, who don't want to go to this extreme, of cutting the tubing, and would just like to use the anchor and screw idea, I have modified several sets, with very little trouble, however, if you have access, a few tools, other than a screw driver, it will make this job much easier and neater. WARNING - Do be careful, when removing the rubber covers, from the ends of the handles, because most of the handles that I have seen, have a very sharp and nasty burr, around the holes, where the metal clips were attached. You can see where the holes were drilled in the tube, so beware. Once I carefully removed the metal clips, and the rubber end caps, I took the handles over to the grinding wheel, where I smoothed down the burrs around the clip holes, and then polished the ends of the tube with a rotating brass bristled, wire brush. You could probably accomplish the same effect, with a little elbow work, a flat file, and some emery cloth. Just be careful. In fact, the file is probably all that is really necessary, if you will be very careful, and try not to scar the exposed part of your handles, while filing the burr. A padded vice, would be quite helpful, for holding the handle steady, while you file it smooth. You just need to remove that sharp metal burr around the small holes. I also found it necessary to ream out the ends, of most of the tubing, as there was some kind of hard residue, just inside the end. I don't know what that was, but it definitely needed to be removed. Either way, it just makes for an easier job, once the grinding, polishing, and reaming is done. Then it was just a matter of forcing the plastic anchors (with shoulders), down into the ends of the tubing, and inserting a #10 stainless steel screw, leaving just a small gap under the head of the screws, for the pigtails to be looped around. This can be seen clearly, in Watty's video, which can be found here http://www.vimeo.com/7746634 Also, I'll try to post a couple of pics, of one of my latest modified handles.(see below)1 point

