
Jeepster
-
Posts
583 -
Joined
-
Last visited
-
Days Won
1
Everything posted by Jeepster
-
Congrats Scott ...
-
How to stabilize a "FlowForm" single line kite ?
Jeepster replied to Guy Capra (Alomphega)'s topic in Kite Making
Two thoughts come to mind when watching your video: 1) Four keels instead of three would help both the shape of the airfoil and the ability for it to maintain inflation. 2) The keels are too long from the bridle point to the leading edge. Being too long will create too large an angle of attack and contribute to the side-to-side hunting and eventual crashing. If the kite is an experimental one, then sew a small bridle loop on the rib right at the rib-to-lower panel joint. Do that for each of the seven ribs. Then add a new bridle line from each of the loops to the junction of the three main bridle lines-to-the flying line. First adjust (tighten) the new bridle lines to flatten out the leading edge. Then slowly tighten all of the seven new bridle lines as a unit until the kite flies in a stable manner. Too stable and it will not correct for wind gusts ... not stable enough and it will not stabilize when it's hit with gusts. There's a sweet spot that is hard to find with a single row foil kite. Jalbert's early kites had multiple rows of bridle lines that allowed him to adjust to get the best flying angle. Foils are more of an art than a science ... Cheers, Tom -
May? ... May? ... hmmm Cheers, Tom
-
Okay, so you won't buy into the vented B2 taking some of the load off my travel Rev2. Guess, I've got to fess up and tell you the real reason I need it. You see, many years ago, Ben gave me permission to build some Rev-like kites ... all stuff that he didn't manufacture. I wanted to start out small, and thus, this is one of the first ones ... a four foot wing span vented "half-pint" kite. Cute little thing isn't it ... all babies are cute aren't they? Such a soft pulling kite ... in 25 mph plus winds, it's like holding a feather. It flies nice and all, but it's never grown up. To this day it's simply a half-pint. Now, with a more adult example, it surely would have a chance to mature. Now that I've shared the needs of my half-pint kite with you, think of how gratifying it'll be to help me obtain the more mature vented B2 kite ... yes? Cheers, Tom

-

From the album: Jeepster
Four foot Rev-like vented kite. -
Making Your Own Kite Lines (How do you do that?)
Jeepster replied to Reef Runner's topic in Adjustments and Modifications
One admonition ... do make sure your old line set is the correct length. My first line set came with the kite and was advertised as 80 foot long. My best guess is that the manufacturer cut the raw line 80 feet long and THEN made the line set. I finally cut it down for a Kite Party line set. Not sure how close the line sets need to be for flying in team situations, but three feet too long is too much. The Fosters fly on 100 foot lines a lot. Since we were going to be together for a week this last summer, I made a 100 foot set to fly with them. Theirs turned out to be about 3 feet shorter than mine. I was constantly being buffeted with turbulence when following one of them. They had no trouble 'cuz theirs were the same "odd" length. Cheers, Tom -
Making Your Own Kite Lines (How do you do that?)
Jeepster replied to Reef Runner's topic in Adjustments and Modifications
Hey Tom, I like that idea......... Oh come on! You guys with beach access don't have any worries ... just stretch out 240 ft plus (or 480 ft plus) and tug away the creep. Here in the Midwest the &$%^# corn gets in the way. I used our RC club's flying field early one morning to build my first set of 120s. Stretched out the 480 ft plus of line and tugged away. It worked okay, but the wind interfered with the sag method of evening them out, thus the transfer to my local school's hallway during evening hours. Cheers, Tom -
Making Your Own Kite Lines (How do you do that?)
Jeepster replied to Reef Runner's topic in Adjustments and Modifications
Here's a posting I made several years ago on the Rev forum about stretch and creep that is still valid: ................................. Point of order: Our flying line exhibits both stretch and creep. Since it's a form of plastic, the fibers/weave will permanently yield under load ... ie take a set and not return to its original length ... that's creep. In addition to creep, the line will elongate under load and return to it's original length when the load is removed ... that's stretch and can't be removed. Said another way: When the line is new, you can pull on it with an increasing load and it will elongate in proportion to the load. However, when the load is removed, the line will not return to it's "off the spool" length. That's creep, and that's what we're trying to remove from new line when making a line set. If you make up the individual lines independent of each other and don't use a scale to induce the same loads in each line, then you'll have various levels of creep in each line. That will mean lots of adjustment after you've flown for awhile. The alternative is to pair up the upper lines and the lower lines. Remove double the length of the line set off a spool (plus enough extra for all four loops.) Sleeve both ends. Place the loops over a stake/nail/post and stretch out the doubled over line. Place a carabiner (or a pulley if you're also a SLK guy) at the doubled back point and load it up. Since the sleeves/knots reduce the breaking strength by about a third, your 90# line will now break at about 60# of load. But, since the line is doubled, you can pull with 120# of force before the line will theoretically break. Pull and tug away with abandon ... tugging does seem to assist in increasing the creep. The closer you get to the breaking strength the less post-flying adjustment will be needed. Now measure the line length plus one times the amount for your loops (don't forget an additional 1/2 inch for each knot you place in the sleeving.) Cut the line there, melt the exposed ends, and sleeve away. I use the sag method to get the lines even. You will be surprised at how much extra line you will cut away ... if you don't pre-creep your lines, this has to come out during the initial flying sessions. Now make the remaining pair of lines the same way. If you measure the same length before cutting, this pair of lines will be close enough to the other pair for the initial usage. Remember that reasonable differences between top and bottom lines can be adjusted out with your pigtails. After flying in high winds and rotating the top lines with the bottom lines, make your final adjustments ... probably for the life of the lines. I know it sounds annal, but I absolutely hate to futz with line sets at the flying field. This "work" is usually accomplished in the hallway of our local school during down times. Now, has anyone seen my tin foil helmet? .................................... I use Shanti sleeving (purchased from A Wind of Change) ... that way all my line sets have the same color designation of top vs bottom. Which ever you buy, make sure it's all the same diameter or you'll have trouble getting your top and bottom lines even. Also, I only tie one knot in the end I'm adjusting to even out the lines. Once the lines are even, then I tie the second knot. It's easier to untie one knot while adjusting the lines than two.. Cheers, Tom -
When we travel, my old and tired Rev2 comes along to be flown in interesting places. Here it is stretching it's sail in Monument Valley on the Arizona-Utah state line. It sure could use a companion to help "carry the load" so to speak. I'm sure the rest of you would agree with nudging the RNG towards coming up with my number ... yes? Cheers, Tom http://kitelife.com/forum/gallery/image/4987-monument-valley/
-
I agreed with everything that Nick talked about until the part about the "very large and hard to handle kites" showed up. When the kites get big enough to really pull, the carabiner will bring them down, as Nick describes, however, you'll end up wearing a groove in the carabiner ... with the assumption that you're also doing some damage to your line. For the larger kites I use one of these two pulleys: http://kitelife.com/forum/gallery/image/4946-pulley-1/ The orange one is a climbing pulley sold by Gomberg Kites ($15) and the tin one is a modified pulley from Tractor Supply (~$7). There was a lot of filing involved with modifying the tin one, but it can be disassembled to remove any beach sand grit from the bushing. The pulley goes over the line and the carabiner - with a strap - is snapped through the holes. No drag nor wear on the line. Cheers, Tom
-
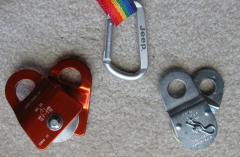
From the album: Jeepster
SLK Pulleys ... -
But, your to-do list is simply too long already. Just send it on or bring it to WSIKF and I'll help you shorten your list. BTW, you'll now find out how difficult it is to fly big kites AND fly with the Rev crew. Frustrating is what it is. Congrats on your new kite. Cheers, Tom
-
Hey Nick, no problems ... really. The two reviews on Amazon that you read were both accurate. Relative to the Kestrel units, the Windtronic does seem like it's fragile. But, if my Windtronics unit ever wears out, I'll buy another one. I used the search label "Windtronic wind speed meter anemometer" in Google. Didn't filter any out ... simply grabbed an assortment of websites to pull your chain about your limited "research". Wayne, you better change your posting to clarify that you're talking about John never using a wind meter ... or else sleep with one eye open at WSIKF. I thought the "he" referred to me when I first read it. Cheers guys, Tom
-
Oh come on Nick ... here, besides Amazon and Sears, are a just few places that sell the Windtronic 2: http://www.windmaster2.de/index-e.htm http://www.novalynx.com/200-960.html http://www.windpowersports.com/wind-gauges/windtronic-2.php http://www.balkowitsch.com/ProductID-959-ProductDetails.aspx http://www.tractionkitesuk.com/windtronic-ii-windmeter-p-463.html http://www.powerkiteshop.com/accessories/windtronicwindgauge.htm http://kiteplace.com/kiteplace%20Windtronic%202.htm http://www.yourdatacenter.com/cgi-bin/ydcaws/index.cgi?Operation=ItemLookup&ItemId=B000WHPL14 You'll notice several kite shops in the mix. Cheers, Tom
-
When I bought my first torque wrench I opted for the dial readout ... it was a couple of percent more accurate than the click kind. Then I discovered that you had to both pull on the wrench and position your eye in just the right plane to take advantage of that accuracy. Since then, all torque wrenches have been the click kind. With wind meters, the same thing holds true. You have to position the "fan" type meters exactly perpendicular to the wind or they'll be off a little. With a shifting wind, leaving the unit stationary to monitor the wind introduces a lot of inaccuracy. With the Windtronic 2 unit, it doesn't care where the wind is coming from ... it simply reads it. That was the deciding factor when I bought the second unit. Hmmm, maybe John could talk the Windtronic folks into donating one for a future drawing ... Cheers, Tom
-
Come on guys ... if you have to have one ... and what self respecting gadget freak doesn't need at least one ... then go for one of the best ... Kaindl's Windtronic 2 unit. The price has come down enough that even Amazon is selling one, with case, for only $99. Stop goofing around and buy one ... you can also help out John by buying through Amazon.com. Geez, Tom PS ... I notice that even Sears is selling them now. Check out this website for a review.
-
I'd vote for skipping the wind meter. Calibrate your "head" by flying your kites. Fly a kite, decide how well it's flying in the current wind, and then look at the trees, tall grass, a flag, or anything that will give you a "feel" for the wind speed. Do that for a couple of months and you'll be able to instinctively pick the correct kite every time. Plus, our Midwest winds are changing all the time anyway. Measure five mph and by the time you have your kite set up the wind will have either quit or doubled. I own two wind meters. One an inexpensive ($20) generic unit that works well. And, the other a rather expensive, http://www.youtube.com/watch?v=4_p_ujTgyUQ'>Kaindl wind meter that I highly recommend if you just plain love gadgets and HAVE to have a meter. My meters are seldom used ... once in awhile when I'm going to fly a large SLK I'll drag out the Kaindl. My wind meters get used more when someone says the wind is blowing at XX mph. Then the meter comes out to settle any bets. My observations are that many folks, who can ALWAYS pick the correct kite and frame set to fly, can't correctly judge wind speeds. They have calibrated their awareness of the wind and choose the correct kite to fly, but don't have any real comprehension of actual wind speed. If you have a smart phone, you might consider a wind app. Several folks that I know swear that they are reasonably accurate. And, the app is much cheaper than a good meter. Cheers, Tom
-
Here's a thought/opinion for your consideration: Ever bought something that was very expensive for you, and consequently, you were worried that it'd get scratched or broken? That item didn't/doesn't really get used!! I've got an eclectic collection of Revs and I can honestly attest that they are all great. But, I fly some more than others. The Pro-series mid-vent is my favorite ... but, it was one of the first made and doesn't have all the neat tricks that Bazzer is now adding. So, I tend to treat it without much respect. And, my second favorite is my "McKite" SUL ... it's got slits in both the screen and the fabric, stitches that have been worn through, patches, and the ends of the leading edges are frayed like hell. I fly that kite like I hate it ... it's replacement is on the shelf waiting for it's demise. I have more fun and learn more on those two kites 'cuz I'm not worried about what happens to them. Buy a Rev that doesn't stretch your budget. Then treat it like a disposable item - although they do seem to last forever - and I am suggesting that you'll have more fun and learn quicker. Cheers, Tom
-
Those dealers who sell lots of Revs will have both individual rods and full frame sets for sale. One of the most informative dealer websites is Ken Kingston's "A Wind of Change" site. Here's a http://www.awindofchange.com/product/rev-15-comp-frames.html'>hotlink to his page on Rev frame sets. It might help you answer some of your questions. Surf around for some of his other pages to see if any other info will help. Cheers, Tom
-
The above is good info. I've seen rods broken, but all were due to flying in too much wind. One breakage was a race rod frame set and a full sail being flown in 20 + mph wind ... one of the vertical rods exploded. The other breakage was a 4-wrap in a full vent with 30 + mph wind ... one of the lines hung up and the kite spun into the ground at a 45 degree angle breaking the leading edge rod. So, don't push the wind range of your kite and you'll probably never break a rod. If rods were too fragile and too expensive, you'd see less of a willingness for folks to lend their kites to others to fly. Buy the standard 13 inch handles for your 1.5 Rev. Those are what 99% of the Rev fliers use ... must be for a reason ... yes? Plus, it'll make it easier to fly in a group ... iQuad uses the same 13 inch length handles, line weight, and frame sets when they perform. I've got 15", 13", 11", and even a 9" set of handles ... I use the 13" set 99.9% of the time. Understand that there is not a single Rev kite that will handle all the normal wind conditions you'll encounter. If you get hooked on Revs, you'll need a minimum of a full sail and a full vent to cover the majority of the wind range you'll encounter. It doesn't matter which one you buy first, the wind on the day it arrives will be wrong for that kite. Some one needs to do a PhD thesis on why that happens. So, pick one and live with the reduced flying time that that choice yields. Or, jump in with both feet and buy both kites now. If you really fall in love with flying Revs, the rest will come naturally. And, you'll find your personal favorite ... I usually ask myself not "which kite is appropriate for today's wind" but "can I fly my mid-vent in this wind." Oh yes, the 180GO! Rev team uses SLE sails with 1/4" frame sets, so don't get too hung up on the SLE/B-series/Pro series question. Focus on which will give you the best value for your price point. The B-series comes with two frame sets which increases the wind range of each sail, so it generally gets the "good value" nod from most folks. Enjoy, Tom
-
Well now you tell me that!!! That would have been a good choice also. I used sail tape and some one inch poly binding. Removed an inch-and-a-half of stitching along the triangular point and along the sail-to-venting seam. Stretched the sail tightly over the "guidelines" drawn on my glass table. Then applied two rows of sail tape along the edges of the guidelines. Then tucked the binding under the top edge (where the stitching was removed) and carefully laid it down following the guidelines. At the triangular point it was tucked between the sail and the reinforcing tip. The binding was sewn along both edges with a three-step zig-zag stitch ... matches the normal Rev stitch. Then replaced the stitching along the sail-to-venting seam and the bottom triangle. Now that I think about it, the insignia tape (with pre-applied adhesive) would have been a better choice 'cuz it would help to hold all of slit length together ... and prevent any intrusion of sand/dust between the reinforcement and the sail fabric. Cheers, Tom
-
Suspect this is the tape the Chris is talking about: http://www.3m.com/product/information/Blenderm-Surgical-Tape.html I used Tedlar tape on one of my SUL sails when it started to develop perpendicular slits in the fabric along the vertical rods. I only taped the backside of the sail. After flying the kite on the beach a couple of times, I noticed that the sand/dust collected on the gummy side of the tape right through the fabric slits ... looked terrible. Also, after about a year, the tape split right at the fabric slits. So, if you're going to tape your sail, I'd highly recommend the "tape both sides of the sail" approach that others have recommended. Another fix that hasn't been discussed is to patch the tear. A friend of mine tore his favorite B-series kite on a steel post while playing with the crowd. He used a contrasting color fabric to create an additional design on the sail (plus a symmetrical patch on the opposite side of the kite) that actually looked very good. It ended up looking like the kite has lime green "eyes." As to my SUL sail: Last week I peeled the Tedlar tape off ... that stuff really, really sticks. Then used Goof Off to remove the remaining adhesive ... the adhesive is tenacious. Then sewed some 1" binding along the path of the vertical rods ... aka Bazzer's approach on the Pros. That covered the slits and hopefully extended the life of the sail. Just can't give up on it ... it's been to five Kite Parties and has flown on numerous beaches in and out of country. It's the gold and raspberry colored kite that looks like an advertisement for McDonald ... thus it's name of McKite. So, don't despair on your small tear, do something to stop it's progression and then fly the hell out of it. Every time you fly it, you'll see the "repair" and remember that you were having a blast on the day the sail tore. It's funny how only happy thoughts attach themselves to older kites. Cheers, Tom
-
Opps, didn't answer your thread size question. It's difficult to answer because it seems like the thread manufactures try to keep it confusing. Even the Gutermann site doesn't tell the consumer what size their thread is!! The poly thread sold for commercial use comes in a huge assortment of sizes. Kite builders favor size 33 and 46. The Gutermann thread you'll find at JoAnn fabrics is probably size 33. I've used that size thread for two square foot kites and 100 square foot kites ... never a failure ... yet. Visit thethreadexchange.com web site for a ton of information on threads. Make sure you visit the tab on polyester thread. Cheers, Tom
-
You need a sharp needle ... no ball ends or special designs for knit fabric. You would like a small diameter needle to reduce the hole size and a large hole in the needle to prevent the thread from hanging up on the needle ... the thread goes back and forth through the hole a number of times before it's left on the kite as a stitch. Since a small needle and a large hole are mutually exclusive, you have to compromise. Luckily a specific size of thread will usually work well with two or three needle sizes, so it's not that critical. Here's my recommendation: Visit JoAnn fabrics ... you'll find the Gutermann thread there also. Buy Schmetz Sharps needles ... their Universal needles are a number two choice. I don't think they come in an assortment, so buy both the 12/80 and the 14/90 size. Try each of them in your machine with your kite building material and the specific thread you're going to use. Look carefully at the results to decide which is correct for your set up. If you can't decide which is better then that's a plus ... your set up isn't fussy. If the needle hits anything metallic while sewing, change the needle. If the needle starts making a "popping" noise while sewing, change the needle. Needles are cheap (about 50 cents apiece with a half-price coupon) and it doesn't make sense to try to stretch their mileage. Good luck and please post pictures of your results. Also, aim for showing up at WSIKF on Thursday and competing in the beginner class with your kite ... seriously!!! Cheers, Tom