Exult
-
Posts
580 -
Joined
-
Last visited
-
Days Won
27
Content Type
Profiles
Forums
Gallery
Downloads
KL Shop
Blogs
Articles
Everything posted by Exult
-
Hello and welcome @VirtualFacets! It is a nice feeling to go out, with a straight back, getting blown on by the wind and looking towards the sky, perhaps after doing some weed removal in the garden or some other (paper?) work when the face is down over some kind of static work. I'd suggest to get some DLK (dual line kite), perhaps even some kind of foil kite, just to get you right/left reflexes right and ability to give line slack instead of crashing with tensioned lines right. Then quickly get a proper kite or if you are prepared to do some CA-gluing and spar replacements, a proper one from the start instead. Welcome once more, happy to hear any progress reports. Value the time of learning, when you manage to do the first axel (turtle or fade?), you'll feel proud of yourself in addition! Best Regards, Exult
-
If using the above "ugly fix" perhaps one could try to get from the situation of having eight lines and approach kind of four lines. Before folding the 80 lines double to get the 40 lines, twist each line about 100 revolutions by rolling it between your thumb and index finger a couple of times. Now fold it double, let it slowly release while keeping the 40 foot double line stretched and with some help it will twist to form some kind of a two strand twisted rope of half the original length. If this would be an improvement or not remains to be seen.
- 212 replies
-
- 1
-

-
- tips
- san francisco
- (and 4 more)
-
A suggestion which I haven't tried is to remove the handles from the lines, undo the knots around the sleeve on the handle side, slide the sleevings to where you would like to have the new knots, make the new knots. Obviously you would need to thread all now excess line through when making the the new knots. Now connect the handles again. Then use rubber bands to hold the excess lines tightly against the handles. Perhaps too much time would be consumed of your remaining stay. To undo the knots I like to use a corkscrew of the thin helix type that just got air along the centre line (I'd say the most common type). Carefully widen the knot with the tip, squeeze the knot, widen, squeeze, widen... An ugly quick fix if you are really desperate, fold the lines double and larkshead the line directly to either handle or kite sides and accept two sleeved knots on the other side. Nope haven't tried this one either. Could perhaps lead to some "interesting" cases of tangled line if unfortunate. And whenever travelling, check distances to the field, communications and size of fields before, but I guess that this is now redundant information... Have a nice (remaining) trip.
- 212 replies
-
- 1
-
-
- tips
- san francisco
- (and 4 more)
-
Such things can improve. When I was in school I had to join the group of pupils that couldn't spell. My hand writing was also simply the worst - could literally provoke laughter. (Today writing in English "offers" an additional set of pitfalls - accidentally mixing Swedish and English could have highly embarrassing consequences as this page of failed Swedish to English translations reveals (though you would need to know Swedish to see why these mis-translations are "natural") - don't don't follow the link if you are easily offended by unintentional strong words: http://www.avigsidan.com/avigsidan/avigt009.html How this page would turn out if run through on-linen translation would surely be much confusing.)
-
Totally agree: IT IS TIME NOOOOW !!!

-
Where is the trash talk? Where are the self confident speeches of glorious victory I may ask? Proper (non-heartless) taunting in the right amount at the right time and place is a fine art!: https://www.youtube.com/watch?v=A8yjNbcKkNY (Monty Python - French taunting)
-
From the album: Exult's Photos
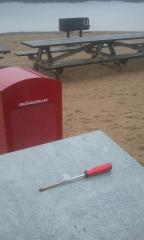
Couldn't find my kite stake when preparing the lines. Found it accidentally on top of a garbage can. Had forgotten it on the field about two weeks ago. The session, well it was a kind of messy less well organised story - well every session is some kind of practice of something, but not necessarily in what you planned. It is the day before X-mas (the 23rd, since we celebrate the 24th here). After several pre-X-mas errands by car I now saw an opportunity to head to the field/mini-beach. The forecast wasn't really spot on, the hard winds missing, on the other hand the rain was only light and later ceased. The main things to attempt to practice was flic flacks (and very much remains to learn here) and occasionally manage to mix it with an occasional rung of a JL (equally much practice needed here as well). For the QLKing the most "urgent" was the clock work practice that seems to have gotten very lame (or have I been looking on to much perfect Youtube videos with perfect crisp ones to alter my view on what is acceptable). Yes, the new Speedwing should be tried out as well. After the assembly I was looking for the kite stake... nowhere to be found... strange. Since the ground was mostly frozen not any branch could be used as a stake .... hm.. tie the handles to the plastic bag of lines? Then just when starting to unwind the QLK lines I saw it the red screwdriver (actually only red tape) on top of a garbage bin. It had been on the field for almost two weeks. Thank you everyone for leaving it in place! The session well, rather dirty winds (an upwind cape might be responsible) almost parallel to the little (and crowded by fixed grills and outdoor furniture). The only really new here was to shift focus from the LE to the rear part of the QLK thinking of the rear "rudder surfaces" to the extent that it almost became the focus and possibly "a second LE". This was only initiated during this session, lets see where this goes. I normally think another kite gives some new input, but for framed QLK I "only" got the 1.5 B-series, so I really try to get hold of new inputs when I get to see them. For the DLK Infinity this session was quite much a drill in a kind of crowded precision rather then the tricks I intended to work on. I only had the 20m lines, was too lazy to move the QLK lines that occupied the free space between the rubble (outdoor furniture) on the narrow beach. Not much free space for up-/down-winds running either. Got a feeling from the rather few attempts that I was more maintaining "skills" of the tricks I intended to practice, rather than progressing. For the last few sessions the DLK I've almost completely limited me to one kite (the Infinity) due to some early progress here. It is some kind of stability I'm after I guess when the flic flack/JLs are so so new and unreliable. Just I little time before going home I remembered the discussion about hand movements and drum hits ( http://kitelife.com/forum/topic/6403-hand-position/?do=findComment&comment=68573 ). Arrg.. should have had this in my head from the start. Be well prepared for your sessions if possible. This whole session kind of competed with many errands. It was booth crowded in available space and time so to say. On top of this I had completely forgotten to test the Speedwing... (more of that in http://kitelife.com/forum/blogs/entry/293-20-first-minutes-of-speedwing-a-really-short-session-for-a-change/ ) Well I have had better sessions, most will be forgotten, but the kindness someone showed when making something as small as a worn screw driver/kite stake visible and the fact that it had been left on the beach for in the first place, so that it later could be found was a nice one. Kind of gives the field a bit of a home feeling. -

20 first minutes of Speedwing - a really short session for a change
Exult posted a blog entry in Exult's Gentle Breeze
Mon Dec 25 13:00:00 CET 2017 GB, Forecasted 4m/s (gusts 8m/s) Cross Kites Speedwing X1 25m 38kg lines Looks small (113cm span), but is capable of surprising you (much like the Monty Python monster rabbit https://www.youtube.com/watch?v=cCI18qAoKq4 ?). Looks wrinkled as well? Don't worry - once in the air everything gets smooth. Conditions/background: Quite OK wind, but I still wouldn't hesitate to trick trickable kites. Rain on frozen ground... My flick flack exercising earlier during the day felt a bit stalled, so switching to something completely new felt like a fresh breeze. Much is speedy about this kite: Assembly is just one spreader. No standoffs. No battens. No bridle/standoff tangle. Nose back/forward bridle adjustment is only one knotted line/larks head. Speed (obviously) forward and angular speed (though not necessarily very tight/small radius). So, except for the above, what is this kite anyhow? - A no spine speed kite with a deep (strange looking) bridle! Bought it mostly to see and learn how it was made. First launch, nose angle was medium setting - no problems to launch. No problems to control - until getting close to the edge of the wind window. Kite just tumbled out of control to the ground. No standoffs - didn't even try to avoid the walk of contemplation therefore. I guess there could be two reasons for the difficulties here. If you have no spine, you don't have this flatter area around the spine to fly on when the flow around the wing tip fails to function at the edge of the wind window (think of the varying angles of attack along the span of an ordinary DLK). For the Speedwing the whole wing seems to fail at once it appears. Add to this that you are likely to have some momentum forward (due to the high speed) when you enter the edge of the wind window, driving you a longer bit into it than when using trick kites. Also when the sail fails, there are no standoffs that holds it in place, so you can more or less pull the lines and frame, but there is little effect on the sail once it goes non-filled. As you might have guessed, stalling and tricking - no success there. Stayed away from the edges and more trick attempts and had no further problems when using the medium nose back/forward angle setting. A larks head knot under a bridle setting knot gets you the best of two worlds. First an easy launch. Once in the air the kite starts to pull and the larks head slides out to the outmost knot. Now you are in nose back "speed kite mode". It felt "fresh", speedy and a pull that "shouldn't" be in such as small kite, but I wanted more, so I adjusted the nose back. The following start then failed - just tumbling around with no forward drive. Then (I'm proud to say) I got an idea. Why not adjust the nose forward to the medium setting, but instead put the larks head just under the mid one of the overhand knots in the nose. During the launch the nose was enough forward to give a simple launch, but in the air when the kite started to pull, the larks head slided down to the outmost knot giving the kite a nose back speed kite like angle - and this just worked out of the box (I'm sure such a simple and efficient fix must be a standard launching method?)! The turns got tighter after the adjustment, but don't make them to tight to preserve full pull/speed. In gusts the lines begun to sing (even in the centre of the wind window) and the sail gave a swosh like sound (much like when powering up a Rev QLK without having a flapping trailing edge). Normally for DLK trick kites I get the singing when "parking" them at the edge of the wind window (for the Speedwing I just avoided the edge because the kite had just fallen out of the air there previously). The kite was quite easy to control, not at all like my few and very short attempts with the Atrax. Even some limited (and quick) figure flying was possible: straight lines, 180 deg turns, squares, circles, figure eights. After a while I begun to think how to land it. Stalling didn't seem to be easy, so I flung my arms forward to kill the forward drive. It worked well, say 5m from the ground it kind of entered a mode resembling the tumbling start when the nose had been adjusted in this nose most backwards position. To recover from the tumbling it was sufficient to pull one line rather much for a moment. I guess the angle of the kite to the wind changed so it got some at least sideways drive. How the nose of the kite caught up with the direction the kite was going in I didn't get even at the time. Returning to the landing attempts, I just flung the arms forward once again but without making any tumbling recovery attempt. The kite then tumbled to the ground. The disassembly was even quicker. When the kite had tumbled down to land, the only spreader had already slid out of the fitting on one side. Much wind a problem? - No I look forward to more of it! The kite is small so it could be in the bag as some kind of high wind insurance, though I should have some slightly longer and stronger lines as well for the really windy days. And who knows, getting enough experience with the Speedwing, I might later even learn the Spiderkites Atrax. I was quite happy with the session - 20 much interesting minutes where much was not familiar. -
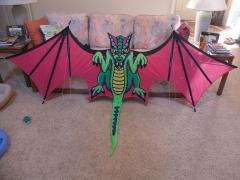
 Q: How do I know that Christmas is coming? A: @SHBKF makes a Christmassy kite photo! Great idea that spurs further ideas! Don't be surprised if I have nicked the basic idea the next year (after all, imitation is the sincerest form of flattery I've heard). Possibly doing something like putting the X-mas tree illumination on the floor/ground, a nice looking kite its back over it (covering every lamp), make a large bow from red ribbon and then make a frame of twigs/branches of spruce following the shape of the kite. Or something else... Why not a Halloween kite? Spider web, spider, soil around the kite kind of slowly beginning to cover it, and a glowing mummy hand (plastic glove, wind paper masking tape around your hand/fingers, cut open with scissors, remove (real) hand and put wrinkled/random transparent plastic foil as padding and a LED inside) holding the LS. Well no real hurry here.
 -
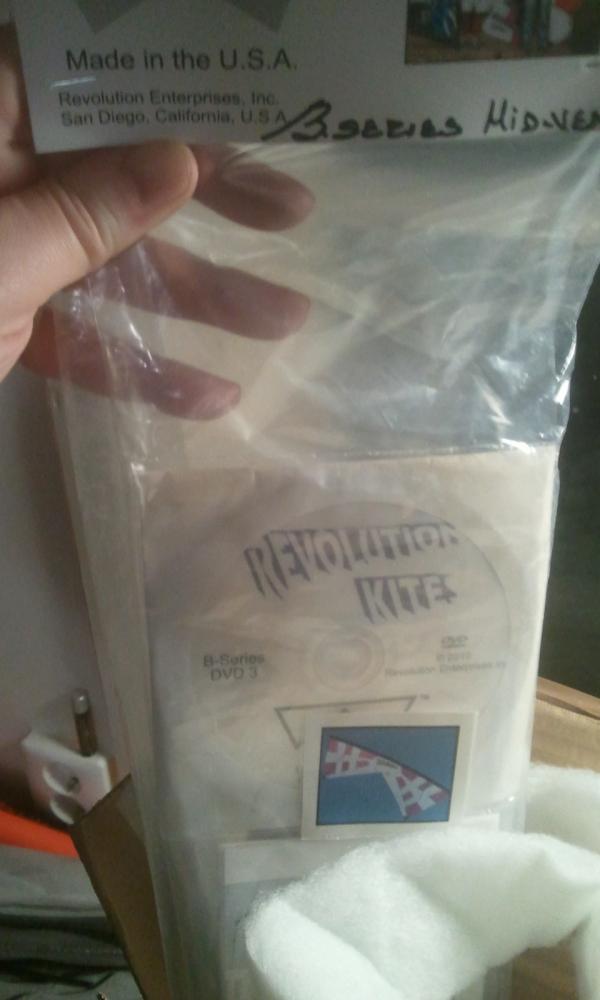
This image shows one missing kite. At the time this drawing was announced: After being informed by lady luck (by closely observing the leaves in a cup of tea) it is my sad responsibility to inform other optimistic contenders that winning the mid vent unfortunately is out of the the question (Sorry folks!). You see, this mid vent already got a home between my only other two framed QLKs, my std and full vent 1.5 B-series. You may say that that the colours won't match - I say it doesn't matter, we are all brothers and sisters. None of them will be "more equal" than the other. The outcome is obvious! We stand together (me, my std and full vent) and join hands/bungees. We shall overcome!!! Winning this price will also help to overcome potential problems when tape patching the full vent to become a mid vent during wet conditions. I'd also like to try to make a QLK stack. And several weeks passed... : The above hand/bungee joining ritual worked! A miracle! A mid vent appeared out of a box from a German kite shop! Thank you, thank you, thank you Santa! Everything is fine - hope that the kite drawing kite goes to a good home and receives a lot of attention!

-
When swinging the Kaiju around you gliderlike in circles with the handles in one hand (like in "Kaiju at the park" above at 0:35), does it feel stable? Is controlling the circle path an issue or does it come naturally? Any need for controlling the kite here by using the handles by angling the hand holding the handles/straps/line-loops?
-
 Really like the perspective the lines in the foreground gives. How did you hold the camera here?
 -
I wonder why finger straps (two fingers) are not more popular. Well it gives you, if you allow, a finger tip feeling. Compared to wrist straps it frees the finger movement from the contact of the thumb. Use a pair with snug fitting or press the index and long finger together to hold it. Strength is not an issue except for the largest kites in harder wind (you are quite strong in these two fingers at the second joint) - If required just fold the second joint of your finger around the finger straps when you really need to hold it tight. Do I live by this? - Not at all, tend to use whatever strap/handle that happens to sit at the end of the line. Also gloves and in worst case mittens can interfere or make it not possible to use the finger straps or affect how you deal with wrist straps. If I'm not mistaken, you recommended (or performed yourself?) a drum hit for a fade launch. Any other tricks benefiting from drum hit like input? Will at least think of if I can replace some arm movement with wrist movement here. Still a flick flak rookie though or did you mean "plain" back flipping as well? Beware of this Crash person . I have noticed that he tends to like framed kites and rocky or frozen bare ground in harder wind.
-
 Did it work? No parking fine? (Yes, you are right, this was just a low comment of pure envy)
 -
 Playful and imaginative!
 -
Friction increase with time of use of the Spectra line and they are therefore not as slippery as a new one. Isn't a problem using a spectra line as a SUL bridle that it is a bit too slippery to hold knots? I had some minor issues (but somewhat annoying) with my HQ Shadow bridle (which I believe is spectra/Dyneema) before. A high friction Spectra line then sound more fit to be used a SUL bridle, thus giving a second life to some old lines? (nope never made any bridles from scratch what so ever). A nice line length if the field easily allows it, giving you room for both tricking and more relaxed figure flying. Usually go between 20m and 25m 38kg (66' and 82' 84lbs) and 15m 25kg (39' 55lbs) for low wind flying. I believe having time on the 20m set teaches you to make use of the available space, making the 25m feel like a luxury length. I guess if I'd take the consequence of this I'd make more use of the 15m 38kg (49' 84lbs) in medium wind to really learn to be economic with space or try street kiting perhaps? Street kiting b.t.w. is short lines yes, but is it always performed in light wind too? Prefer at least 25m lines when towing my 23m (75') Prism tails.
-
Hmm a speed kite can be quite small and pull quite much for their size (check line recommendations e.g.). The Fazers I got are more robust normal DLK than speed kites. So robust that they can be up in any wind that you I can handle and therefore becomes fast. But I can still trick those kites, so I kind of doubt that they are "pure" speed kites. I need to start using my Atrax and the Speedwing arriving soon to be able to make a comparison. In general I don't think a speed kite is a good trick option. Perhaps go for a vented DLK kite if you want to reduce pull and still be able to do some tricking in higher wind, but to my experience, moving your tricking from the centre of the wind window to the edge of the wind window can also do that. Go OPK to find out about speed kites if you can (I can't with a reasonable amount of effort)! Well pastures doesn't really need to be such bad places for kiting. One might even find a loyal audience: http://kitelife.com/forum/topic/8233-minchhampton-common/?do=findComment&comment=66603 What kind of pasture (b.t.w.)? Something that you maintain?
-
Must say that compared to me you did/attempt the Lazy Susans much earlier than I did. If we talk the belly pop up launch (a low wind start) it can look dramatic IMO. People can also be surprised by any low wind flying in that it is possible at all. And one can always try to expand the trick repertoire (obviously).. If you don't do it already, figure flying is easily understood by a bystander and is certainly worth practicing (don't stop perfecting and challenging yourself here though). However there might be other moves that is currently your focus and points of most development. Also, the result of practice, a series of well performed moves, should not be boring to a bystander - and if it would, so what? You need room for practice new stuff to progress in your way! A too high amount of known "crowd pleasing" moves takes time from your development as a pilot (and would I be "accused" of this I'd instantly plead guilty as charged). Never intended to take any fun out of it though for either party, though the audience side might need to wait sometimes - after all it is your spare time, effort and kites.
-
When being new to DLKs during snap stalls I could accidentally snap a LS. They were not plugged closest to the centre-T by design. The centre T was of the type surrounding the tube. Once the inner side of my Jam Session and Maestrale LS were plugged this never happened again. The other time I've done this type of reinforcement on the inside was on a LLE by glueing a 1dm long carbon fibre rod in the inside of the 8mm tube just where the lower spreader connects when replacing the original LLE of my Fazer XL. If you keep the original LE/LS fitting, reinforcing on the inside, this is the possibility that remains. In this case the batten fitting also makes it extra crowded. Since it has only snapped on one side, only one side has been reinforced - and no I can't feel that the kite would have become unsymmetrical in any way. You must be seriously patient! I'm sorry for being of poor help here - I can't really say that speed kites are my thing, nor that English is my native tongue. Honestly, I'm a bit uncertain of the difference of a camber and a billow.

-
Hmmm - perhaps I should first apply a thin layer of that stuff on the inside of the heat shrink tube to be able to remove it later? Though care must be taken not to accidentally put any of it where the epoxy actually should stick to. Thank you for your kind comments - you two almost make me blush. And @Lisa Bernard / Kiteworld , perhaps it is me who has entered the dorky path of spar repairs. I have just placed the order on a Speedwing X1 (EUR 47) i.a. for the main purpose of doing "industrial espionage". You see I also never built a kite (in any in modern material). In the book "Stuntkites II, Servaas van det Horst, Nop Velthuizen, 2nd revision from 1995" they compare (and describe the build process) a Speedwing with a flat sail and one with a billow. The one with a billow pulled more and more even in the whole wind window. It was also easier to launch and also made it more quiet. Well functioning wings and sails (trick kites might differ having other priorities than creating speed and traction) typically have a billow. For a kite to be a speed kite or a power kite you need an efficient wing therefore I'd assume that they would have a billow. So it looks like you will need to deal with a billow here. (Another bonus with the Speedwing purchase might be that I get some traction* to learn using the old demanding Atrax speed kite). *My children object to frequent puns like this one, which a happily disregard. From the Description text of the kite store: "The secret of the Speedwing is the lack of a vertical rod which allows the sail to optimally bulge out in any given wind speed. The Speedwing is fitted with a special coupe in the sail which improves its aerodynamic shape. This shape helps in making the kite faster, pull harder and make less noise." I didn't plan to say anything about the Speedwing/build plans (which might change, prefer to have started the process before outing anything), but it kind of fitted the situation to bring it up. In the end is not really a speed/power kite that "happens to be the current plan/play of thoughts", but I'll say no more here and now. Should get more familiar with my sewing machine, before I ruin any ripstop etc... To give a perspective I've had the above book for more than 15 years without producing any kites.
-
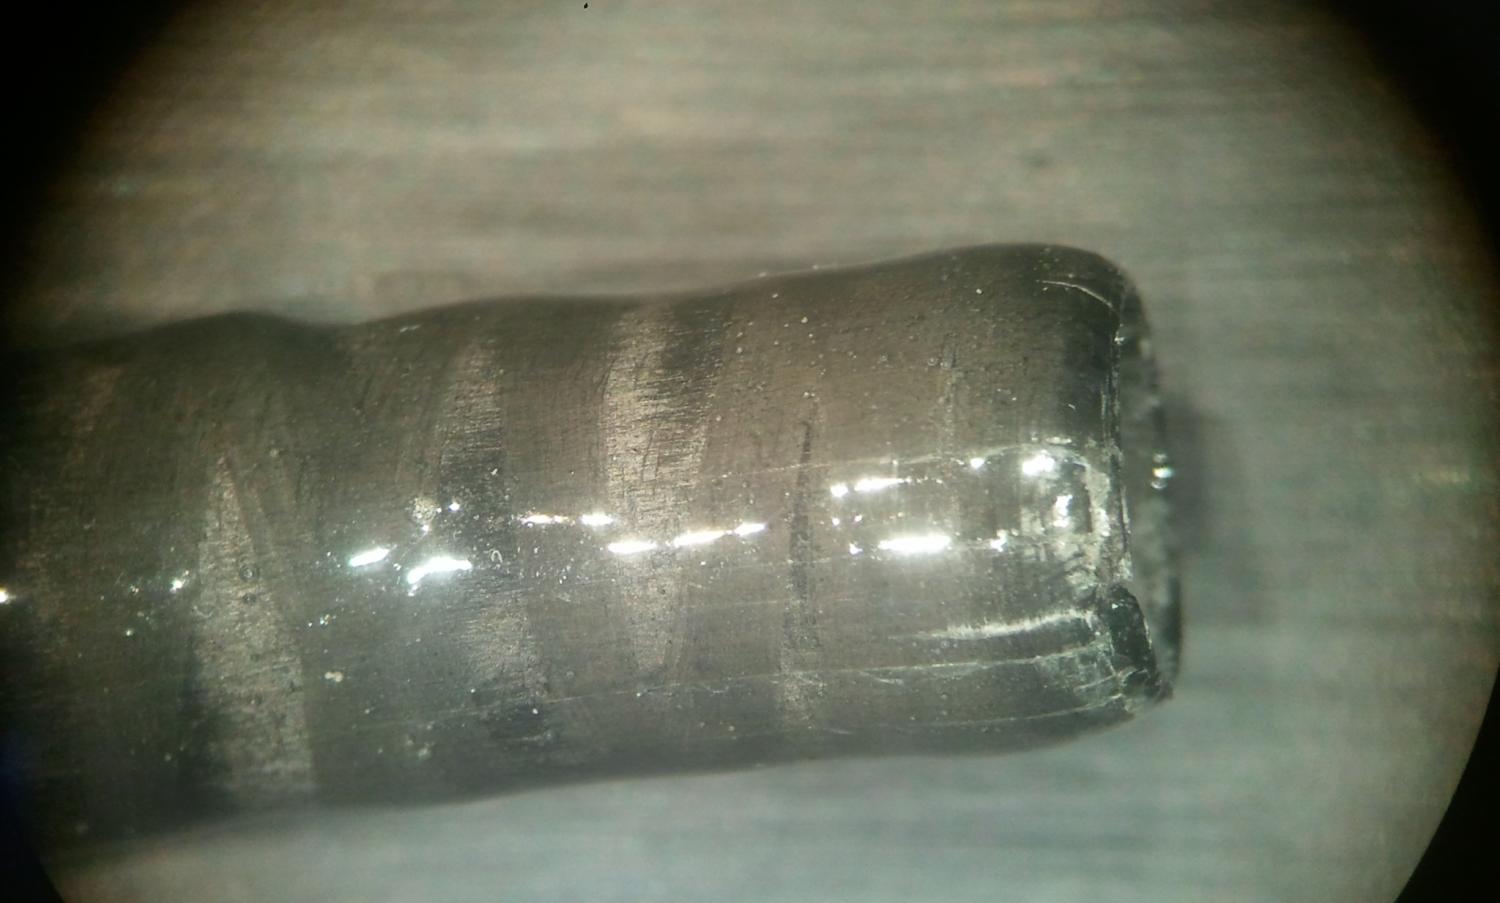
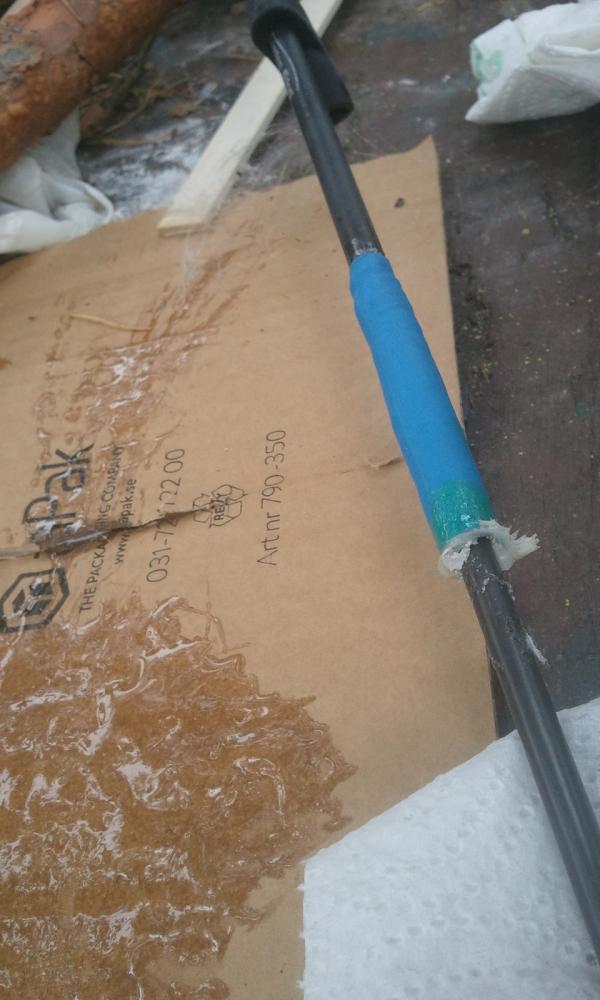
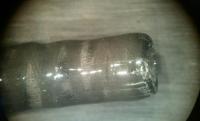
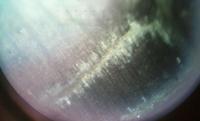
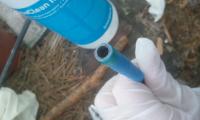
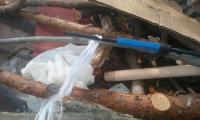
There is no need to go capital text here. We are all brothers and sisters in kiting . Yes and no and funny that you said so (since the most elaborate repair was just before a festival). The history of epoxy repairs so far: . The first one was on the Infinity lower spreader using little glass fibre and no heat shrink tube, the small fissures returned from small notches at the end but was still usable - is still using that spar and have not invested in any replacements.* (Original) cause of failure: too hard input just above the ground. The second one was repairing a stand off of the Fazer XL. Instead of using heat shrink tubing I used tape - the result was quite ugly and required much horrible sanding (really dislike glass fibre dust) before it looked OK. Cause of failure: stuck in snow and I didn't observe that the line was wrapped around the wing. The third one was one of my Kymeras when repairing an upper to lower LE connection. This was just days before a kite festival that the kite broke and I had no spare tubes at home. At festivals I never carry epoxy, heat gun, glass fibre and heat shrink tubes, but then the festivals I've been to only lasts a few hours. This Kymera repair, that is still working b.t.w., was the second iteration/attempt of a epoxy spar repair. The things I had with me from the Infinity repair was, don't leave a notch at the end and make it stronger, which I tried to implement using more glass and a higher glass to epoxy ratio. Cause of failure: multiple Kymera to Kymera in air collisions and a failed pancake (flare)landing on hard dry ground - wasn't prepared for the slow flare/pitch movement with the tail weight removed. The fourth one was a stand off of my Fazer XXL. Did the repair at the same time as the Kymera one - had all the gear out anyway. Cause of failure: Too impatient and hard launch without noticing that the line was wrapped around the wing. One could argue that repairing stand offs takes about the same time as replacing with new better looking slightly lighter ones. In this case one should consider that the Fazers are quite heavy kites. I see it as an investment in skill that the repair rather than the replacement gives me. Being good at repairs gives you more options, e.g. why not try using a lighter spar and harden at sensitive parts before it breaks somewhere? Will the repairs last? Well it is always difficult to make forecasts - especially about the future . But if you don't try a particular method you won't learn if it works out or not. The Infinity repair didn't last. It broke again. Especially at the whitish fissure closest to the sharpest largest notch the whitish fissure. In the higher magnification images you can see the individual broken glass fibres. That the higher magnification images appear mostly fuzzier follows by laws of optics - the higher magnification microscope objective the lower depth of focus. The last image I more or less included because it was nice to see the carbon fibres of the tube and the almost invincible glass fibres in the epoxy. This is from the Kymera LE repair. I was careful to increase the glass fibre content and to leave no notches remaining at the end of the spar. Unfortunately I have no better pre repair images than the first image. Disregard those narrow rings of green heat shrink tubing in the before image - they did not provide enough force to hold the parts together during the CA-gluing and was therefore not used. Looking carefully at the cross section of the finished repair one can see the tube, the glass fibre epoxy repair and the heat shrink tube stack. * Kind of reminds me of a thing a have heard of airliners, a fissure doesn't mean that the (crucial) part is replaced - just that the crack progress is being monitored. Does anyone know if this is true? On the other hand, the stress is not uniform along the spar, so a well placed reinforcement should be able to increase the strength. Perhaps a gradual transition could improve this matter?


-
any video of this? Check out the ground pancake from this Dodd Gross HQ video: https://www.youtube.com/watch?v=Dn9K2L-5hyY at 00:40 Yes, here is also the belly launch showed. You can find it in Prisms "The advance way to fly" from the nineties, in this Belly launch section: https://www.youtube.com/watch?v=kkpzy3fHF7k You would also be able to see something like it it in the corresponding HQ one: https://www.youtube.com/watch?v=aYWh7FVvJsI However the belly launch here is more of a fade launch, which requires more wind for the fade to last. These old videos are inspirational - there is always something to improve and rehearse!! Even if you think you know it - how well and reliably can you do it and under what conditions?
-
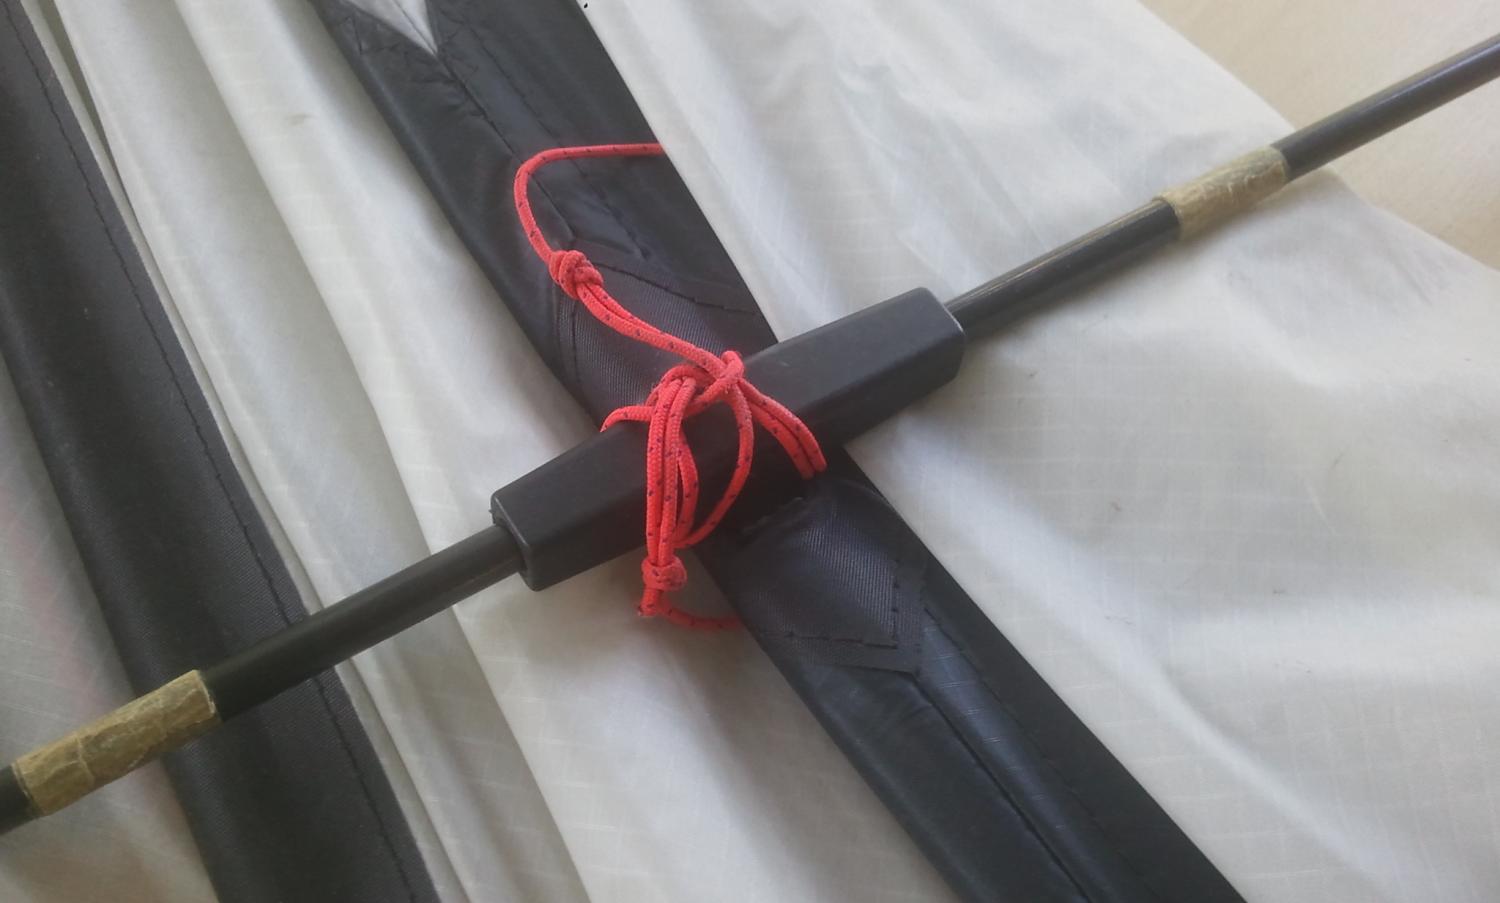
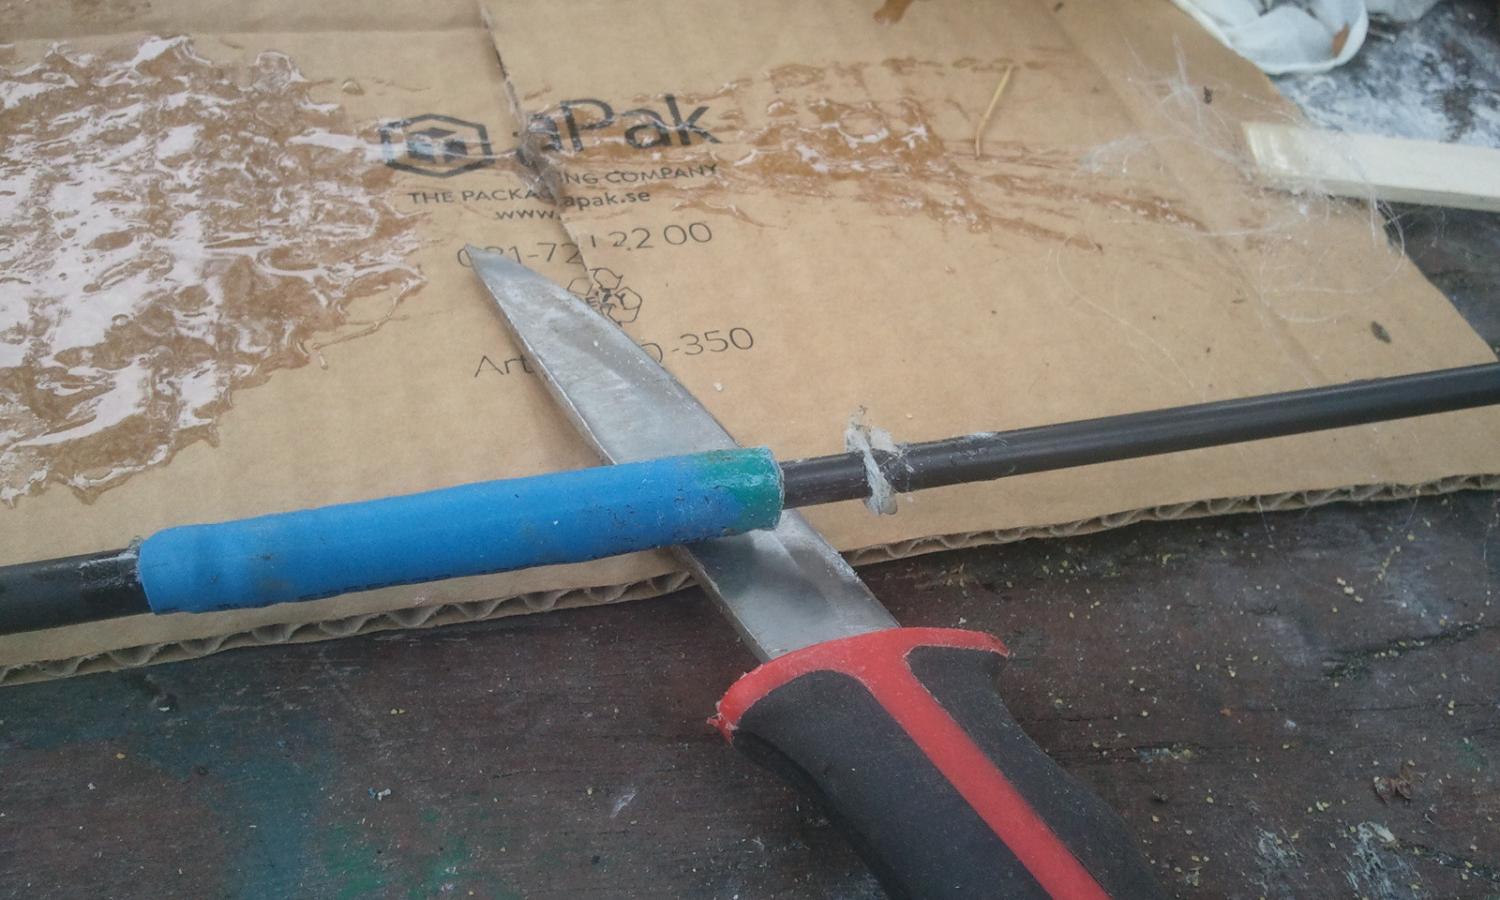
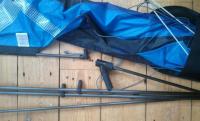
Another way to make a bit more permanent repair (or perhaps prevent future failures) is to repair using epoxy, a fair amount of glass fibres, mini amount of CA glue and then heat shrink tubing. OK, a little work intensive, but sometimes you are out of options. Assuming cracks at the spar going around the ferrule one way of repairing would be: Use as little as possible of the CA glue just to keep the broken parts in their proper places during the repair. Prepare a reasonable amount of glass fibre bundle about 3dm long be used later. Don't use to little, since the glass adds to the strength. Put a temporary spar with the same dimensions as the ferrule in the centre to prevent epoxy going into the broken tube in such a way that it would be blocked. Mix the epoxy thoroughly and quickly. If you dare, put some epoxy on the inner spar to distribute and repair from the inside. Don't know if some fat on the inner temporary spar would make it less prone to get stuck. Soak the bundle in epoxy so every part of it is properly wetted by the epoxy. At this stage it doesn't matter if there is a bit too much epoxy - much of it will be removed by the heat shrinking tube. Wrap the soaked fibres around the broken rod. Put the heat shrink tube over the repaired part. Also let a small part of the heat shrink tube cover the end of the broken spar. Apply the heat by using the heat gun. The idea here is to drive out excessive leftover epoxy (avoid shrinking the two edges of the heat shrink tube as this could trap the epoxy inside the heat shrink tube), get the repair nice and round and to cure it faster. Much of the epoxy get pressed out of the tube leaving the strong fibres remaining. A bonus of the epoxy moving in the direction of the axis of the spar is that it should cover any small notches at the end of the spar from the original cracks that later could be the starting point of new cracks. Constantly move the inner temporary spar so that it doesn't get stuck permanently (which would of course be a disaster). When the epoxy is jelly like. take a sharp knife and cut lose the part of the epoxy/glass fibre/heat shrink tube that goes outside the end of the broken spar (leaving some margin - ideally less than a 1mm so you don't have to sandpaper so much). Remove the temporary central spar. When the epoxy is hard, sandpaper the end of the repaired spar to the original length so that the end surface becomes flat. If the ferrule is difficult to get into the repaired tube, use a small file or sand paper to widen it. Enjoy the feeling of accomplishment or learn from any mistakes. Added info in edit: I'd say that the 0th thing I do whenever gluing anything on a carbon fibre spar, whether it is by CA glue or epoxy, is to de-regrease using propanol and possibly some sand papering of the spar surface (though I've not really compared to not doing it). Second is that the images of this repair can be found in the images describing the LE repair (with the blue heat shrink tube and blue bottle...) here a few posts further on ( http://kitelife.com/forum/topic/8458-widow-ng/?do=findComment&comment=68335 ).
-
Which is the reason why the 4d is eyeing me. right now all i do when there's no wind is equalizing lines While waiting for a low wind kite, use the time to learn something that can be of use for any kite in low wind: One can practice stalls, one almost got the barely flying state for "free". You can also practice Fly Aways (gaining ground flying the kite downwards). Start normally with you hands as far from you as possible, pull the kite high up in the wind window by backing while pulling your arms behind your back. Now turn down. Run/move forward and try to get the nose of the kite slightly out from you (kite is still flying straight downwards), while you move forward to gain ground (by moving down wind). Just before the kite reaches the ground (you are still moving forward) fling your arms out to flare the kite two decimeters above the ground. When the kite has landed pull one line so that one wing get one dm closer to you. Lightly pop the other line to make the kite take off by spinning around to clear the nose from the ground. You can vary the belly pop up launches: make them small and efficient, make the kite jump high up or make the launch into a tilted fade that you immediately flies out from. If you don't already know everything of the above, it should keep you occupied in low wind for a while. And the good news is that the low wind makes it very unlikely that something would break even it the above suggested exercises would be new to you. The only warning I'd like to give is that to be gentle when doing the belly pop up launch so that the sail is not hocked on a thorn, the kite is stuck and/or a line is wrapped around the sail snapping a stand off (but the launch pop should not really be so hard). IMO almost any condition is an exercise in something, but yes in low wind I (obviously) would prefer a low wind kite.
-
Awfully portable kite I'd say. It took some time before I accepted it as a "real" kite. Controlling the kite by setting an almost pre-determined speed of your lower arms and hands as for the other kites no longer held water for me in this case. This kite really requires gentle input. For me as such - educational. Another thing gradually learnt was the 360 (still work in progress before I'm happy with them). When running around to get the kite go around, to get the timing (or phase perhaps?) right make sure that the kite is flying into tighter lines not out from tighter lines. Imagine a temporary wind window that is a result of your circle jogging, the kite should be somewhat closer to the leading side of the wind window, rather than the trailing side of the wind window. Next step, I'll try to replace the circle jogging with rotation as far as it is possible. I guess that the above would apply to other smaller low wind kites as well (had I seen them). If you would compare to the HQ shadow, it only requires slightly more wind, feels more like my other DLKs and is trickier. To get by the first few sessions of my first QLK, the B-series 1.5 Std., I pretended that the brake lines were the input of a DLK. The top leader setting was not then at the outmost position, but more towards the centre to give it some forward drive. It took some sessions to get used to the inverted hovers, yes, and even after that occasional flash back normal/inverted hover mode confusion could take place. Then move the top line to the outmost position so that you need to pull for forward speed, but this you already have built in as a DLKer. As a DLKer you already know how to give slack to the line just before any impact with the ground. When you also manage to transfer this to a QLK, don't fear going to the light frame. If you compare getting into QLKs to DLK trick learning I'd say that there are not too advanced DLKs tricks that are a bigger issue to learn (reliably) than that. I'd say that after having watched some informational videos a few times here, going into QLK from DLK is not such a big issue. I did say going into QLK, not becoming really good. Kind of reminds me of the slogan of Othello (Reversi) game: "A minute to learn - a life time to master". So where is all this leading? Well , you appear to be a quick learner. There is really nothing preventing you from going QLKing as well you know !