frob
-
Posts
420 -
Joined
-
Last visited
-
Days Won
27
Content Type
Profiles
Forums
Gallery
Downloads
KL Shop
Blogs
Articles
Everything posted by frob
-
Video and email address.
-
Lights vary tremendously. They range from individual LEDs on elastic, to keeping the kite lit up, to LED strips to fully computer controlled color lights. Finger lights are cheap, potentially a few cents each. Northern Lights are a recent decent backlight on spars. Fancier lights are custom.
-
Both, for now you can work on the practice part. For me, the biggest help was to break it down. I could fly up, and slowly back down. Could I back down faster? Could I back down slowly with precision? That is reverse. I could fly up diagonally, and back down diagonally. Could I back down at a different speed, or more precisely? Again, that is reverse. I could do a dive stop and back up slightly to flip around. That little piece was reverse. If you can hold an inverted hover, that is reversed against gravity. Hold it steady as long as you can. When you are ready, slowly back up more. As slowly as necessary, work to increase the height of the inverted hover. That's all reverse. I could fly forward horizontal but reverse would flip, so I did it at an angle, about 30' or 60', backing up as triangles slowly. Go super slow at first. Practice those elements. Look at ways you are already reversing and do more of it. Do it slowly with more deliberate motion. Hold on as long as you can. Try to recover when it flips, then try again to hold and repeat. For tuning, as mentioned above, more brake helps. The default Rev leader lines have a lot of forward drive built in, but reverse is the opposite of forward drive. More brakes helps.
-
I have not seen many items I wanted to join in. For the few I was interested in, many others were too. There are many posts of people cleaning the closet and posting items they never flew, new in original packaging, or only lightly used. I don't have that, I use everything I have. I think mostly I could offer a gift card, rather than a closet full of items to pass along. Combined and for me personally the drawings don't work. Don't get me wrong, I like that they happen, but I feel it is difficult to participate unless you are already knee deep in gear and have more than you can use. There is little for newcomers or those with a small bag of gear. If there were a way to address it, a way to pass along the good will without already having a pile of gear ready to part with, I would want to participate more. Is there a way to get it more inclusive? I think of people who are able to gift equipment to those who would use it, but it doesn't work well with "pay it forward" while within the kite world. I recall some drawings where the winners offered kitelife.com subscriptions and gift cards to kite stores, that type of seeding the pot back up could help. I don't know how it might work, though.
-
Taking the plunge, blue & green for my lights (went with dark+florescent green)
frob replied to frob's topic in Kite Making
Done, signed, and now have a video up. The vented sail won't be done any time soon, I've got hours of soldering left. Sadly I have learned that while most parts hold up well, the solder joints are a weak point. They're a tiny blob of tin, silver, and copper, and are brittle. While it can hold up for most flying, too much stress or jostling can break a solder joint. I learned from prototypes that a hard crash can break a solder joint. Folding and rolling up the kite can break solder joints if it puts too much pressure on the wire. While putting on the bridle and spars I already had two break off, but they're easily soldered back on although I need to be careful not to melt the sail. It looks much nicer than the taped-down version I was using, and should be a lot more solid than before. Forecast looks good, so I'll probably get the first flight at Kite Fest Louisiane. Thanks for the help and support, and hopefully when I get back I can post a video of it in flight. -
Taking the plunge, blue & green for my lights (went with dark+florescent green)
frob replied to frob's topic in Kite Making
Elastics and endcaps on, frame installed. With everything all together I'm at 367 grams. That's about 35 grams heavier than what I was using, but should still fly. The Rev with all the lights attached drove like a tank. Sadly it was not durable like a tank. This version feels sturdy, and also easily repaired if something should go wrong. I'm excited to get a bridle on and see how this thing moves. -
Taking the plunge, blue & green for my lights (went with dark+florescent green)
frob replied to frob's topic in Kite Making
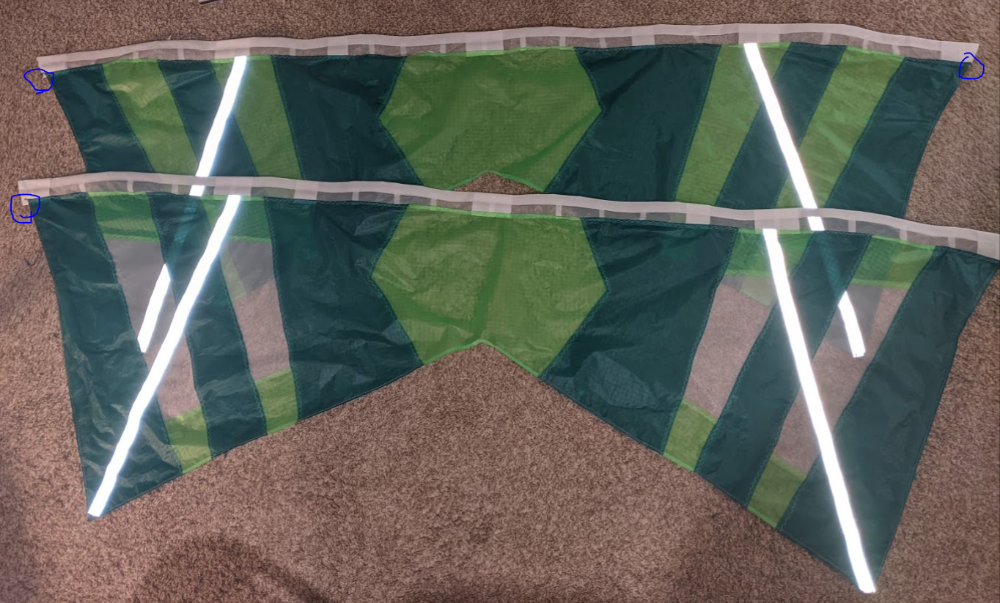
Two more checkmarks for the full sail. ✔ Sew on LED light strips on both kites ✔ Final soldering for joints on LED light strips on both kites (48 solder joints. Eeek.) And while I haven't sewn on the final cover/trim, the LEDs are taped into place: Remaining for this kite: ⬜ Sew on LED strip covers (bonus task) ⬜ Tie bridles ⬜ Attach bridles, elastics, and endcaps ⬜ Create kite bags for both kites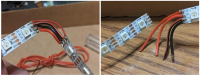
-
It is different. I've tried them at events, but never spent the money for owning my own. Not because I haven't put it in my virtual shopping cart enough times, but because when it comes to actually slapping down the money I've decided to prioritize other kites above it. They're fun, but not my type of fun. It still maneuvers, it is still controlled in basically the same way. It has less forward drive. The Fulcrum doesn't glide as well, nor side-slide as well. While it is precise, it also feels like it has less stable flight. In some regards it is similar to the difference in dual lines between a freestyle trick kite versus a solid straight team flier. That's good if you're looking to do acrobatic tricks, something the Hadzicki wing doesn't have many of. I've seen people do all kinds of acrobatics that look more like dual line freestyle tricks than quad line flying. As you are close enough to actually fly with other owners, I recommend you ask to try theirs. Then you can see the flavor and see if you enjoy it or not.
-
Taking the plunge, blue & green for my lights (went with dark+florescent green)
frob replied to frob's topic in Kite Making
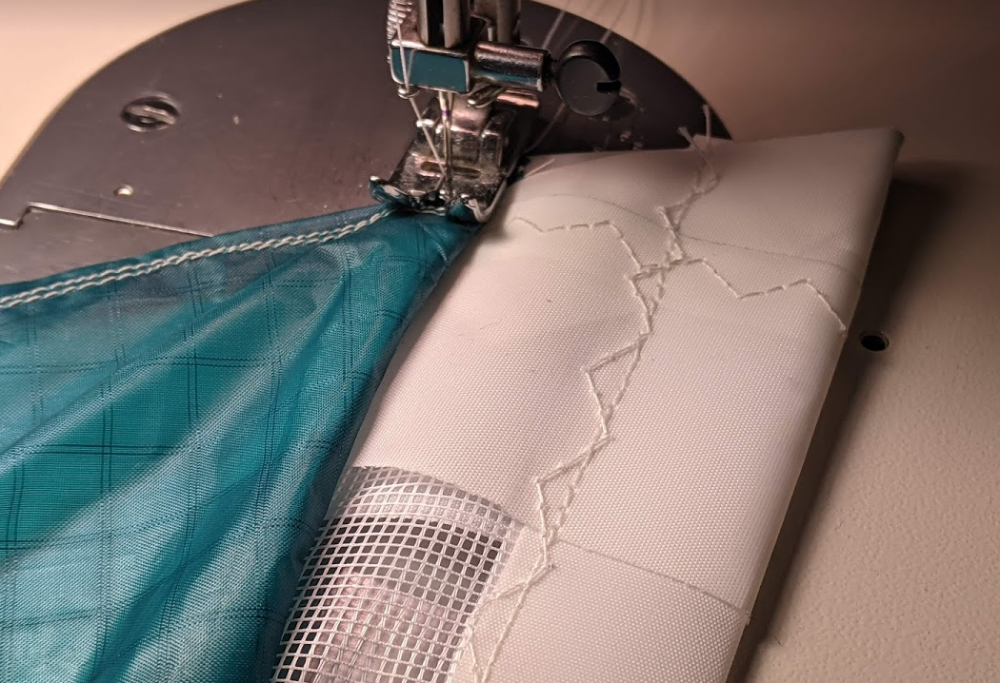
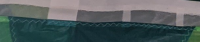
Done with the other leading edge. It only took about 2 hours this time. This bit right here has been the hardest to sew in each one, followed by the end tip: It's the reflective tape on the front, Dacron stretch strip in the back, Icarex from the body, plus 2x Dacron (4x in the overlap) for the leading edge, and the mesh which isn't difficult ... all of that tripled because it is a folded hem. 24 layer thickness. Every step I needed to manually push the needle down while turning the machine's wheel, and manually help pull it back out. Some required driving a hole through it gradually to get through all the layers. Same with the two pieces at the end with all the folded over bits to make a non-fray corner, lots and lots of layers mean I'm basically manually stitching each one of the triple zigzag. So the sails are basically complete. There is certainly room for improvement, those tiny white corners on the leading edge bug me. I think next time I'll need to make the LE about an inch narrower, which should help it on either side. Stitching isn't perfect, but should be adequate. I'm likely going to be the only person most concerned about how some of the zigzag stitches are narrow, some wide, some rather strange looking. But it should hold: Even so, that's some more checkmarks down the long list: ✔ Figure out paper prototype dimensions ✔ Cut and tape paper prototype ✔ Verify paper prototype, refine template ✔ Cut pieces for full sail ✔ Sew full sail body ✔ Cut pieces for vented sail ✔ Sew vented sail body ✔ Prepare reinforcements ✔ Sew reinforcements on both sails ✔ Sew hems on both sails ✔ Apply fray check and check all the details ✔ Cut leading edge pieces ✔ Sew both leading edges ✔ Attach both leading edges ⬜ Sew on LED light strips on both kites ⬜ Final soldering for joints on LED light strips on both kites (48 solder joints. Eeek.) ⬜ Tie bridles ⬜ Attach bridles, elastics, and endcaps ⬜ Create kite bags for both kites
-
What do you want to know about it? Are you asking about that specific kite? Or is this a "want to buy" type post where you're looking for something visually similar? If so, what's the price range? Their ITW branded kites are typically pretty good. Not Peter Lynn good, but far better than Walmart specials. ITW fills a good slot in the beginner/intermediate market.
-
No effects due to heat (or winter cold), but having it with you comes with a dramatically increased chance of flying. Take the opportunity when you can, even if that means stopping at a park on your way home, or pulling off the side of the road on a long country drive.
-
Taking the plunge, blue & green for my lights (went with dark+florescent green)
frob replied to frob's topic in Kite Making
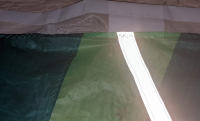
Finally found the time to attach the first of the leading edges. 2.5 hours to attach the first one. The endpoints and the center were by far the hardest parts. If you look closely, the Dacron has: outside layer, folded over layer for a non-fray edge, overlapped layer to make it 3.5 inches, doubled for front and back (x2 layers), plus the Icarex which is tripled at the hem, all with a folded hem (x3 layers). That's 12-16 layers of Dacron, 3-9 layers of Icarex, and 3 layers of mesh. Each of those stitches took several impacts to push through. It might have been easier to hand-stich those bits with a sewing awl. The rest of it sewed on relatively easily. Plenty of uneven stitching as the tensions constantly changed. Each time I hit a Dacron strip the zigzag changes length, switching from a 3-layer of Icarex to 3-layer of both Dacron and Icarex really slowed things down. But at least it is all on. The reflective strip is bright. It should mix well with the LEDs when I get to that step. Hopefully the second leading edge for the vented kite will go faster, maybe 2 hours. That's for another night.
-
That is my favorite feeling. Thank you for sharing.
-
Taking the plunge, blue & green for my lights (went with dark+florescent green)
frob replied to frob's topic in Kite Making
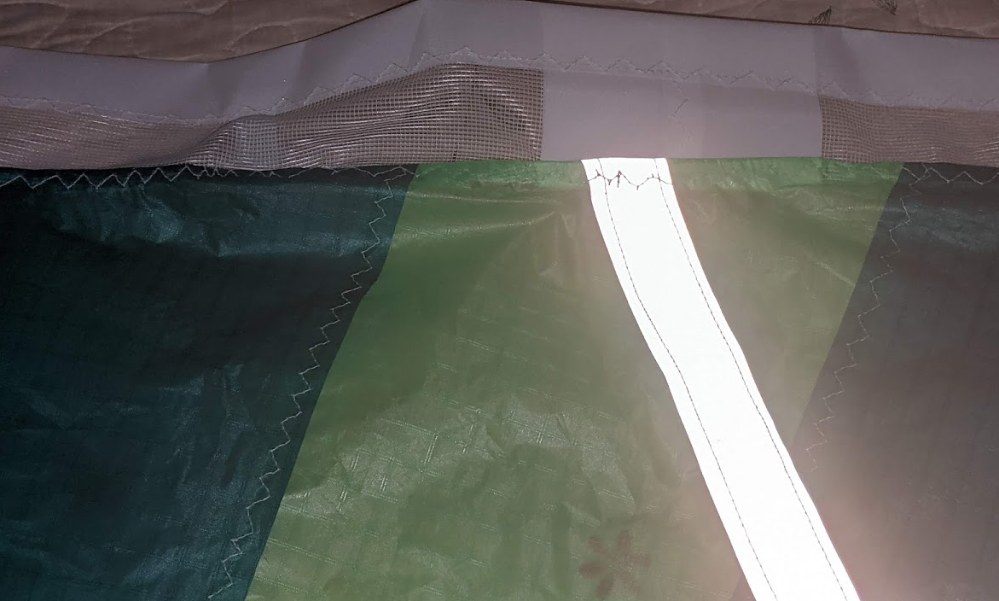
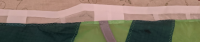
Thanks for the info. I've delayed leading edge construction until ... well, until today. I've had tons of interruptions and real life events that pulled me away from this project, but I managed to get a good chunk of sewing in. https://photos.app.goo.gl/2jYS3MUgZXcb9mbq8 Stretch strips sewn on the back, reflective strips sewn at the same point in front (which should be visible with some lights at night), then as part of hemming sewed in the tip reinforcements and middle V reinforcements. Finally, double-stitched the rolled hems along both kites. Along the way applied fray check to the reinforcements, stitching endpoints, and stress points. And during some breaks, I applied tape and cut out a bunch of leading edge pieces, ready to assemble them. Whew. No knot covers, in part because it's yet another piece, and in part because with lights there is no chance I'll be doing tricks that will need them. Clicking on those images and zooming in shows a bunch of details. Five more checkmarks, but still have so much to do... ✔ Figure out paper prototype dimensions ✔ Cut and tape paper prototype ✔ Verify paper prototype, refine template ✔ Cut pieces for full sail ✔ Sew full sail body ✔ Cut pieces for vented sail ✔ Sew vented sail body ✔ Prepare reinforcements ✔ Sew reinforcements on both sails ✔ Sew hems on both sails ✔ Apply fray check and check all the details ✔ Cut leading edge pieces ⬜ Sew both leading edges ⬜ Attach both leading edges ⬜ Sew on LED light strips on both kites ⬜ Final soldering for joints on LED light strips on both kites (48 solder points total, but I am considering some solderless clips) ⬜ Bridles ⬜ Attach bridles, elastics, and endcaps ⬜ Create kite bags for both kites -
While it is a common question, it is quite open ended. What is the wind normally like for your area? Where do you normally fly? How often do you plan on flying? What is your budget? Do you have others you can fly with? What you describe might not be you or your kite, but might be related to where or when you are flying. Turbulent air can cause loss of control and instability even on an amazing kite. If you're looking for a quality beginner kite, there are many good ones out there. The Flying Wings Beetle has a reputation for being quite durable. The Prism Quantum is also beginner friendly, although at a higher price point because Prism is a well-known brand. The Prism Jazz is a step down from that, less durable and less performant but somewhat cheaper and widely available, still with a brand-name markup. There are similar beginner dual line kites from HQ, Into The Wind, Ocean Shores, Skydog, and quite a few other reputable companies. If there is a local kite shop near you, or a local kite club near you, find some people who know your local conditions and can let you try a variety of kites. You might prefer bigger or smaller, faster or slower, noisy or quiet, or assorted other varieties. The best way to know for sure what you like or dislike is to try a bunch of kites.
-
Such a great prize. I fly my Extra Vent relatively little, about once a month, but it is so nice to have when needed. (Same with the hardcore. I don't pull it out often, about every 2-3 months, but when I do I am so happy to have the equipment for such strong winds.) While I have duplicates in lower wind ranges so I can fly with someone else, it would be great to win to be able to fly with a friend in strong winds, too. Whoever wins, thank you so much for the drawings and prizes.
-
Try Flying Wings Kites if no stores closer to you can get them. Calling is often better than web sites. Toll free 1.800.728.0704, they are in the San Jose area.
-
Yeah, I remember that. The film broke Chinese box-office records, and government entertainment groups started research and offered funding to animations studios because they wanted to know how an American animated comedy could push popular culture farther than any of their home-grown movies could. A few people sued, but I think when it comes to movies, a few people always sue. IIRC, people sued Warner Brothers over the Harry Potter broomsticks, saying the pointed the wrong way. I recall they offered to remake the broomstick scenes if the group could demonstrate actually flying on broomsticks, which got a chuckle but dismissed from the courts.
-
Taking the plunge, blue & green for my lights (went with dark+florescent green)
frob replied to frob's topic in Kite Making
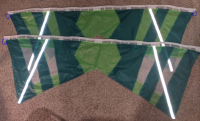
Okay, both the "standard" and vented sail bodies are done. Am I the only one who thinks of "standard" as "full sail"? The vented one has fewer puckers, fewer variations of wide/narrow zigzags, and the pieces with venting are slightly short but still within my tolerance. https://photos.app.goo.gl/rYSTcd5kdQXmoYcu8 When I took the pic I was surprised at just how much the perspective changes their apparent size. Dragging them atop each other, they're the same within a few millimeters, except for the vented panels where I must have overlapped by too far or maybe had some other issue. When I built the pattern I planned on a half-inch hem plus an extra half inch on the LE side to give a bit of "wiggle room", and maybe to even put in a slight LE curve if it works out. Next up is the leading edges. I've got to re-read everything on the forums here, and on other sites, and re-re-re-watch Riff's video for leading edge construction, and maybe scour the web for any additional information. Sewing all the LE tabs and getting the various positions correct looks tricky. I'm also going to need to read up on how to make a non-fraying leading edge boundary, I think I saw those details in the video but that's something that bugged me after receiving my first Rev. Even though it doesn't materially affect flight, it's something that feels better, I think. Then when the leading edges are constructed I'll know exactly where to attach the stretch strips, sew in the reinforcements, attach the leading edge, then hem up the remaining bits, then pull out an old ruined soldering iron tip (icky copper that won't silver up any more) and melt the holes for the bridle. Does this mean it's about 50% complete? -
Occasionally someone comes into a collection and wants to sell the unknown kites here, such as after a collector dies. Usually the first thing is to identify what all of them are and figure out their value. It requires clear pictures of each kite, with closeups of wear and tear and damage, along with knowing all the pieces are present, if any spare parts and the bags are included, etc. If you know them more exactly, you can come up with a list like this person did here and here, listing 39 "items" for 51 total kites being sold, then take pictures of details as needed. If you don't know those details coming up with an estimated value will be difficult.
-
Taking the plunge, blue & green for my lights (went with dark+florescent green)
frob replied to frob's topic in Kite Making
And of course, can't forget the vented version because nobody knows what the wind will be. https://photos.app.goo.gl/gBcbZ3hiDEMQYPTN9 Vented version of the body is now cut and taped together, sewing will take place later in the week. And after sewing this second sail body will be the leading edge creation, I think. Originally I thought this would be better than buying two premium kites used and modifying them, saving myself around $500 or so, plus whatever effort went into the modifications. Now that I'm doing all this work, I'm wondering if it is all worth the work. I'm learning a lot, but it's a lot of hours. -
Taking the plunge, blue & green for my lights (went with dark+florescent green)
frob replied to frob's topic in Kite Making
More progress, figuring out sewing tension and stitching the body. https://photos.app.goo.gl/4jbcQgKVa4ugHuqe9 There are some puckers and places where the zigzag ended up longer or shorter based on the feed, but more progress. I figure with the first few flights those will more or less settle in as fabric stretches and takes form, but I worry it might make little cups or bumps for a while. I guess time will tell. I will need to study my other kites for insight, but what are preferences for ordering for stretch strips, wingtip reinforcements, leading edge attachment, and hemming? I imagine doing them in that order, but is another order better? -
The same can be said and asked for many products. How can you tell how a different shirt design will feel? How can you tell how a different vehicle will feel? How can you tell how a different restaurant will taste? How can you tell what a different fabric feels like? How can you tell how enjoyable a different music or movie will feel? Consider that ten people can use the same ingredients to make the same food, like all ten making burgers or all ten making tacos, and each person has results liked or disliked by others. None are wrong, or necessarily better or worse, but even with the same ingredients results vary tremendously. Two people may have similar tastes. Two other people may have different tastes, one a strong liking for an attribute that others don't care about. Others can describe their experience, but it is their own experience and not yours. Ultimately it is individual preference and personal tastes. Ultimately the only way to be certain is try it yourself and form your own opinion. They have differences. The kites designed by expert pilots were trying to correct what they saw as flaws. Some people may have seen those as strengths. The kites from amateurs are often inconsistent, and differences are sometimes just differences rather than attempts to change specific elements. Some factors like design choices and craftsmanship and materials used can make a big difference. Some factors are subtle or barely noticed. Some factors ultimately make no difference at all. Try to attend shows, events, and meet with other people. Fly other people's kites and ask them questions. Some designs are far more popular for common reasons. There are reasons people like driving fancy sports cars or large SUVs versus a compact commuter car even though all are able to transport from site to site.
-
Taking the plunge, blue & green for my lights (went with dark+florescent green)
frob replied to frob's topic in Kite Making
Pieces of the sail all cut, and taped together. It looks like a quad... https://photos.app.goo.gl/k73fSZdMBvs1VG457