frob
-
Posts
420 -
Joined
-
Last visited
-
Days Won
27
Content Type
Profiles
Forums
Gallery
Downloads
KL Shop
Blogs
Articles
Everything posted by frob
-
I know a handful of kite flyers in Austin, but none in the Houston area. I'm sure they exist, since there are two inactive people on the Member Map, but they aren't plentiful. When I traveled out to kite shows in their area most were SLK fliers. The only dual/quad pilots I met had also traveled to the site.
-
I'm in Austin. I've made the trek out to Galveston's beaches (just beyond Houston) a few times, as well as out to the fledgling Texas City kite festival. The drive to Houston is long, but if it were a Saturday for a day of group flying with others, it would be worthwhile for me.
-
Lightning is the exception to that. If there is lightning in the forecast, no flying. It can be fatal. But snow or rain, with proper gear those can be fun.
-
That's exciting. Given how you've listed South Padre Island as your location, I'm sure you'll have plenty of great flying days on the beaches.
-
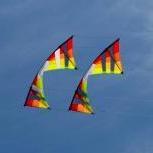
I'm partial to #2. I already had a bunch of of kites in similar sunburst colors, so the "hot fade" Djinn was my automatic choice when picking those up. That yellow to red burst looks good, although I'd probably swap out the green in the middle with white instead. My second choice would be #4, it looks like a plaid or woven color pattern, even though it might not stand out against the sky very well they're soothing to me. #1 or #5 only if you're looking for something to fly in July.
-
If you can find someone in Houston and a place to fly, I am considering making the 2.5-hour drive to join up for a proper group fly.
-
Looks snazzy. The black plus grid looks professional and business-like, if you go for that sort of thing. So four wide large kite pockets, one narrower, and three small. How will you handle having *only* 5-8 kites with you? 😉
-
@gmrviper Two were just posted to Facebook. I'm sending a direct message with the link.
-
No snow in central Texas, but about a foot in the city I grew up. I don't miss the snow. However, the arctic blast hitting the country has dropped our temperature down to about 45' F with wind chill hitting the upper 30's and some light rain, so layers with a light jacket is certainly in order. I've had two flying days this week, and look forward to another tomorrow. As nice as winter is for flying here right now, summer is the worst. Typically it means no flying outdoors for about two months of summer due to heat advisories. In summer months I see all the videos and think I should abandon my job for a road trip.
-
That's a LONG drive to try out the kites. Even so ... Potentially well worth it, although closer events will be easier on the pocket book. Even if you've got your inexpensive beginner kite, a day working with some experienced or professional folks will simplify the discovery. You can still learn on your own. People do it. I first learned to fly dual line as a kid in a field by myself in the pre-Internet era, with some old kite magazine descriptions and the dream that maybe someday I would see a kite festival. Decades later I learned to fly quad line watching hours and hours of videos and asking questions. It is possible. Even though you can probably do it alone, it is so much easier having someone who can observe and give corrections instantly, or who can demonstrate as you repeat and copy the motions.
-
The site has a voluntary member map (which looks broken at the moment) were people can mark where they live. The map (when it works) is a good place to look for others in your area. The AKA Calendar is a good resource at finding events. I see this event in Spiro OK next month listing "professional kite flyers" and some promising photos from previous years, and another festival in Tulsa in May. An email to the organizers to find out who the professionals are, and another email to those professionals could probably get you some contacts in the region.
-
This seems the more important part. Make contact with someone in your area and try their stuff. Where are you located? Many people have a wide range of kites and are willing to let you try their kites. Flying with other people's kites and equipment gets you some close attention as you learn (since they don't want you to crash their kites), and lets you quickly experience a range of gear. Also, the price is $0 to try many different varieties. Other people's kites are the best deal out there when first learning. This is universally true. Quality kites are expensive, and for the most part you get what you pay for. The Freilein Vertigo models, and the Rev EXP models, they're both made from heavier/cheaper fabrics than their more expensive brethren. The Revolution EXP is the low-end model and about $200 for the ready to fly kit that includes the kite sail and frame, plus shorter-than-normal lines and cheap handles. The Vertigo is a similar price for similar quality equipment. You can find those entry level kits on ebay and similar for about $200, very near the original price because they often are nearly unused. Unfortunately, if you get into the hobby seriously, it will only take a small amount of experience to outgrow that cheaper equipment. If you're looking to go even cheaper, there are knock-off kites for closer to $100, but they have significantly heavier fabric, usually have fiberglass rods (instead of carbon fiber) and have very cheap lines. These will be a quad line kite so you can get exposed to the sport, but they are not kites I would want anyone to learn on, nor used to judge the sport. I would discourage those kites. Getting higher grade equipment a "Revolution Classic" is probably the lowest of the good quality quad line kites, and with 120' lines and no-snag handles will cost about $350. The Freinlein Exodus with lines and handles will be about the same price. People who get in to the hobby tend to get comfortable on their first kite, then pick up 2-3 more for a wider range of wind conditions, then branch out over time with additional equipment, different line sets, different handles, etc. The first purchase needs the kite and frame ($200+), the lines (about $75), and handles ($20-$80). Only you can decide how much money to spend on the hobby.
-
Fishing line spectra is different than kite line spectra. Both use the same chemical compounds for the core fibers, but they are spun and woven differently. If it is coated line, those produce dramatically different line. Fishing line spectra is designed for dragging a fish through water, it is somewhat stretchy and designed to absorb shock when a fish bites. It has less stretch than a non-woven line; nylon can easily reach 50% stretch, but fishing line spectra stretches by about 15% when pulled to absorb the shock of a fish strike. They usually have a coating to help slide over grass, stones, and various crud in the water, but that coating is sticky when it rubs over itself, increasing friction. Often the line is tinted to blend in with water or grass and be less visible to fish, which adds weight. Kite line spectra is designed to be non-stretch with a high tensile strength, and a different type of weave that is designed to help the line wrap and slip around itself. Different brands use different weaves, some take up much more spectra fibers than others, increasing their cost. The stretch rate is about 4%-8% for kite line weaves versus about 15% for the fishing weaves. Some spectra kite lines (like Skybond) also have a coating, but the coating is designed to reduce friction over itself, instead of protection from underwater grass and pebbles. If you have both spectra kite line and spectra fishing line, do an experiment. Pull out a kite-line length of line, that's about 100 feet, secure one end of both lines, and feel the difference of pulling on them. Put some serious strain on them, maybe 50 pounds or so, and feel how they respond. Feel the difference of twisting a few lengths of it over itself, you'll feel the fishing line start to snag on itself and bind up quickly. Since common kite line lengths can be 120 feet or longer, even a tiny variation of stretchiness makes an enormous difference. I've got a set of 120' lines where I suspect one line of the set came from a different batch because it has slightly different stretchiness. At the full length of the line it works out to a few inches when the line is under tension, meaning perhaps a 0.5% difference in stretch. That's not enough variation to matter for a fisherman, but for a kite it means the lines must be held at a different positions based on the pull, and one line is less responsive than the others.
-
If you are flying alone you can use whatever lengths you want. If you want to fly with others, the standard quad-line length is 120-foot line, the standard dual line length is 80-foot(ish) line. Both of these are common in stores, and if you buy a ready to fly bundle it will probably have those lengths. (Dual lines groups often fly anywhere from 75-85 foot, they're close enough to the same for group flying, and unless you are on the same exact kites you're likely to have more significant differences than the line length.) After that, mostly it depends on what, how, and where you are flying. Longer lines add weight and drag, so trick fliers often use shorter lines. Very short lines from 30-foot or shorter tend to be unworkable at higher wind speeds, so they often use a lower-strength light line, such as 50# strength or less. Longer lines tend to also use higher strength line, 175#, 200#, and if you're flying power kites 300#, 500# or even 800# line is available. A Wind Of Change has a good tutorial on lines. Most avid flyers have a variety of line sets in their bag, and choose based on the conditions they are in. Because they have so many they tend to make their own lines. For your first sets it is easier (but somewhat more costly) to buy pre-stretched sets from a reputable kite shop.
-
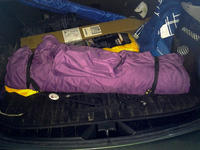
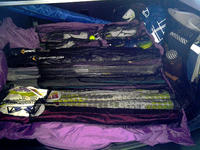
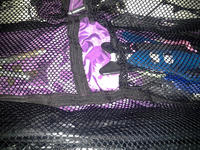
Inspired by the other discussion but not wanting to commandeer that thread... some pictures of my own homemade roll up bag made about two years ago. Here it is all rolled up in the back of the vehicle. It's nearly the width of the vehicle, made from ripstop nylon. There are adjustable backpack clips on webbing holding it closed, and a 2" webbing shoulder strap taken from an old gym bag. The trunk isn't messy, those are kites: a blue kite bag that won't fit lying down, a shipping package containing some indoor kites. Also visible in the vehicle's cargo pocket are the cayenne pepper bottle I occasionally sprinkle in as dog repellent on the right side, along with hats, sunscreen, and other kite-related stuff. The big outside pocket on the bag has a purse-style double zipper and holds my wind meter, papers for logging flight time, repair tape, and misc other stuff. (Note to thieves: please don't rob my vehicle.) Unwrapping the burrito. Five large pockets each able to hold about 3 kites, and four 4 smaller half-length pockets hold other parts. Currently contains 9 kites (soon to be 10 when I win the drawing) a mix of dual-line and quad-line, a pile of spars, about 10 line sets, handles, stakes, and a few other odds and ends. I used elastic cargo net mesh for the inner pockets, sewn down with webbing. To keep all the pockets closed there is a strip of bungee elastic interwoven with the netting, I can tighten or loosen the openings as needed with knots in the bungee. Detail of the half-length pockets, sewing, and bungee elastic. The webbing has one line of black stitching down the middle, and two lines that match the bag color running on the sides. You can see the knots in the bungee elastic that keep the pockets closed. There are a few things I would improve if I created another. I'd move the outside straps in about two inches, the top one I left out a little bit far because I expected to add some wider kites, but ultimately that never happened. I'd make the outside pocket a little less deep, it was about 1.5" but because it isn't pushed tight against anything it opens up like a cavern, which works well for sunscreen and other items but feels too big to me. Overall it's a great bag, worth the time and money invested in the project. I didn't realize how big the project was until I finished it. It took several weekends, and I understand how the well-made kite bags can justify the $100+ price tags. Anyone else have custom kite bags to share?
- 1 reply
-
- 2
-

-
I made something similar, a roll up bag with cargo-mesh pockets. In theory it holds up to 15 1.5-size kites plus gear, but I'm still collecting enough kites to prove that number. It's got 5 big kite pockets each able to hold about 3 kites, plus two more that I subdivided into four pockets for lines, stakes, and other stuff. To help with dogs, I keep it and the kites dusted with cayenne pepper with a big bottle purchased at Costco. It is enough that dogs quickly lose interest since it is a mild irritant, not put on so thick it could injure them. I've had too many dogs come sniffing my stuff and think the kites are toys to paw through or catch with their teeth. After the pepper dogs are curious but immediately move on.
-
The only warning I know about old kite line is that old kite lines may not be compatible with the new stuff. Dyneema/Spectra are both HMPE line sold under many names like LaserPro Gold line, Shanti Speed line, SkyBond, and more. That's currently the best stuff for sport kites, and probably what you've got. Older sport kites often used Kevlar, and a few places still sell it for high lift kites and special applications. Kevlar rubbing against Kevlar works okay, but it rips up HMPE line when they rub together so don't mix them. Cotton line is cheap and sometimes used with inexpensive kites, it also doesn't play well with others. Same with other types. No matter the type, Kevlar, Dacron, polyester, nylon, cotton, and waxed lines all have their uses but don't mix them when flying with other people.
-
While normally I'd be against invasive species, I see very few things wrong with that plan other than the RNG generating the wrong number.
-
@RNG: 01000100 01101111 00100000 01111001 01101111 01110101 00100000 01110100 01100001 01101011 01100101 00100000 01100010 01101001 01110100 01100011 01101111 01101001 01101110 00111111 Also, 1464 is the number you need. I'm equipping a bag for myself and my kids, and we want to fly together. Think of the children.
-
I'll win because the system knows I have a gap in the bag. I've got multiples of standards and mid-vents when my family flies with me, but only one full vent 1.5-size kite. Any of you past winners know how to slip the RNG some cash as an incentive?
-
I can get the light strip down to about 100 grams by removing the waterproofing, and I can get down to 74 grams for the microcontroller, gyroscope, and bluetooth by using soldering things together rather than plugging to a breadboard. To attach it I was using 2" clear packing tape around the border, which probably adds single-digit grams. With the battery that puts me about 260 g, but I need another weekend of progress to build it out. Still to heavy for a standard rev?
-
Didn't get video, but the first flight attempt wasn't great. Let's just say I learned things. I talked with Mario a bit at SPI festival today, and he had some ideas. He said his lighting rig is around 30 grams, but it is much simpler. With the microcontroller and breadboard and backer and large battery and the long light strip, mine is over 300 grams and feels like a tank. I can probably drop 50-75 grams easily, but the battery will be my biggest issue. I need at least 700 milliamps on 5 volts so a USB battery works perfectly, but the things are heavy. I tried it again here at SPI, but light winds made it impossible to launch.
-
I've seen that type. They're neat. The whole collection of parts for me was $68, plus time for developing the code behind it. The lights were by far the most expensive part, at $36. I'm struggling with the best way to attach everything. Snapping onto spars is good. For this, I think I'm going to use some strong tape around the edge. It may leave a bit of sticky residue, but should be fine.
-
I've done a little with lights, and back then I thought fully programmable lights would be MUCh better. Even static lights look amazing, and color-cycling lights look cool, so responsive lights would be that much more fun. I've got some acceleration data, but the math for acceleration at an angle is tricky. There is a chance I'll make the 6-hour drive to SPI and maybe show them off. Unfortunately I'm guessing my work schedule won't turn out well, but there is a chance...
-
I got a gift card for Christmas for some geek stuff, and thought I could turn it into a more advanced rev lighting. I figured this could be a fun project with my skill set. I've a strip of fully programmable lights (5 meters, 300 lights), an acceleration + gyro chip, a bluetooth chip so I can control it by my tablet, and a 9v battery attachment, all plugged into an Arduino board. I've spent a few hours the past two weekends getting the parts figured out and a mockup made, and I've got some simple patterns identified and programmed. As typical, videos of light shows aren't nearly as pretty as the actual light shows. I also have a "sudden stop" that flashes red for a quarter second, not shown in the video. Those are the patterns on the slowest speed, moving one pixel at a time. They can be made MUCH faster. I'm planning on attaching the patterns to acceleration forward/back and left/right to pull the lights to the side as long as the speed is increasing, then return to neutral. That should give long arc-wise turns throwing the lights to one edge, and launch/landings to have the lights bounce around. I want the circles attached to bicycle spins. And sudden stops on ground or midair will have the red flash. Any other ideas to program in to the thing before I start attaching it to a real kite?