DonFibonacci
-
Posts
120 -
Joined
-
Last visited
-
Days Won
2
Content Type
Profiles
Forums
Gallery
Downloads
KL Shop
Blogs
Articles
Everything posted by DonFibonacci
-
3D Printing For Kite Making and Customization
DonFibonacci replied to SegelFlieger's topic in Adjustments and Modifications
I'd be interested for sure. I have a printer, but it seems like my prints are too "rough" (i.e. layer lines) and would need to be sanded so as not to abrade lines/sails. I'd like to see whether that's due to the quality of my printer or not (it was pretty cheap). Also, it would be good to know how well the more friendly plastics like PLA and ABS hold up. -
Absolutely!
-
Welcome! Love the screen name 😉
- 1 reply
-
- 1
-

-
I will try to banter better 🙂
-
I usually read them, via the link here.
-
The lines are (supposed to be) equal length, so it doesn't matter which go on top and which on bottom as far as flying goes. But most people choose a color for the bottoms and one for the tops and stick to that. My mnemonic is that the ground is "darker" than the sky, so I put the darker color on the bottom, closest to the ground.
-
Today, I "225-clam-rolled" it (gravity got me that last 45!) and then wound normally from the kite to the unanchored handles. That worked pretty well, but it will take some work before I'm confident in it.
-
With the kite in what position? If still upright, that seems tricky and prone to inadvertent launching. Maybe I'm misunderstanding. I've done exactly this on grass, after landing inverted and letting the kite fall backwards. But on concrete I want to avoid the inverted landing.
-
Exactly. I should have said this before, but I went through the exact same thing as you on that level 3 pattern. I decided I wasn't happy with the spin as he described it, so I went with more of a bicycle. Like @frob, I dropped the whole thing soon after that. That said, I saw your Level 3 video - you used some arm motion after all and did pretty well. 30 foot lines will make that one pretty tough at first.
-
Thanks! I've had success with no anchoring by just laying out the lines on the concrete and then throw launching. I'm careful with my line management, so the occasional twists and pass-throughs don't render the kite uncontrollable after the throw. Then I can land upright and deal with whatever line issues I might have. I still don't have a good answer, though, to packing up without anchoring the handles. Let's assume the wind is strong - is there a way to get the kite into a "safe" position (i.e. where it won't auto-launch) without an inverted landing? I imagine JB will say to "270-clam-roll" it 🙂 but is there anything simpler?
-
Yesterday I set the handles down and carefully unwound the lines from the winder onto the ground in sort of a figure "S". I connected the lines to the kite, being very sure I had tops/bottom/left/right correct. Then I just went for the throw launch, trusting that I'd have only minimal and controllable twists etc. That worked fine. Anyone have any tips for improvement?
-
Basically, the surface is rough enough that I don't want the kite dragging on anything but the end caps. I'll mostly be using Djinn, so dragging on the end caps is no problem.
-
I feel like this must have been discussed here before, but for the life of me I can't find it. If there's already a post somewhere, feel free to just point me to it. As it gets hotter at my favorite spot, the parking lot often has better wind than the field, and I'd like to start flying there instead. I'm interested in thoughts on how to set up, launch, and take down the kite in this situation. Let's assume I'm on (abrasive) concrete with 30 foot lines and no way to anchor the handles while I set up (unless I bring something). What's the safest procedure to set up, launch, and then pack up?
-
Two more Djinn and a Rev to add: Rev EXP Rev 1.5 B Full Rev 1.5 B STD Rev 1.5 Reflex Classic STD (Reflex removed) Caicos Quad (aka Peter Powell Omni) Djinn ST (Cool Fade) Djinn MV (Hot Fade) Djinn VT (Green Fade) Djinn XT (Green Fade) 5 self-made
-
New to Kites. Rev EXP pre-reflex
DonFibonacci replied to westers's topic in Adjustments and Modifications
The stock Rev leaders are fine for absolute beginners. My advice is keep it as is until (and only until) you are capable of simply keeping the kite in the air and "steering" it roughly where you want it to go. Then consider buying or making longer leaders (the ones on this site are fantastic). The longer adjustable leaders will enable you to develop the additional control you'll want once you've mastered just keeping the kite in the air. That's my opinion anyway. There's a great discussion on the forum here about leaders. I always point people with this question to . -
The way that spin is presented in Level 3 will always cause you to lose some altitude, especially out on the edge of the window as in that Level 3 pattern. It's presented as being just wrist motion, but there's got to be some arm motion (i.e. "bicycle") to really keep the spin in place. Just do that. The only way that spin works as presented is if you really snap it hard, let the kite float through the spin, and catch it when you're ready to stop. That will work, and you can get good at it, but it's based more on hope than control. I prefer to learn the control.
-
I like the vented stars idea.
-
Even your bungee rig is tuned for the conditions 🤣
-
I assume the lines attached to the blue leaders are on knots you would typically use? You personally I mean.
-
Will the leaders that come with the new Djinn handles be different from the current Pro Leaders?
-
Same here, I bring my tops in 2 or 3 knots on a Djinn.
-
Totally agree. But while you wait, it's way better than stock. The first time I met another flyer on the field (@flynhi) the very first thing he did was tie knots in my stock bottom leaders as close to the handle as possible. I had a couple months experience at that point, and it was an immediate improvement for me. When I first got the pro leaders, I adjusted up and down for several reasons: wind speed, vented vs. full sail kite, and what type of flying I was trying to work on. As I've gained experience, I've zeroed in a lot more on the knot I like and I change it only rarely, if I'm just not "feeling it" for some reason.
-
Reminds me of a recent throw I did where the kite went about halfway out and then turned around. It was having none of it.
-
KiteLive: Three new web discussions
DonFibonacci replied to John Barresi's topic in Scheduled Events
I'm in for Light Wind Theory. I'll be working, such as it is, during the others. I'll see what I can do about that. -
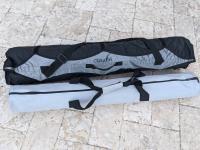
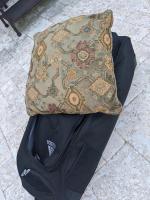
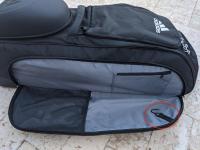
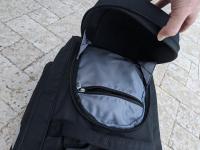
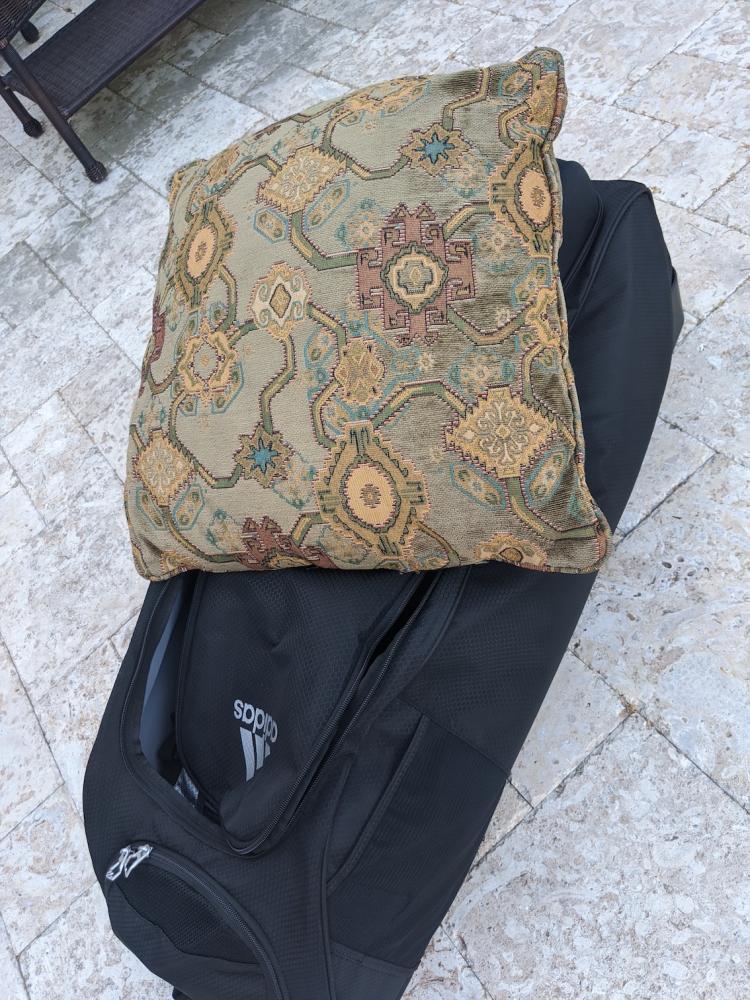
Tried it out. I wouldn't be able to fit two of my rollup bags (OSK, 40" long by about 9" diameter) simply because the bag tapers toward the top, but I can fit one OSK plus my old smaller "quad bag" (13 kites, 3 extra frames, 3 handles, 7-9 linesets, etc). I added two throw pillows to simulate clothes. Everything fits without feeling tight: . . A bit, but not too bad. The flap on the upper front isn't an external pocket, it's just the "lid". There's a long side pocket and a hardshell compartment (for a cap or glove I guess). The side compartment still has at least 2" depth left when the bag's full. The cap compartment shares some space with the interior, but the hard lid leaves a lot of space too: . The biggest drawback is that I can't open up the entire length of the bag, so I'll have to pack things in from the bottom up. But overall I'm pleased. EDIT: I forgot I was going to ask - anyone know what that little hook is for (the one that's circled in red in the side pocket pic)?